Round Things: Highlights & Shadows

Painting light and dark – contrast – values – is a hard one for me in watercolor.  I want to do it wet-in-wet, but maybe layering will work better.  I just don’t know.  So, when in doubt, look to YouTube!

Here is one video I found that I think does a very good job on both highlights and shadow, discussing reflected light and so on.

Another video which is also good, with a look at only the shadows on a spherical object, discusses the use of analogous colors to create the shadow on the surface opposite the light source.  This video can be seen below.

Because I was having problems with making grapes believable (see here), I decided to research highlights, shadows, and round things.  These two videos proved very helpful.  Rather than describing them in detail, they are definitely worthwhile watching.  The top one addresses shape and shadows on the object, as well as the cast shadow.  The lower one uses analogous colors to deepen the shadow on the sphere itself, which keeps the color of the sphere rich, rather than neutralized by a complementary color or an added grey, such as Payne’s or Davy’s.

That said, I spent a bit of time on these old spheres today and yesterday.  Here are some of the results of my practice.

The image above is based on the exercises in the first video.  The ones with the red and blue spheres are the most believable, I think.  The spheres and shadows are essentially wet-in-wet, with the final thin lines of darkest shadow done with a finely pointed brush on a dried image.

Here is another round of studies, trying slightly different techniques, such as wetting the paper first, then applying color.  The techniques followed were the same as in the first video, with greater success.

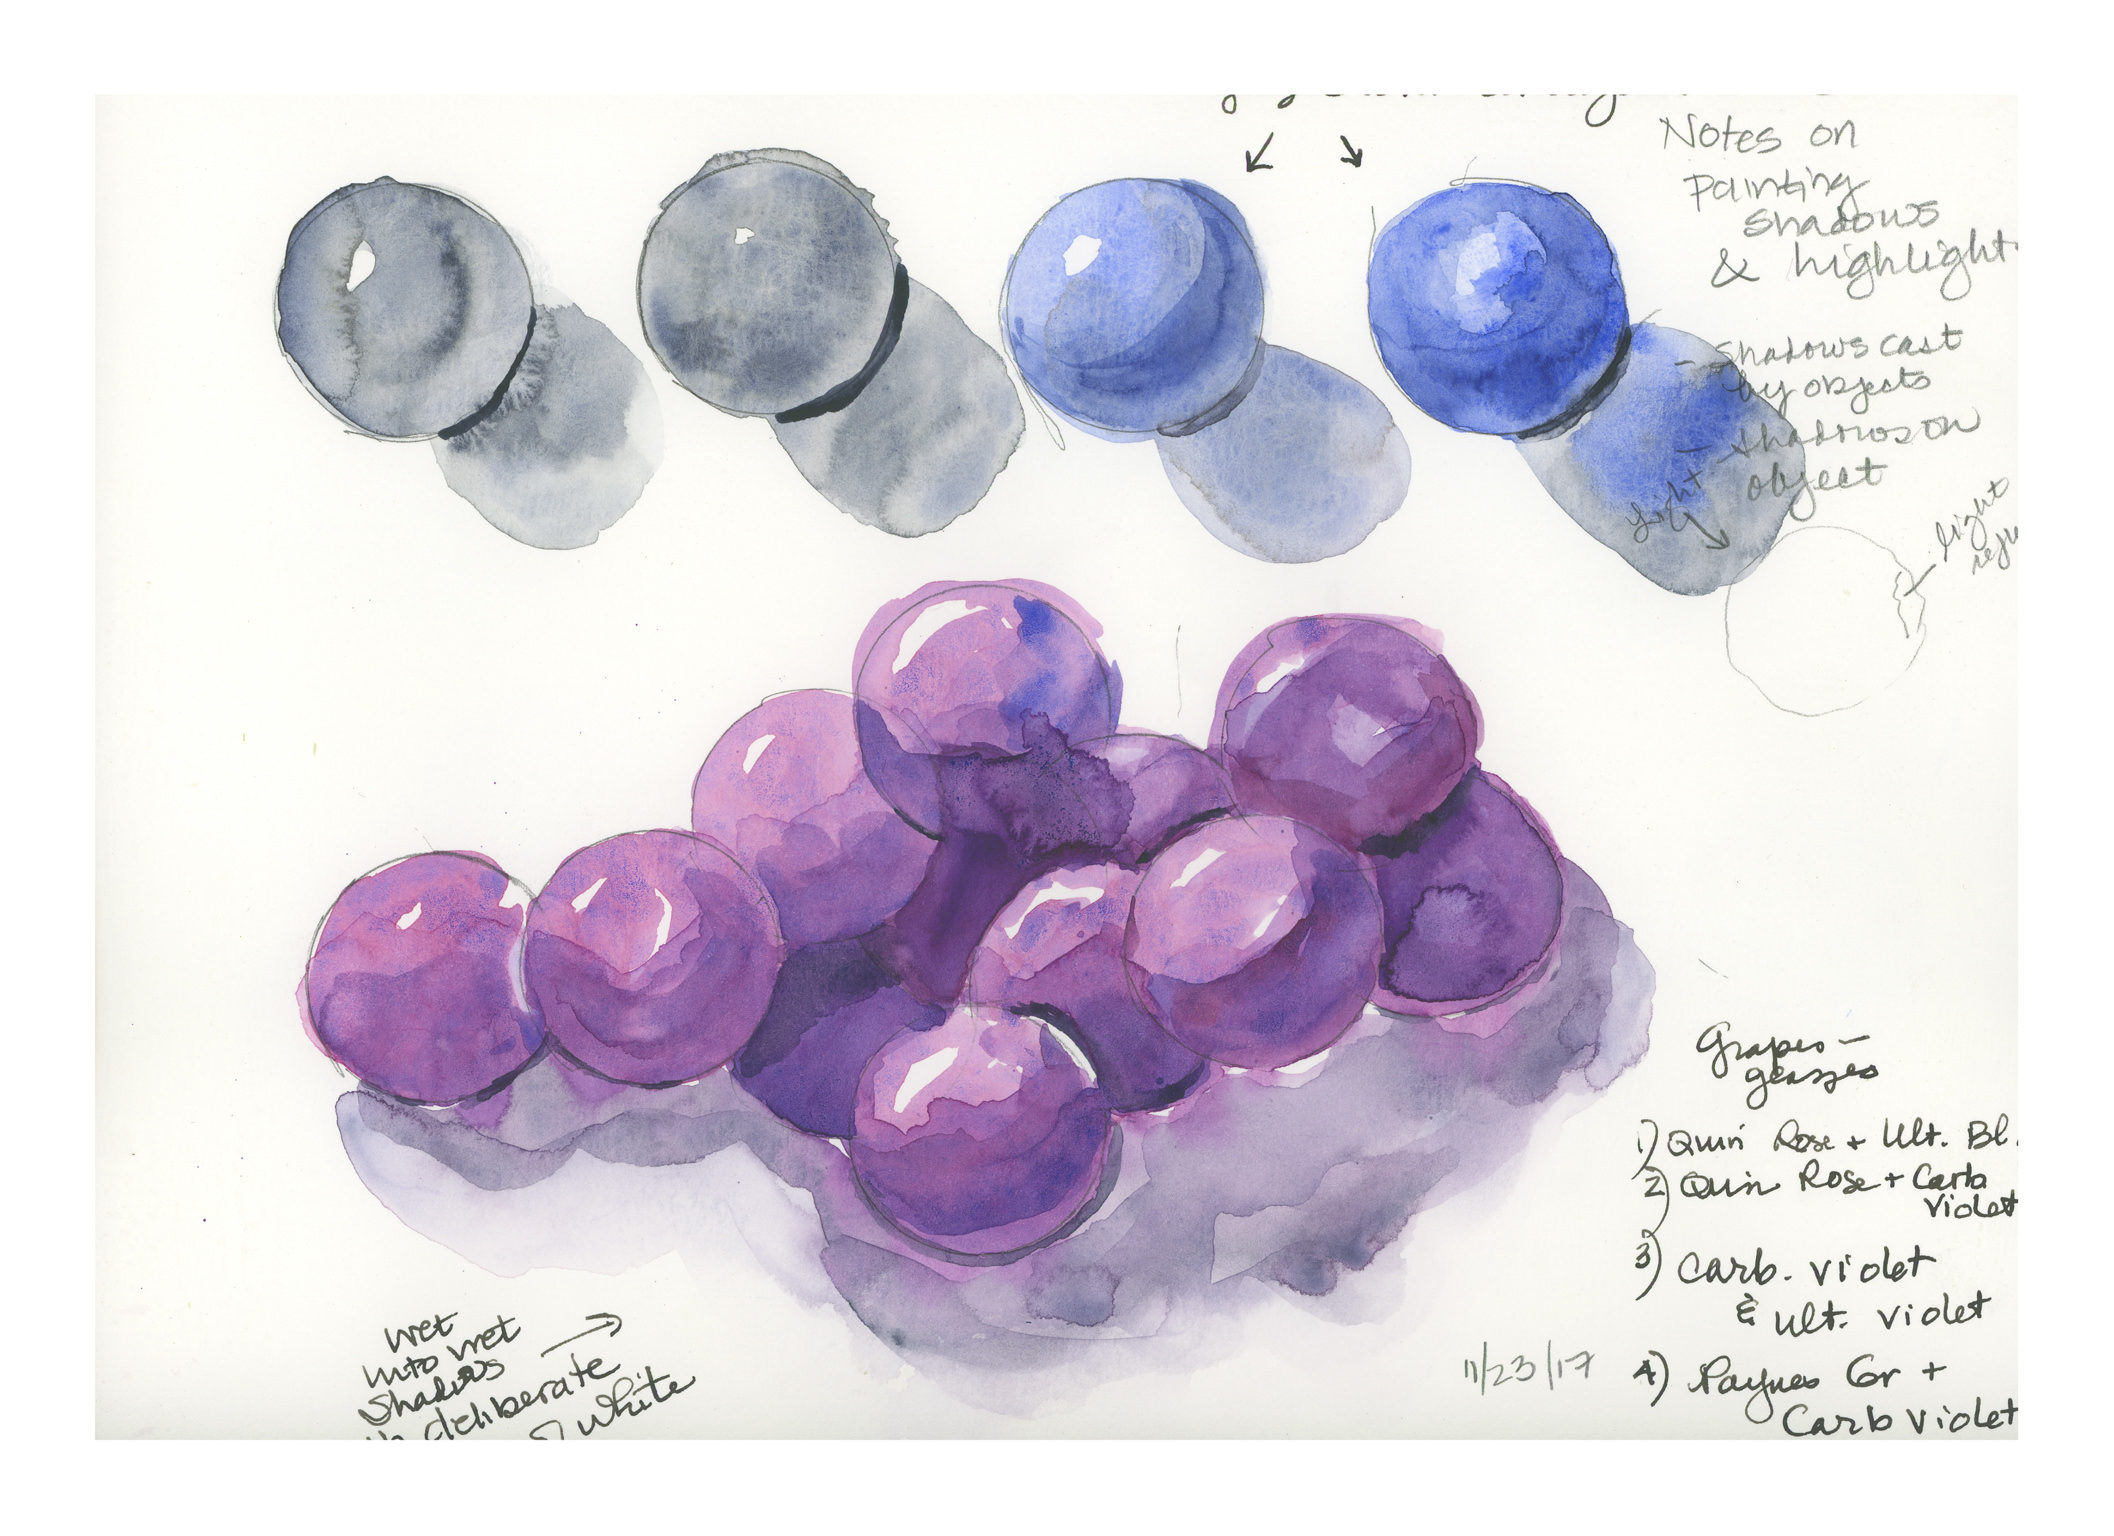
Here, the spheres were made as in the first video, but then I went in to darken the shadows using analogous colors.  The blue spheres were done in ultramarine blue, and the deeper shadows were a glaze of indanthrene blue.  Below the 4 spheres is a bunch of spheres, sort of like grapes.  The spheres were done with quinacridone rose and ultramarine blue, with analogous layers in the shadows to include carbazole violet and then Payne’s grey (see note on lower right of image).  The shadows were done wet, and linked to the grapes to bleed color in.  I deliberately left areas of white, even if they didn’t make sense, just to create areas of white between grape and grape, and grape and shadow.

Finally, the above image.  I have a bunch of oranges I want to paint, so I thought it was now time to incorporate all my lessons into one little orange.  The one on the left is the example, with, I think, the best orange colors.  These were hansa yellow, pyrrol orange, and organic vermillion – all three are colors new to my palette.  The ink is carbon ink from Sailor on the left, and just a fountain pen with regular black ink on the right, just if you are curious.

My orange is my favorite of all the exercises as it pleases me the most.  The grapes are OK, but they are glazed, which I am not too excited about.  It could be that I am just not adept at glazing.  Anyway, there we have it:  Thanksgiving morning exercises.


Book and Video Lessons for the Student: A Retrospective

I have picked up watercolor on a serious level, along with drawing and sketching.  I have neglected that side of myself for a long time, but have attempted to reconnect with that part of myself off and on.  Truthfully, it has been more off than on, but when I do delve into painting, it is such a pleasure.  Over the years, I have purchased video classes or viewed videos from a variety of people.  Today, I sat down and went through some of my notebooks and watercolor pads, and decided to scan what I have done to see if there is anything of value.

One person I have admired and enjoyed for a long time is Charles Reid.  I love his loose, wet, messiness in watercolor.  It works.  I have watched his videos and read his books, attempting to catch what he does – learning from the teacher by doing.  I have had some success, but I still tend to overwork and create muddy colors.

Another artist I have learned from is Birgit O’Connor.  Her approach is very different than Reid’s – not splashy, but controlled, thought out, and very disciplined.  The results are completely different, but valuable in that self-discipline and forethought are necessary to achieve results.  Reid’s discipline is from years of knowledge, such as how to paint negative spaces and create contrast.  O’Connor uses masking in varying forms, such as with contact paper and frisket to help preserve white space and create texture.

From both Reid and O’Connor, I have learned a lot . . . but without daily practice, it all is forgotten.  Besides needing to remember how to paint, how to manage color, I have also forgotten how to sketch.  Craftsy classes have proven to be helpful, with ones from Shari Blaukopf, Mark Taro Holmes, David Brody, and Kateri Ewing.  These classes range from urban sketching to an extensive, classical drawing class.  Each of these has proved, and is proving, to be very valuable.  Videos are some of the best learning tools when it comes to finding time to do and to learn.  Books with encyclopedic samples on how to do things are also great, such as Claudia Nice’s books on ink, pen, and watercolor, as seen below.

On YouTube, I have subscribed to multiple channels.  These range from using dip pens to lessons from extremely talented watercolorists and sketchers.  Of late, I have been working on negative painting – painting around things, rather than directly painting things.  This is in the hopes of learning to manage white space better.

It’s easy to use lines to compensate for a lack of contrast to define light areas in negative space.  The flowers are rather disastrous, but a lesson on YouTube (sorry, I don’t recall the video the trees are from, but it was fantastic!) was very helpful.  The key to that video was to paint from the foreground back, unlike in traditional watercolor, you paint from the sky down for the most part.

In addition to videos, books are an excellent resource.  I have a lot of books.  The ugly truth is that art books are damned attractive, but how many of them have I actually sat down with and gone through, step by step?  Not many.  In fact, none at all . . . until I came across a book by Jenna Rainey:  Everyday Watercolor:  Learn to Paint Watercolor in 30 Days.  Rainey’s painting style is not what I see myself doing, but what I do like is the “daily” approach and the short, structured lessons.  Thus far, I am up to Day 11, and have been really enjoying myself.  I’ve let go that nasty inner critic that expects perfection out of the gate, and have been loosening up, and doing some things that I like.

More than anything, I am happy to see I am not lacking ability – only self-discipline to work on painting and drawing when I have time.  Looking at what I have done is inspiring me to continue, despite frustrations and time.  Nothing like a retrospective to see what and where I have been, what I am doing now, and looking forward to what I might yet do.


Video: Painting Sunflowers in Sumi-e

There are a lot of “try before you buy” video editors out there.  Some allow you to publish a video without blurbs on the final product which tell the whole world who they are.  Others do it, which is annoying, but they can be removed with some editing.  Some programs are fairly intuitive – which is important if you don’t know a dang thing about video editing – and others come with decent tutorials and help sections.  Some are slow to load, hard to see, confusing, but full of cool devices.  Others are not, but have online resources which you can use to create your own what-is-needed, like a title or template.  To get what I want I have been swapping between a number of programs, but expect I will eventually settle on one.  I really appreciate 30-day windows to try out stuff!  I’ve been rather confused and frustrated, but am beginning  to understand a bit about them. One thing I do know is that over-processing the videos is occurring, and a lot of quality is lost. As long as you don’t watch them in full-screen mode, the quality is okay.

Sunflower Sunday

As always, my weekends are far too busy, but I do make time to have fun.  This weekend I was determined to try out a different set-up for the Zi8.  When I work inside in my studio (office, spare room, whatever!), the camera cannot be easily placed where I usually work.  My painting area is part of an L-shaped computer table, and the camera really is best placed to my left.  Unfortunately, the computer area is also to the left.  I have tried all sorts of gyrations, but nothing was especially great.  Practice will eventually create the perfect set-up.

So, I decided to try it out on the patio, and it worked out pretty well.  I could get the camera over to the left of the chair and angle it so I could film as if the viewer were looking over my left shoulder.  The key was to place the feet of the tripod perpendicular to the table – this way I could scoot the chair back to stay out of the picture, but not knock over everything if I moved.  All this worry creates a very stressful painting situation, but this time I actually felt fairly comfortable, and ended up painting and filming – turning the camera on and off with the remote – for quite some time.

The result was a 15-minute video on painting sunflowers.  YouTube has both a size and time limit, but I decided to try it anyhow.  No dice.  I tried to compress the video into a 10-minute segment, and all I ended up seeing was a black screen.  Thus, I had to divide the video into segments, which was not easy until I got into another software package.  I was able to edit out sections with pauses, and divide the sections into different videos with different titles.  The final result is two videos!

Painting Sunflowers in Sumi-e:  Part One and Part Two

Here they are!  YouTube also allows you to do “audioswap” and add a free (to the video-maker) music track to the video, with the caveat some advertising may appear.  I did it for the Painting Wild Orchids in Sumi-e video, and for the two sunflower ones, which you can see below.  Hopefully the music will add to the proverbial “viewing pleasure” and the advertisements won’t distract.

Online Knitting Resources – A Few Thoughts

Online knitting resources have been around for years, but as internet technology and hardware improves, they have become better than ever.

One of the most valuable tools, for me, is the video.  On youtube, there are all sorts of instructional videos.  These really help get points across, and show the viewer something which is really difficult to describe in words, even with sequenced photographs.  Just doing a search for “backward caston” results in numerous hits, and refining it with “knitting” breaks it down even more.  If it hadn’t been for youtube, I’d never have been able to purl using the continental method – the Norwegian Purl video was more than a little bit of a help!

Other favorite sites for patterns include Ravelry, Twist Collective, Knitting Pattern Central, and KnitNet.  On many of these, techniques can be found, groups, local yarn stores.  In some ways, the internet is like an ongoing treasure hunt – click here, click there, and something new and interesting pops up!

Still, despite the potentials found online, there are also limitations, although as time and technology move forward, that will  become less of an issue.  The low-tech book and magazine provide a portability not found online, and yes, you can take them with you!  I personally would rather look at these than spend hours online, sitting in a chair, at a desk, and be indoors.  Much nicer to wander outdoors to peruse.  Color illustrations still catch my eye, the smell of ink and paper, and the beauty of layout, design, type font as well.

And, in this high-tech world, isn’t it interesting that many of us still prefer to knit with fine knitting needles in our hand, rather than at a knitting machine?