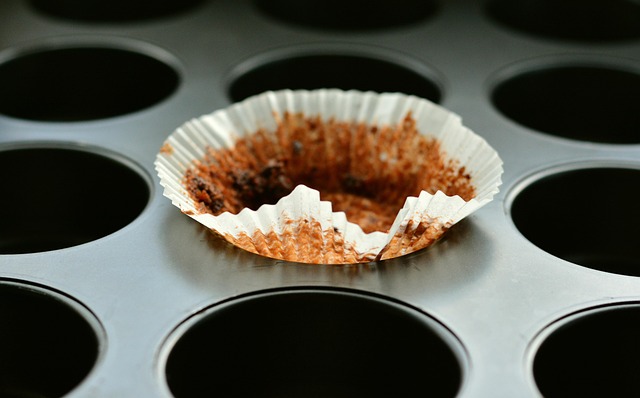
I am not a big fan of most muffins – they are simply too sweet, too big, and bland. One recipe I found years ago was made with honey and blueberries – quite delicious – but no matter what I did, warm or cooled, they always mixed with the paper cups and you got a mess. Yes, I tried silicone muffin cups, but they were not much better, even when coated with butter or sprayed with cooking oil.
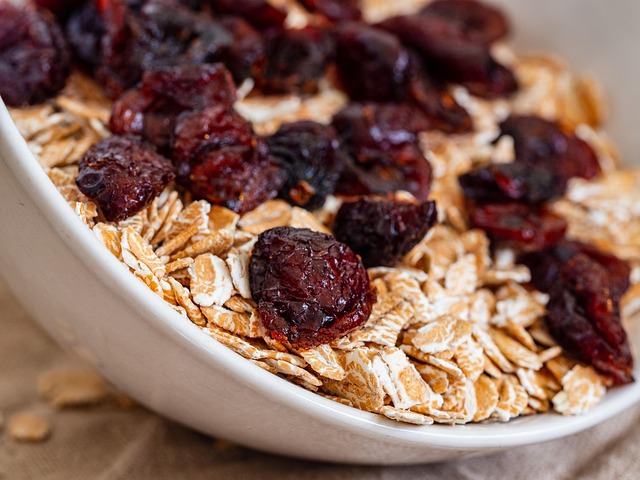
And then I found this recipe for “Nutty Cranberry Oat Muffins” by Getty Stewart. There is sweetness but not too much, texture, flavor, and oodles of good suggestions. I made the version with white flour, as that is what I had on hand, used goat milk kefir diluted with water to get the correct of liquid to equate buttermilk, and used pecans along with the dried cranberries. Other than that, I followed the recipe pretty much. I suggest you go to her link (above) for the details. I really like the flavor and texture of these muffins!
Getty Stewart’s Nutty Cranberry Oat Muffins
Ingredients
1 c. rolled oats
1 c. goat milk kefir (about 1/2 c.) diluted with water to make required amount – you can also use plain yogurt, buttermilk, or thinner kefir
1 c. 3 T. all purpose white flour
1 1/2 t. baking powder
1/2 t. baking soda
1 t. cinnamon
1/4 t. salt
1/2 c. brown sugar
1/3 c. bland oil – I used safflower
1 t. vanilla extract
1 egg
1 c. dried cranberries soaked in hot water for 15 minutes and water drained out after the soaking
1/2 c. – 1 c. pecan halves
Method
Preheat oven to 375. Line 12 muffin tins with paper cups.
In small bowl, mix the kefir / yogurt / buttermilk with the oats.
Heat up hot water and soak the dried cranberries in it for 15 minutes – same time amount as oats – and drain when ready to use in batter.
In larger bowl, mix together flour, soda, powder, salt, cinnamon.
After 15 minutes, mix together the oil, brown sugar, vanilla, and egg into bowl with the oats-kefir mix.
Stir the wet ingredients into the flour. Mix until just mixed – too much mixing will result in cone head muffins!
Spoon evenly into muffin tins. These will not make big muffins that flow over the top of the muffin cups. If you want bigger ones, put more into each cup and plan for a longer cooking time and fewer muffins.
Bake 15-17 minutes until tops are firm to touch.
Remove from oven. Cool or eat as desired. My muffins were cool when I ate them and I didn’t have paper and muffins fighting to stay together. I didn’t eat one when warm, but I wonder if, because I used dried cranberries – which have less liquid – I would not have that paper-muffin war. I’ll try that next time!
Notes
There is a topping included in the original recipe, but I don’t tend to like toppings on my muffins. Instead, I like to cut mine in half and eat with butter!
This is, by far, my favorite recipe to date for muffins. If you like more earthy muffins that are not loaded with sugar or coated with drizzled sugary frosting, these are definitely for you!
No, not the Good Ship Madeleine, nor sister to the HMS Pinafore, but the Delicious Cookie Madeleine.
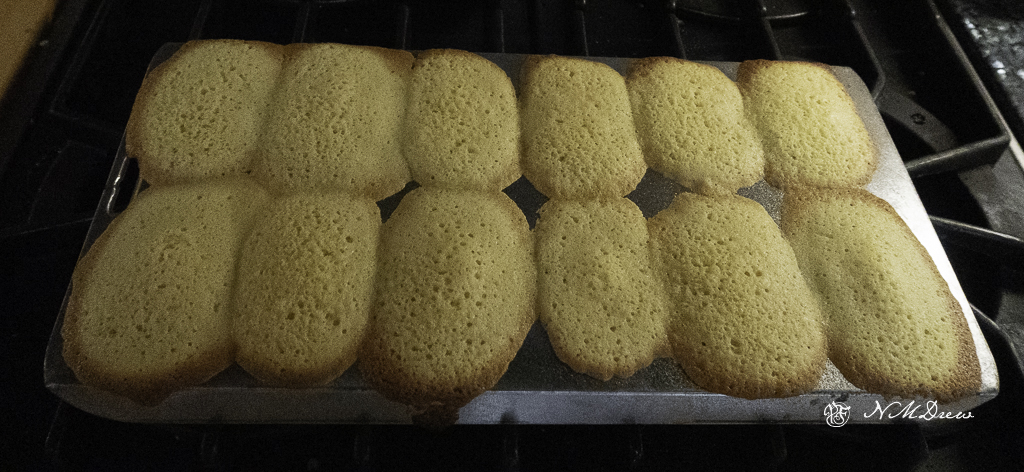
A madeleine is a French cake-like cookie, essentially a genoise, known for its shell-like shape from the pan side and a blump on the reverse. A good recipe is to be had at Preppy Kitchen – it produces a lovely, light, delicate cookie with a subtle hint of lemon. However, a couple of things – bake at 350F, and use a pan which makes smaller madeleines than mine does! I have one pan and I filled the madeleine molds full, like really full, and the batter runnethed over the tops of the molds and the cookies flowethed unto each other.
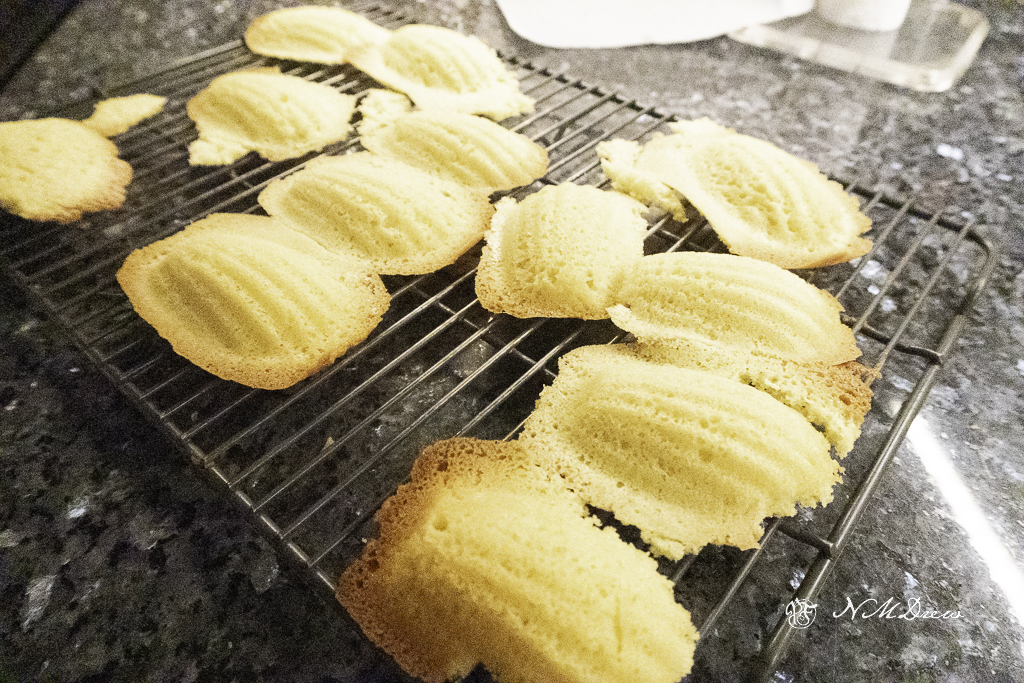
As you can see, my madeleines are robust and hardly delicate to look at. They are baked blobs of blobs of batter.
And, how to get them out of the pan? Well, I had thought of trimming their edges, but then the brown around the sides would disappear, and that little bit gives a crunch to the otherwise soft, airy cookie. And, if they sit in the pan, they get soggy. So, what to do with a hot pan and a cookie mess? Simple – dump them all out on the wire rack. This way, too, I could see if the cooking spray I used to grease the madeleine shapes would work.
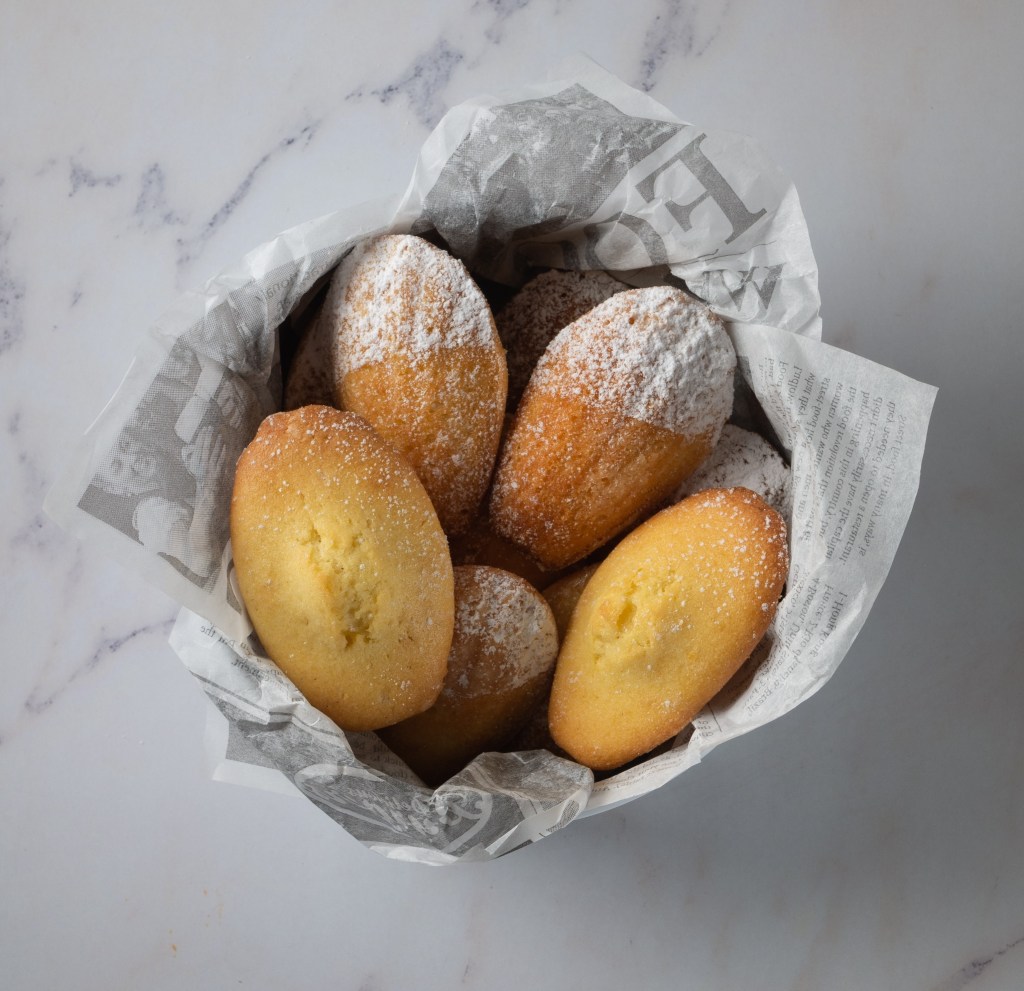
And the spray worked beautifully. Now, I have a pile of weird-looking cookies that don’t look especially appetizing – certainly not as lovely as our very first photo, which is a royalty-free one off the internet. However, be not dismayed! They are delicious! Good dunked in coffee, and most likely tea, and if you are familiar with M. Proust, you know of which I write.
Make yourself some madeleines, at least once in your lifetime. Make a test cookie or two in your pan – don’t overfill, but don’t underfill, either. I used a heaping tablespoon of batter for my pans, and it was too much. Here is the recipe below – refer to the link above, too, to get some good info that is not included here, and below is the recipe from a devilishly good and delicious website:
Madeleine Cookie Recipe
Ingredients
7 tbsp unsalted butter (100g)
2 large eggs at room temperature
1/2 cup granulated sugar (100g)
1 teaspoon lemon zest
1 teaspoon pure vanilla extract
3/4 cup all-purpose flour plus 1 tbsp (100g sifted)
1/4 teaspoon baking powder
1 pinch salt
Instructions
Melt the butter either in your microwave or in a small pot over medium heat. Browning the butter will add a lovely depth or flavor to the cakes but is of course optional. Once melted or browned pour the butter into a bowl and allow to cool.
Sift the flour, salt, and baking powder into a bowl then whisk together and set aside.
Add the eggs and sugar to the bowl or your stand mixer fitted with a whisk attachment or a large bowl if using an electric hand mixer. Beat on high until the mixture is a light yellow color with a thick silky texture, about 8-9 minutes. You’ll see the beater leave trails when it’s ready. Mix in the vanilla and lemon zest toward the end.
Fold the dry ingredients into the egg mixture and mix until just combined. You can sift the flour mixture into the eggs while you fold to avoid getting lumps or over-mixing the delicate batter.
Drizzle the butter into the batter and gently mix until just combined.
Cover and chill the batter as well as the buttered tins for 1 hour then scoop one tablespoon of batter into each scallop-shaped well. Bake at 350F 8-10 minutes.
Serve with a light dusting of powdered sugar.
Notes from the Baker
Making these cookies needs a light touch. If you can, weigh your ingredients within a gram or two. Make sure you whisk your dry ingredients together and then sieve or sift the dry ingredients into the egg-sugar mixture. Fold it in with a light touch.
After you drizzle the butter over this, again, use a light touch. Turn your bowl as you fold. The butter will eventually work into the batter, but do it carefully.
Be sure to refrigerate the pan and the batter – I had mine in about 90 minutes. This stiffens the batter a bit and preserves the air beaten into the egg-sugar mix.
The recipe says to bake 8 minutes – which I did – but when I saw how big they were, I did another five, touched the center for a springy firmness, removed the pan from the oven. After letting the pan sit for a minute, contemplating what to do, I just turned the entire pan over and watched the cookies peel away from the pan, helping some as needed.
Make some batter. Make some test cookies. Enjoy no matter how homely they may look.
In our home, fairies abound. They take things away, hiding them, as well as giving things back, or leaving presents of many sorts, desirable or otherwise. We have Sock Fairies, Cat Fairies, Phone Fairies, Key Fairies, and Amazon Fairies, to name a few. And as today is St. Patrick’s Day, it is worthwhile to celebrate our own Irish heritage by enjoying a shot of good whiskey in the evening and some traditional Irish soda bread.
And letting the fairies run free.
There are very simple recipes of only 4 ingredients for soda bread, to some more complicated. All require the use of baking soda and an acidic liquid – usually buttermilk – to react with the soda to produce the gas which makes the bread rise. So, without further ado:
Irish Soda Bread
4 c. flour
6 T cold butter cut into small pieces
4 T sugar
1 t salt
1 t baking soda
1 c raisins or currants
1 egg
1 3/4 c. buttermilk (can use an appropriate substitute)
Preheat oven to 350-375. Place raisins in hot water to soak for 30 mins. or microwave a minute, soak, drain, pat dry. Line baking sheet or cast iron pan with parchment paper.
Mix together all dry ingredients except raisins. Add butter, cut into flour to make a coarse meal in appearance. Stir in raisins. In a separate bowl beat together egg and buttermilk.
Check to be sure the oven is hot enough. Once you have verified it is to your liking, make a well in your dry ingredients, dump in your wet, and stir with your hand, fingers extended, until you have a soft, sticky dough. Turn dough out onto a floured board, knead a bit as you would a biscuit (but not a yeast bread) working quickly. Shape into a large circular loaf about 1 1/2 – 2 inches in height. Place on parchment lined pan.
Using a sharp knife, slice the bread with gashes about 1/2 inch deep and spread the gashes a bit. The gashes go from one side of the bread to the other, forming a cross. The cross blesses the bread; on a more practical level this allows the center of the bread to bake more quickly. Then, in each quarter of the bread, make a small cut – this allows the fairies to escape and ensures better chances of a successful loaf.
It is important to note that you do not want your bread to sit around, liquid mixed into dry, while your oven heats up. Wait patiently to mix. My oven is a slowpoke and takes a bit of time to get anywhere I want it, and then it often sits around at 350 even with the marker up to 450!
Bake 50-55 mins. at 350. And then, cool the bread on a wire rack. Test for doneness by tapping bottom of bread. Just as with yeast bread, a hollow sound indicates it is baked.
Some people say wait until all is cooled before cutting in for a better loaf, but that can be difficult. Who can resist warm bread and butter?
One thing I really get sick of is googling “honey cookie recipe” and finding recipes loaded with sugar and a tablespoon or two of honey added. The point is, I want only honey for a sweetener. I could easily walk around glued to an IV of pure sugar and be happy – and addicted. Honey does not have the same addictive quality as sugar as far as I am concerned.
Oatmeal Cookies made only with honey for sweetening!
So, I came across a recipe at last at Amy’s Healthy Baking blog. I am totally delighted. No, they are not super sweet, but they are soft and chewy. I think my cookies came out a bit less soft than hers, but part of it is my oven – it tends to run hot – or cold – depending on its mood and time of month. She says 325F – and mine was up to 347 and 364 at times. I’ll get it down. The other issue could be I didn’t weigh my ingredients, but just did a rough measure. As a result, it could be my dry ingredients were in greater quantity than she calls for. But who cares? The results are tasty! I added walnuts, too, and more raisins, but I am something of glutton in that regard.
INGREDIENTS
1 cup (100 g.) instant oats (I used a mixed oat hot cereal mix that I have been eating up)
¾ cup (90g) white flour (you can use whole wheat, gluten free, etc.)
1 ½ tsp baking powder
1 ½ tsp. cinnamon
1 tsp. nutmeg, mace, allspice, cloves, or any combo thereof
⅛ tsp salt
2 tbsp (28g) coconut oil or unsalted butter, melted and cooled slightly
1 large egg, room temperature
1 tsp vanilla extract
½ cup (120mL) honey (could use maple syrup or agave, too)
1/3 – 1/2 c. raisins, rehydrated
1/2 c. chopped walnuts
INSTRUCTIONS
Whisk together the oats, flour, baking powder, cinnamon, and salt in a medium bowl. In a separate bowl, whisk together the butter or coconut oil, egg, and vanilla. Stir in the honey or agave. Add in the flour mixture, stirring just until incorporated. Fold in the raisins. Chill the cookie dough for 30 minutes.
Preheat the oven to 325°F, and line a baking sheet with parchment paper or silicone mat
Drop the cookie dough into 15 rounded scoops onto the prepared sheet, and flatten slightly. Bake at 325°F for 7-9 minutes if your oven runs hot; 11-14 per Amy if your temperature is spot on. Cool on the pan for 10 minutes before transferring to a wire rack.
Yield: 14-15 cookies
Notes
I highly recommend you go to Amy’s page – link is above – to get specific info. I need to work a bit on this recipe, but it is a keeper in my opinion. It is a real cookie! So much could be done with it, too, as a basis for other cookies, too. The lack of sweetness may need a slight increase in salt to round out the flavor. Also, I didn’t chill the dough.
I did test cookies, too. The first two were baked for 10 minutes. They held together well and were nicely browned, but not as soft as I might like. The second round were baked for 7 minutes. As per Amy’s instructions, I let them sit on the pan for 10 minutes before removing to the wire rack. They seem a bit raw in the middle, and are crumblier than I would like in a cookie. Maybe 8 minutes would be better.
Using honey seems to mean needing a lower cooking / baking temperature, and perhaps a longer cooking time, too. Mine were dryer and my oven was variable, so the results were different – but still delicious.
For the past year I have been keeping a journal – something I have done since I was 10 (I shred them, too!) – writing exclusively with goose / duck / turkey quill pens and iron gall ink, all made by myself.
Real quill pens don’t have all the feathery parts on them. They are removed when the quill is made. Not very pretty, but far more functional. All that fluffy stuff gets in the way when you write!
Why do this? I like the act of writing. Just paper and ink and my thoughts or lists or complaints or observations. In this time period, just the daily usage of ink and quill has shown me and taught me a lot of things, things which are perhaps lost through time and the changes in technology. The fact is, too, I like to make things that I can use, and a quill pen and iron gall ink are proving to be two favorites.
Quills gave way from common usage in the 1830s when the metal nib came into easy manufacture and availability. Why not? Easier than cutting your own quill. Iron gall ink is easy to make if you have iron galls (though any plant material with tannin in it also works), and other ingredients available. It just takes time. Interestingly, powdered iron gall inks were available to the public, and apparently in common usage during the Revolutionary War by soldiers and others on the move. The powder was in packets, and all you did was sprinkle some ink on a surface, add water or wine or beer, and with your handy quill and a bit of paper, off you wrote.
Today’s treatise is about the Yncke itself. I’ve made multiple batches and have found out a few things that may have been common knowledge back when it was the only ink commonly available.
Observations
Iron gall ink is best used in small amounts, such as in an inkwell with a lid. The ink evaporates and particulate matter settles out with time. By keeping your ink in a sealed container – I use a mason jar with a lid – you keep it relatively fresh. It won’t evaporate although settling of the materials occurs.
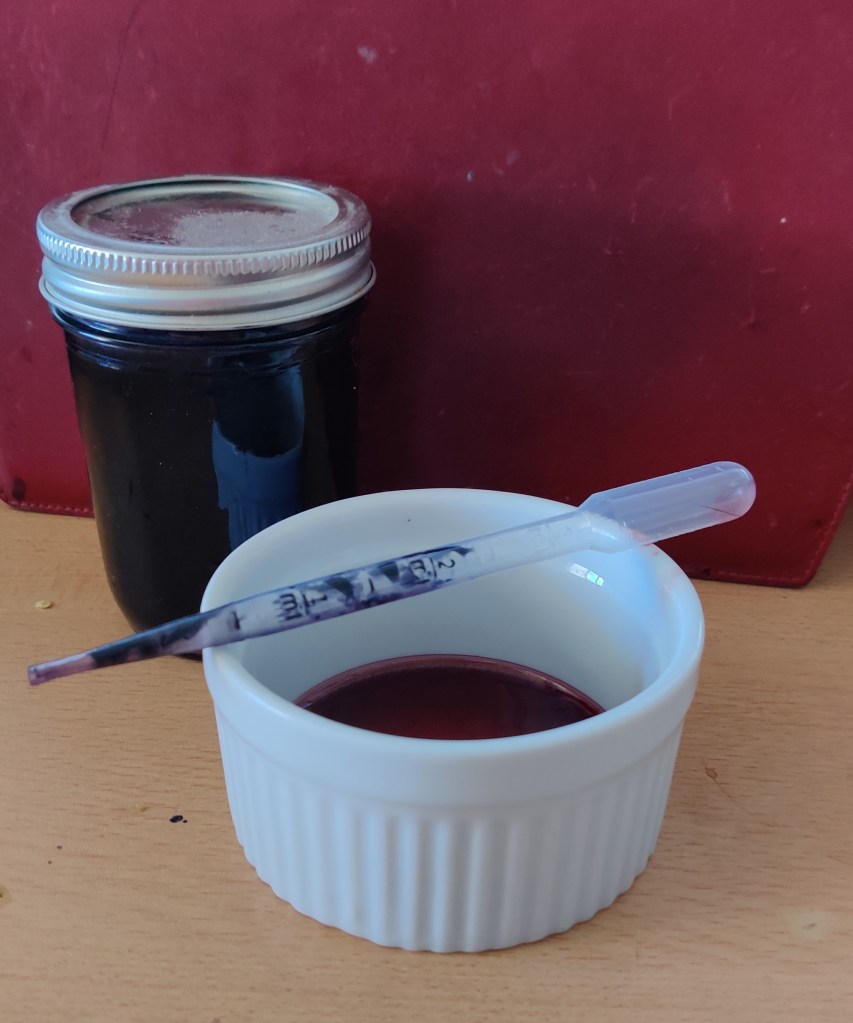
Here are my quills, ink well with porcelain insert, and saucer to catch spills. Notice the stains on my desk! I can usually remove them with some bathroom scrub that has bleach, rinsing thoroughly after scrubbing. Let the cleaner sit for a few minutes to let the bleach work, and use a bit of gentle elbow grease. This is a plastic-topped work station I have had for 25 years, and it has held up very well!
I use a pewter inkwell, reputedly from the early 1800s, with a porcelain well. I keep it on a saucer as spills from iron gall ink stain anything easily. The porcelain is easily cleaned up. I replenish my ink every two or three days – a lot gets used up! Watching it disappear is rather fun.
When I replenish my ink, my choice of adding more ink or thinning it is really my first question. Experience has shown that through evaporation the ink becomes thicker and thus does not easily flow from the pen. I add water in a small amount, but after having read that one should use vinegar or spoilt wine or beer to keep the ink’s color strong, I have tried both. My experience is too limited at this point to make a more definitive statement that either works fine.
How do I know when I need to dilute my ink? I know when I can no longer write a long line of words with a single dip of the quill. The ink begins to blob up and becomes more viscous. If I find I can only write a word or two before the ink is very pale, I know that the first problem is the ink, not the quill. Then, I add a bit of water or vinegar or wine or beer, just a bit, and try writing again. If the flow improves, you are fine. I use a plastic pipette with a squeeze bulb because I can control the addition of liquid more easily than just pouring it into the well.
Here you will see the ink in a 1 cup canning jar with separate screw top and lid. The pipette is made of plastic and has a squeeze bulb on top. This allows for tidy delivery of either ink or thinning liquid – here, old red wine in a custard cup.
In using iron gall ink, I used to keep it in bottles with screw-on lids. Specifically, I used old fountain pen ink bottles. However, this ink is like a glue in some ways because the lids eventually stick to the bottle and become difficult to unscrew. Flying ink is not fun when you finally get that lid off! I store mine in 1 cup canning jars, the kinds with separate screw tops and lids, such as used in making jam or jelly. When I need more, if the lid is sticky, I can usually pry it off with a knife – slowly and gently! And I do it in the kitchen sink or with paper towels beneath the jar to catch any spillage. Clean any spills up immediately!!
Iron gall ink can spoil. I have had batches which developed a scummy surface on it, but it doesn’t seem to affect the quality of the ink. I just shake it up and mix it in. This seems to have occurred when I used water in making the ink. This last batch I made with some old wine, and the scum did not appear. I will say, too, that I like the smell of wine when I use fresh ink! It’s a nice addition.
Making it, as I said, takes time. There a numerous recipes on the internet. You can find my own commentaries on the ink by using the search feature. The recipe I use so far is as follows, and have been pleased with it, especially when I have made it with wine:
Receipt for Iron Gall / Oak Gall Ink
Oak galls: 80 g.
Distilled water / stale wine or beer / vinegar: 300 g.
Ferrous Sulfate (I used ferrous sulfate heptahydrate): 50 g.
Gum Arabic: 25 g.
Crush oak galls into small pieces or grind into powder using a spice or coffee mill. Place into jar and cover with 300 ml. of distilled water. Place in sunny window 3-7 days (depending on your life and schedule). I plan to do 3 as per the recipe from the Schoenberg Institute. After 3 days, there should be a dark murky liquid in the jar.
On Day 3, add 50 g. of Ferrous Sulfate to oak gall mixture; replace in sunny windows for another day. On Day 4 add the Gum Arabic and leave for another day. On Day 5, strain the liquid into a clean vessel and voila, ink!
My Check List For Using and Maintaining Iron Gall Ink
Take the time to make iron gall ink. I think a week or two is best. Anticipate when you will need a new batch.
Store unused ink in a closed container, such as a canning jar.
Use a small amount of ink at a time as it easily evaporates and settles out.
If your ink is thick, before adding more ink to your well, dilute first with small amounts of water, vinegar, stale wine or beer. Test with your quill. A pipette works well to transfer fresh ink or dilution liquid.
Paper towels are excellent as blotting paper. I use toweling to blot a page before I turn it over, and I turn it over onto another sheet of toweling. Sadly, we no longer have blotters as daily items on our desks.
Rinse your quill when done, and blot it dry. Have at least 3-4 quills available to use as they need to dry out between uses.
So, that is it for this posting. Hopefully it is of some use to those who would like to use iron gall ink and quills on a more regular basis. If you are just beginning to use these items, be patient and kind to yourself. Learning to write with a quill pen is not easy, and learning how to replenish the ink on your pen has its own quirks. We are used to pens where re-inking is not normal, but with both quills and metallic dip pen nibs, there is a pattern and rhythm to getting the right amount of ink on your pen. Once you master it – and it shouldn’t take long – you might find yourself quite happy with your new skills!