Somewhere

Yesterday I got to class to paint and realized I had left all my white and black artist gouache sitting on the table. Everything else had come with me.

I need white for gouache, so I got some acrylic titanium white paint to use from the supplies counter in the classroom and blended it in with the gouache. Because it is acrylic, I made sure my mixes of gouache and white paint occurred on a disposable palette as well as made sure I used cheap brushes which I rinsed all the time. Acrylic is plastic and I don’t need ruined brushes or metal palette. And the fast drying quality of acrylic made me work far too quickly.

Sigh.

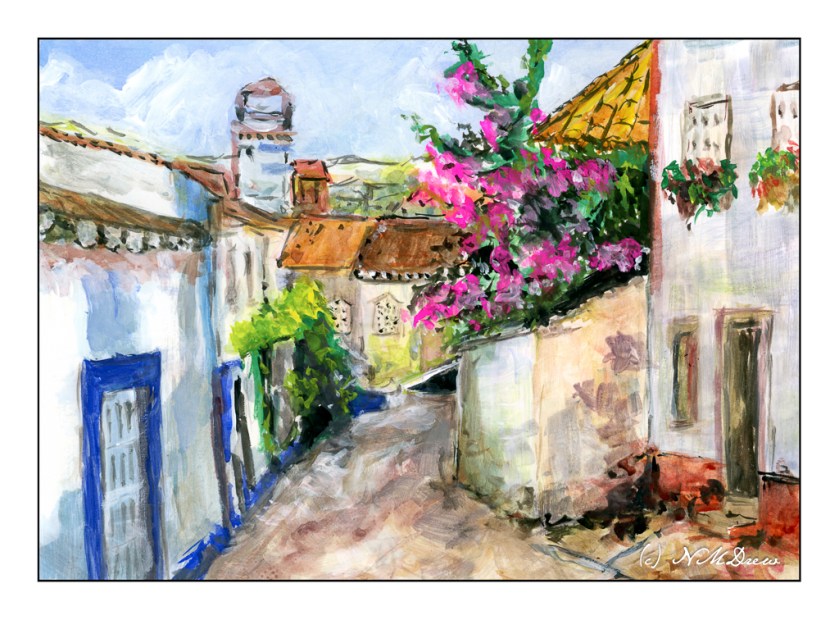
I have no idea where this photo came from, just knowing it is somewhere in southern Europe, like in Spain or Italy or France, or elsewhere. The white plaster buildings are rather decrepit and worn. The streets are more like alleys than a 5-lane L.A. freeway.

The bright blue doors, rampant bougainvillea, and rusty red just make you want to paint it. So, I did, and my haste shows – nasty, quick-drying acrylic paint! – crooked lines rather than straight, poor perspective. My usual faults! In reality, the detail was a challenge to reproduce, even what little I did, and because I knew this would not be a masterpiece, I could play.

I have mixed artists gouache with watercolors, and been happy with the results. Mixing acrylic paint with water soluble paint is a bit of a different story as speed is part of the issue with acrylics. As an experiment, this worked as I could lighten my paints as necessary, but it is not something I want to repeat. My brushes mean a lot to me, can be hard to replace, and my palette is also something I value. Dried acrylic paint would not be a happy blend with enameled metal.

Acrylic paint with artists gouache, 9×12.

Village Windows

Here is yesterday’s first layer of watercolor pencil, now “watercolored”.  I tried to follow the lines of the pencil.

Here is the second layer of watercolor pencil, with a little bit more detail.  The sky was done with about 4 or 5 colors, layered down with a blue, some white, some grey.  The roofs are an orange and a brown and a black.

As you can see, I also colored in the windows and am trying to add texture to the tiled roofs.  Some green, too, for the foliage in front.  After this, I then added water.  Once more, I followed the lines, such in the roofs.  The space on the lower right is a bit of a problem.  I think it needs something, but have no idea at this point.  Maybe a cafe awning so we can a shot of espresso?

As I have never used watercolor pencils for any complete picture, my cunningly brilliant plan is to simply layer color, then use water.  As you can see, there is some bleeding.  Most interesting to me is the sky – in the center the little bleeds are rather interesting.  In the windows, I also did some lifting of color with a dry brush to lighten the glass, as a reflection or to enhance a shadow.  The iron gall ink is beginning to blur into the colors.

I have no idea how many layers I will end up with, but I am going to try to do glazes / layers to represent shadow and form.  No idea how successful this will be!

Village Windows

Well, I don’t live in an interesting old village, but I think I could quite happily.  Suburbia just doesn’t make it when it comes to interesting lines, stones, and such.  Macadam and stucco and neatly cropped lawns are my daily world, so I always have to run off someplace else!  Not that suburbia doesn’t have its good points, like modern plumbing and electricity, but it’s not that visually exciting.

Okay, so I got our my Faber-Castell watercolor pencils.  I have a tin of 60 that I have been meaning to try on a serious level.  So, here is the first layer.  I used iron gall ink on a dip pen for the lines, and then just a quick scribble of pencils to lay down the basic colors.  Next, I will wet the pencils and let it dry.  Then, off to work. Bye!