Pear on a Reflective Surface

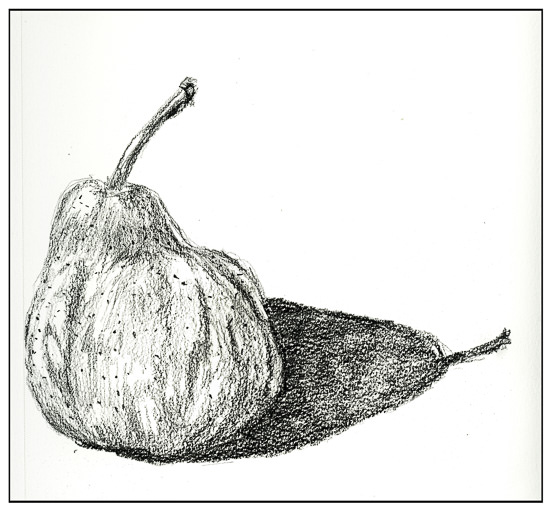
For the past 4 weeks I have been taking a short course in oil painting – we have not laid a bit of oil on canvas in this entire time period! Instead, we have learned so much about color – theory and real world (too complex for here) – contrast, tone, value, intensity, neutrality, and so on and so forth. Finally, in the last 30 minutes we finally got a painting demonstration of painting values on a pear. Some people painted along, but I just watched the instructor.

First thing, we mixed a dark value of burnt umber and ultramarine blue. Then we made a middle value grey by mixing in some white, and then the lightest value by adding even more white to the middle grey. After that, we used cad red light, cad yellow light, and yellow ochre, doing the same to each, but for the middle and darkest values, we added some of the middle and dark greys to darken and tone. I was really surprised to see the beautiful green the middle grey made when added to the yellow ochre, and I absolutely hated the cad yellow light’s greenish cast. Ugh. I rolled out cad yellow deep instead as it was much warmer and orange-ish.

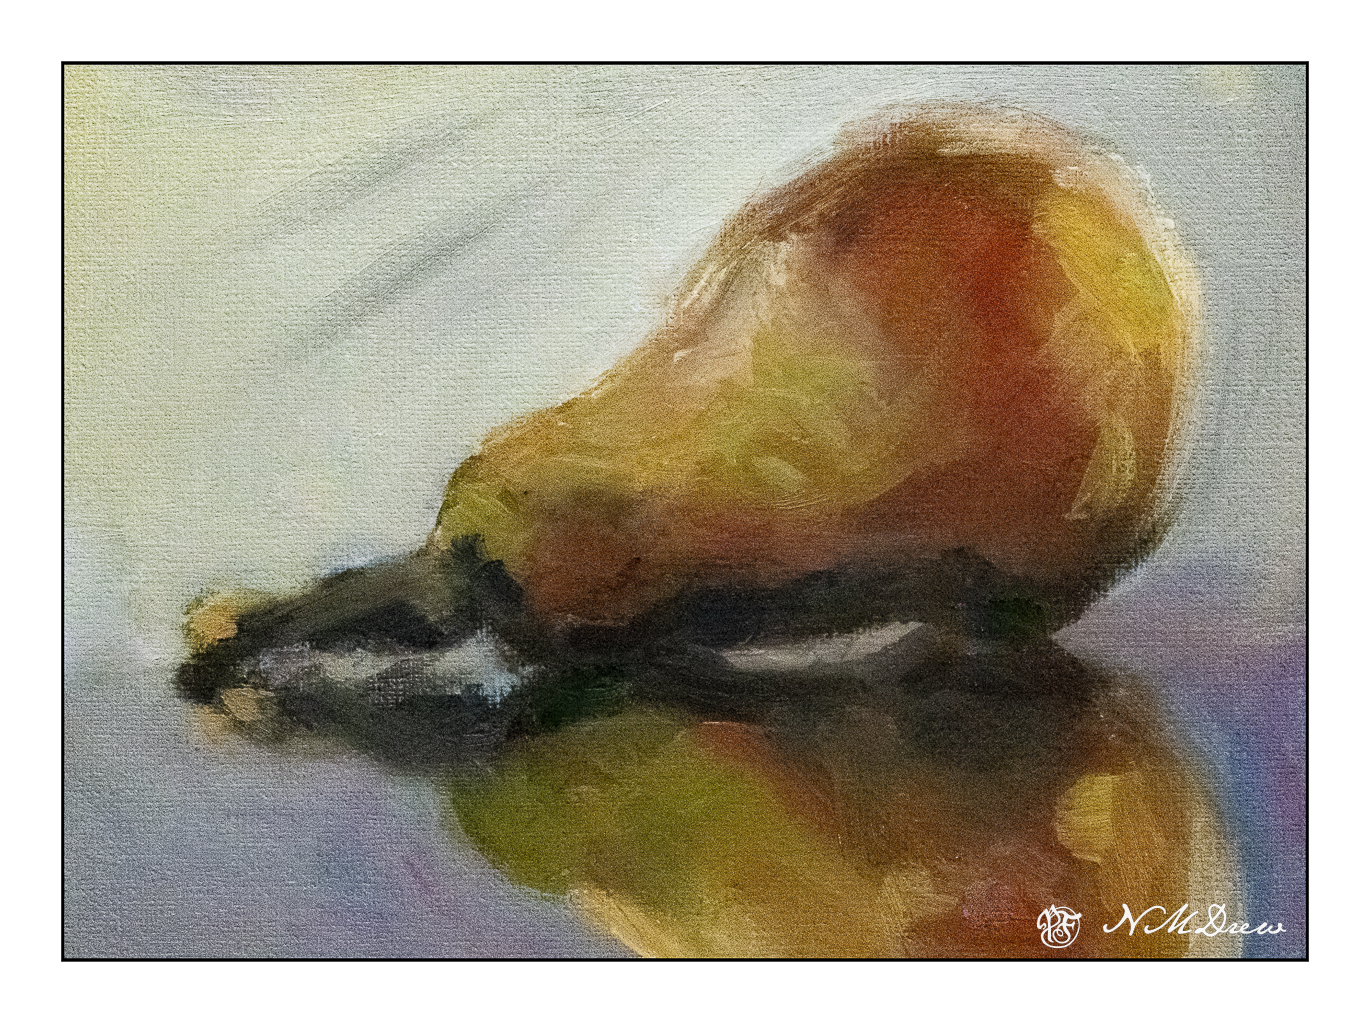
The photo we used was blurred a bit, and then a notan (the rendering of an image into values of white through black, with shades of grey in between – in other words, a grey scale of the image) of the same was printed onto a piece of paper. We painted our values onto this paper, using the methods described above. Some people just kept their areas as values of color, but it made me a bit nuts, so I blurred mine together. The result was much more to my liking but more challenging, too. I made a lot of messes and lost my values quite often along the way.

Our teacher, Harvey, is really good. I have another 8 week session starting in a couple of weeks and I think it will be a good adjunct to a 4 week private class with him starting mid-March. Harvey is not just an artist, he is also an experienced art teacher as he has taught high school art for many years. Experience as a teacher is showing here – he is articulate, logical, and clear. No complaints, and I feel fortunate to have made his acquaintance – I like him, too, as a person, and that adds to the enjoyment of a class.

Oil on paper, about 5×7, value study of a pear. Colors used are titanium white, ultramarine blue, burnt umber, cad yellows and red, yellow ochre.

“The Pears Fatten Like Little Buddhas”

The Manor Garden – by Sylvia Plath

The fountains are dry and the roses over.
Incense of death. Your day approaches.
The pears fatten like little buddhas.
A blue mist is dragging the lake.

You move through the era of fishes,
The smug centuries of the pig-
Head, toe and finger
Come clear of the shadow. History

Nourishes these broken flutings,
These crowns of acanthus,
And the crow settles her garments.
You inherit white heather, a bee’s wing,

Two suicides, the family wolves,
Hours of blankness. Some hard stars
Already yellow the heavens.
The spider on its own string

Crosses the lake. The worms
Quit their usual habitations.
The small birds converge, converge
With their gifts to a difficult borning.

Tracks Across the Fields

I do love the bleak look of winter. With watercolor, a limited palette of 3 or 4 colors can express so much. Admittedly I used more, but I usually like alizarin, ultramarine, burnt sienna, and Hooker’s green for the colder time of the year.

Following through on points for some of the classes I have been taking, I am working to simplify subject matter, colors, and lead the eye. I think I managed to do this here, leading through the fields to the houses on the hilly horizon. I tried to contrast warm and cool colors, with a bit of warm on the buildings with the hope it will draw the viewer in. I also used wet in wet and dry brush, working from general shapes to more specifics; light to dark in general.

In addition to the painting, I am trying to make myself do a preliminary drawing before I touch brush to paint to paper. I did this one today. Lesson – it is actually worth the time, and I have been a silly bunt not to take on this fine habit sooner!

Watercolor, 9×12 CP Extra White Fabriano Artistico 100% cotton paper.

Changing Seasons

It is really important that if you study art that you make studies! I’ve been following along in my haphazard manner a number of teachers I like, online, and am trying to implement what I am learning. Or what is being taught – and then working conscientiously to absorb some of it. Being a magpie doesn’t help as I am so easily distracted by this and that. Focusing on one thing really helps bring mastery, but I get bored with doing only one thing. I know a lot of single-minded people, and I rather envy them. However, we all have to follow our own drummer.

The focus here is to lead the eye to the orangish, autumny trees in the distance. The water does it primarily, but I hope the curves of the field do, too, as well as the lines along the horizon. I am not too thrilled with the trees on the right, but c’est la vie.

So many artists say a value sketch is important. I like to think I can create the values in my head as I become more sophisticated in my abilities. I have decided to create some kind of preliminary sketch before painting as a habit and that is not an easy task for me – even if it only takes a few minutes. Well, the one below is not really a value study, but it did help me work on some compositional elements. Hmmm.

Kilimanjaro rough 140# paper; watercolor.

Values

I just recently realized that I can use Photoshop to help me create shades of grey in a photograph. This is particularly useful when trying to render a portrait into a painting. Portraits are very difficult to produce with any reliability as a painting because the face is subtle in construction, and thence, subtle in gradation. My skills are lacking in this arena.

To begin, I found a portrait on Pixabay. From there, I imported it in PS and applied an “artistic” filter, using the “cutout”, keeping defaults. I then printed out the photo, sized to 5×7, and gridded it out to a correspondingly sized piece of paper.

Once done, I chose gouache as the medium to use – already out on the desk, and easy enough to use without making myself crazy. First done was all the darkest values on my drawing.

I just lay down the black in most of the areas that looked darkest to me. I missed a few areas, but since gouache is able to be applied over previous layers, I was not too worried. Also, as this is the first time I have ever done this, I was not too concerned about perfection – the experience was more important.

From there, some white was mixed in with the black to produce the second darkest shade. Truthfully, I did not mix in enough white as it was nearly the same shade as the black when it dried. That is the nature of gouache – it dries darker than it goes on. I had to lay on a second and third layer.

Next, the third shade of grey. This I tried to push into being lighter than I thought I needed. From there, the highlights as light as I thought I needed. Again. the white was really a light grey that dried rather darker than expected.

Finally, I increased the white, using titanium white instead of zinc white (the former being more opaque than the latter) and did some touching up and adding of detail.

This is the final image. The paint is cracking a bit as it is really thick in some areas. Given this is 5×7 or less, the detail is not too bad, but I wouldn’t like to have this a portrait of myself! The goal of doing values is what is key here – light to dark, catching the face. Much room for improvement, but what I set out to do – a value study – worked out.

I plan to use this method with PS to do more portrait studies. Tools like this aren’t cheating – they help you see what is in front of you more clearly. Gridding the photo onto paper helps keep proportions relatively correct. I would like to do this on a bigger surface with acrylic, perhaps limning in only the white and black values, and from there adding the different shades of grey before moving into a final white.