Disastrous Fun

I promised to paint more buildings.  So I did.  I painted a house in the middle of a cold, cold climate in the dead of winter.  I made better house drawings when I was 10.

I have really lost touch with real cold, real snow, and a real winter.  I do have memories, though, of the intense gloom of the woods in northern New York state.  There was something so magical about them – the silence of the woods, the snow falling, the sense of being alone in the world.  I liked the idea of capturing that with a building, on water, in the dead of winter.

Buildings mean people, even in the middle of nowhere, on a river.  People usually mean unnecessary noise, and in the woods or hiking, the last thing I want is noise.  Silence is something to be savored in our noisy age.

So, let’s get back to the “disastrous fun” of this posting.  “Disastrous” as this is such an amateurish painting, and “fun” because the more I got into, and the more I realized how awful it was, the more fun I had.  Making a “good” painting no longer had any meaning – it was the experience.  And the snow.

The final touch was the snowflakes.  White gouache to spatter.  I spattered on the painting.  It flew onto my glasses.  I spattered some more.  It flew onto my glasses.  I changed how I was spattering, and there were streaks.

Snowflakes don’t streak in the real world.  Spattering paint is an art form in and of itself.

Redbuds in Bloom

Outside my studio window is a small California Redbud.  It really needs more sunshine to show off its flowers – there is too much shade on the western side of my house, and so it does not bloom very often or very much.  Still, it is a lovely tree.  Slender branches, heart-shaped leaves that change color and drop in the autumn.  Local birds like to hang out in its branches.

Today, I tried to express the beauty of several redbuds in bloom, with spring growth abounding in new leaves.  I drew the trees first, then used frisket – a lot of it – in the forms of lines and dots.  From there, the background was laid in, using varying colors to represent leaves, flowers, and other trees or branches.  The frisket was then removed, and trunks painted using warm and cool greys.  Afterward, magentas and yellow greens, warm and cool.  It was all rather splattery!  Finally, after everything dried, white dots applied to suggest spring insects and twinkling sunlight.

Not entirely pleased.  As a realistic painting, it fails; however, as an abstract, it has potential.

Aspen Grove

I painted this using multiple layers of frisket on the paper.  On the first round, I blocked off the right side of the aspens.  Once I was fairly content with the overall image, I added frisket over various areas, such as the greens and browns of the foliage.  I made lines to represent trees, and dots to suggest a glint of sunshine on a leaf.  I did this three or four times on dried paint.  In the end, I removed the frisket, left some areas white, and painted over other white areas with transparent glazes, hoping to pull together different areas of the painting.  Finally, I made small dots of colored paint in the foliage, to suggest leaves.

This study was to utilize what I have been learning from the experience of following Rick Surowicz’s YouTube videos, as well as what I learned just painting.  This is the first time I conscientiously laid out a plan or method on how to approach the painting.  First, drawing.  Then frisket.  Next, washes of green, gold, brown, and oranges broad across the paper and blurred using a spray bottle and blotting.  From there, details, contrast, and so on.  Overall, I think my painting has taken a turn for the better.

Rick & Me

About a year ago I found the YouTube channel of Rick Surowicz, and artist of considerable talent, and a formidably talented teacher.  In the space of just over a year, he has garnered 25K followers, and I am one of them.  Check him out if you don’t know who he is!

Anyway, I did two of his videos, both of which make use of frisket.  In general, I like to “travel light” – meaning, I like the idea of spontaneity for success, not thoughtful pre-planning.  The result for me is usually disaster and disappointment.  Rick’s videos are clear.  He explains what he does and why.  The results speak for themselves.  I decided to get off my don’t-panic-I’m-organic high horse and follow along.  These next two paintings are from his lessons, which I followed.  I can honestly say I enjoyed doing them, even in the moments of terror – that frisket!  those colors!  

Each one of these paintings required the usage of liquid frisket. I applied it, let it dry, and got to work. The beauty of the liquid frisket is that it allows the application of broad washes across the paper without the loss of white paper, or having to do in painting or negative painting. This actually gives a bit more ability to be spontaneous and splashy than not using it! (Surprise lesson here.) I did each of these paintings over a two or three hour period, watching the steps in each video a number of times.

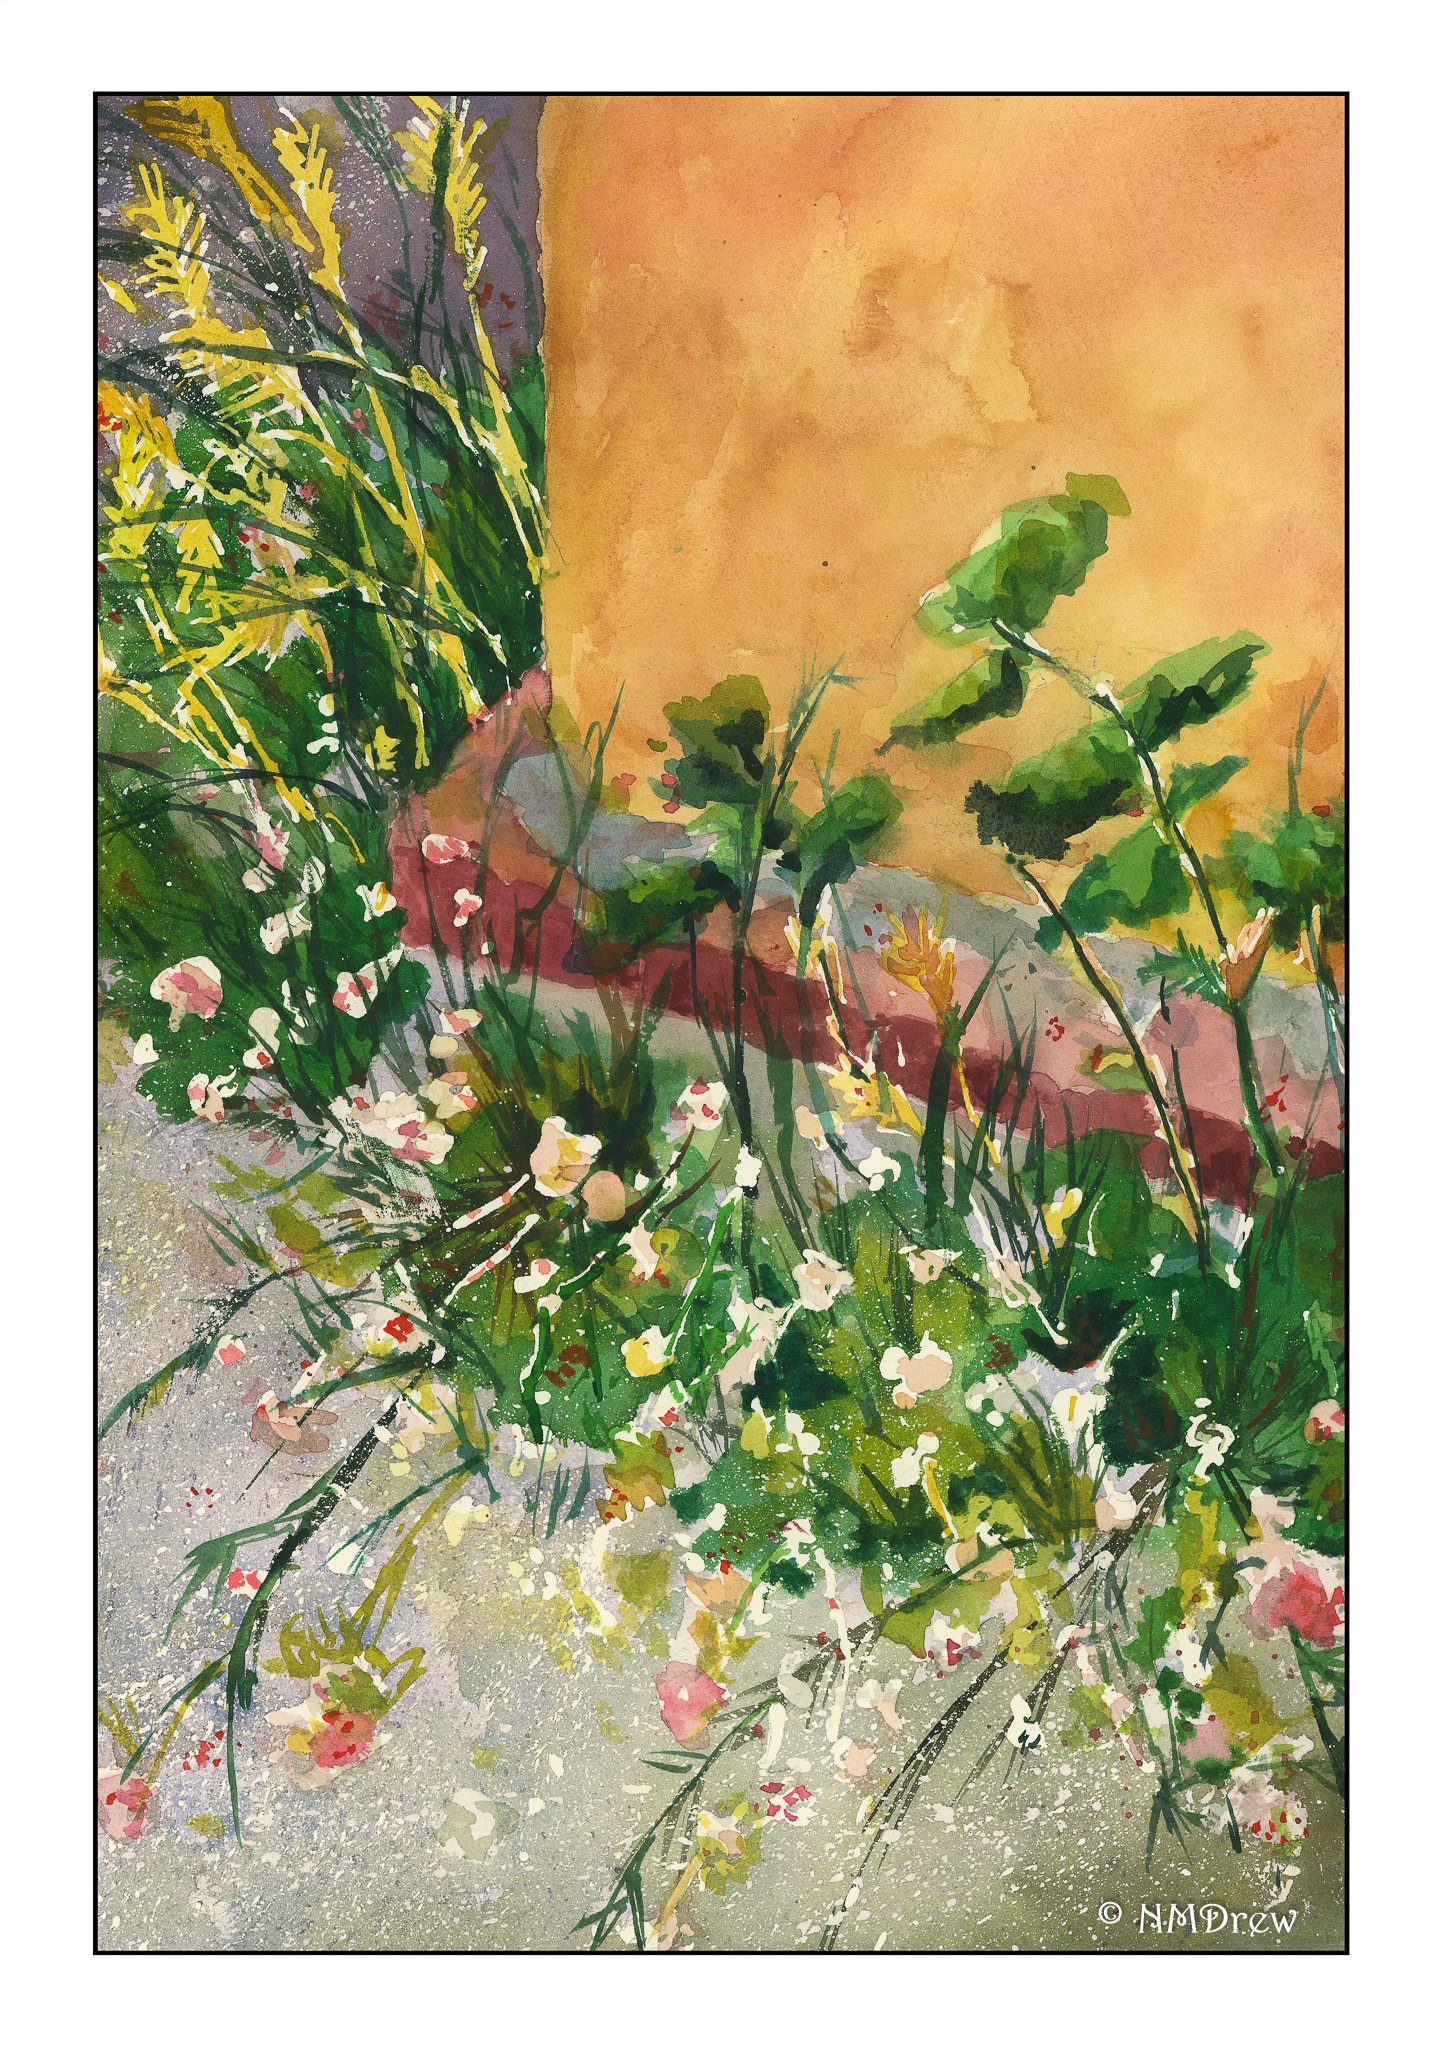
At some point, we all have to try our wings. I took a photo of a weed patch behind La Purisima Mission in Lompoc, California, last summer during a visit. There were white flowers – perfect for frisket – and yellowish grasses – also good for painted-over frisket after it was removed. This painting held a lot of terror, let me tell you! However, I am fairly pleased with the end result – simplification coupled with detail.

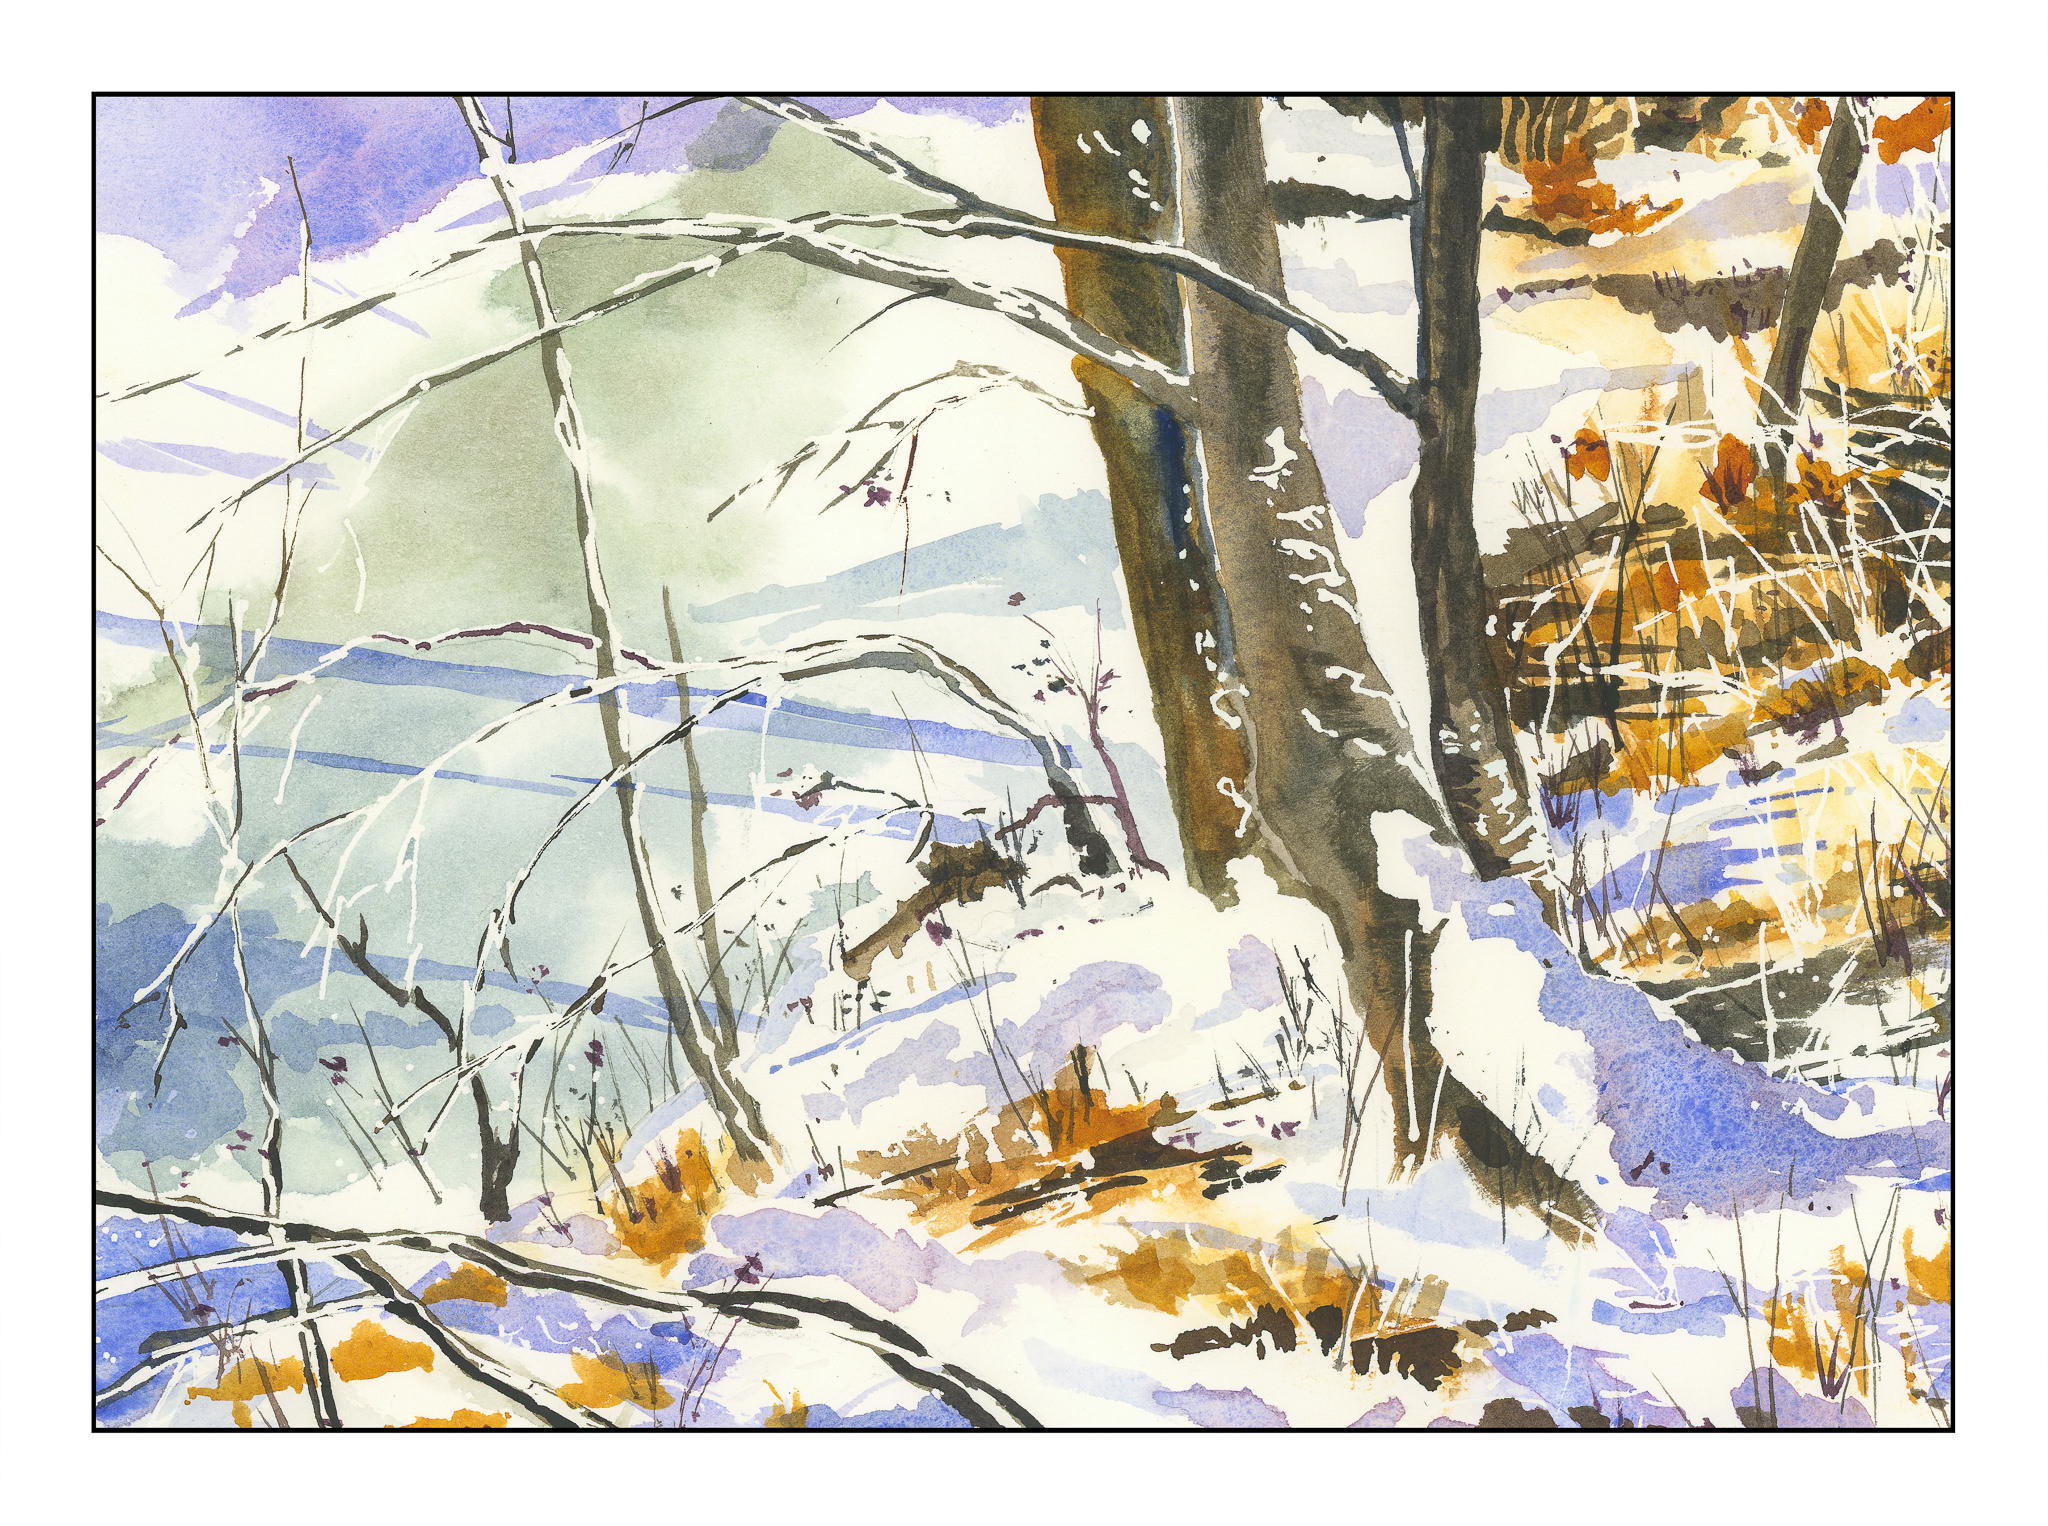
This morning, I did this painting, derived from a public-domain photo of an aspen grove. In the photo, light was shining from the right, and in looking at the picture carefully, the trunks of the aspens, which are a brilliant white, much as birch trunks are, were actually darker than the brilliant yellow-green foliage in the distance. I used frisket for the white areas on the right of the trees, and then, as I laid down layers of color, added more frisket here and there to protect areas of color. I did this for three or four layers until I finally removed it all, and then painted in areas needing more detail or contrast.

By following Rick Surowicz’s tutorials, I finally learned something. Frisket is not scary and can be an aid to a spontaneous or splashy wash as it helps preserve white paper. In the process of copying Rick’s process, I learned a bit about color, reworking areas, contrast, and whatever. I was also able to paint a representative of a bush or leaves rather than hankering to paint the details and losing the overall effect. I am thinking about redoing the last two paintings without frisket, just to work at white space without an aid. That will be more of a challenge I think than not using frisket!

Study: Rick Surowicz’s “Snow Creek’s Edge”

Today was another practice session using a study by Rick Surowicz on his YouTube channel.  This one is titled “Snowy Creek’s Edge.”  As with the one I did the other day, there is a lot of use of frisket, and this particular study with filled with it!  Keeping areas white is important, and many watercolorists eschew using it – I know I sure did – but judiciously applied, it really does make painting easier.  What I really liked is that it is an excellent way to express narrow bands of snow lying along slender branches and twigs.  It also allows for creating negative space without painting tediously around things – a good skill to have, but at times not necessary.

Coming away from this, I am getting less caught up in copying Rick’s painting and using it as a point of study in watercolor technique, blending colors, and usage of tools and brushes.  Tomorrow (unless the family Thanksgiving becomes a bit much during the morning) I plan to find a snowy scene, either from a photo I have taken or from a public domain image, and work more with snow in the landscape.