After spending 7 hours yesterday sorting through books I hope to sell or donate, I was bushed. Dusty and dirty, too. It’s amazing how much of a mess your life can become when you aren’t paying attention! Painting definitely has its attraction as opposed to drudgery, but lately I feel like pushing myself into areas I don’t ordinarily venture. Cleaning and discarding shakes things up, and it seems to be carrying over into artwork.
Charles Reid, besides being great at landscapes, is also fascinating for me as his watercolor portraits are so loose and wonderful. I read a bit in one of his books about how he does skin tones. Colors for pale skin can be yellow ochre, alizarin, and cerulean – these are the ones I used to paint the figure on the left. For the one on the right I threw in some ultramarine and Hooker’s green at Reid’s suggestion. I worked to make the highlights warm and the shadows cool – more yellow in the light areas, more blue in the shadow areas.
Here are some gardeners laboring away. The color palette was pretty simple – ultramarine, orange, and a bit of ochre and green. I tried to create a sense of dimension in each pose, working with complementary colors to create shadows.
I then thought that after doing people, I should do an animal. I found a wonderful picture on Pixabay of an elephant striding along. I was rather teary when I thought about how we are losing so many wonderful creatures, large and small, because human beings are not the best. Of course, I’m not starving, so my perspective is very different. I was caught by the beauty of this elephant and think I will probably draw and paint creatures more. I have never painted or drawn an elephant before and enjoyed this one a lot.
Finally, a building, specifically Dunguaire Castle. It’s from the 16th century and has been restored. I think it would be a wonderful place to visit as it is right on Galway Bay in western Ireland.
Altogether, this afternoon’s romp in the paint was satisfying and challenging. Figures, animals, buildings – all of these really pulled me out of my comfort zone. I kept my palette simple and worked to create a 3D element with shading as well as contrasts of warm and cool. Initially I used rather cheap paper, but in reality, it sucked, so I pulled out my Arches 140# CP and was much happier with the results.
I’ve long been a fan of Charles Reid and his wonderful, loose watercolor style. In particular, I enjoy his paintings of the Bahamas and other Caribbean scenes. The light, the sky, the land all work together to create something most of us dream about.
A Watercolor by Charles Reid
The above painting is by Charles Reid, but when you look at it, you can also see he is influenced by the watercolors by Winslow Homer a century earlier.
Florida by Winslow Homer
Winslow Homer painted not only the Bahamas in the Caribbean, but other tropical areas, such as Florida. Palm trees and ocean and sky and wind show us another world.
Palms by Winslow Homer
Several years ago I spent a week crewing in the British Virgin Islands, and the colors I saw were are so seductive. Around every corner, I thought of Winslow Homer. Charles Reid, while I knew of his work, I did not know he had painted the same areas as Homer, nor where I had been hanging out. It was a real delight to discover he painted the Bahamas and similar areas.
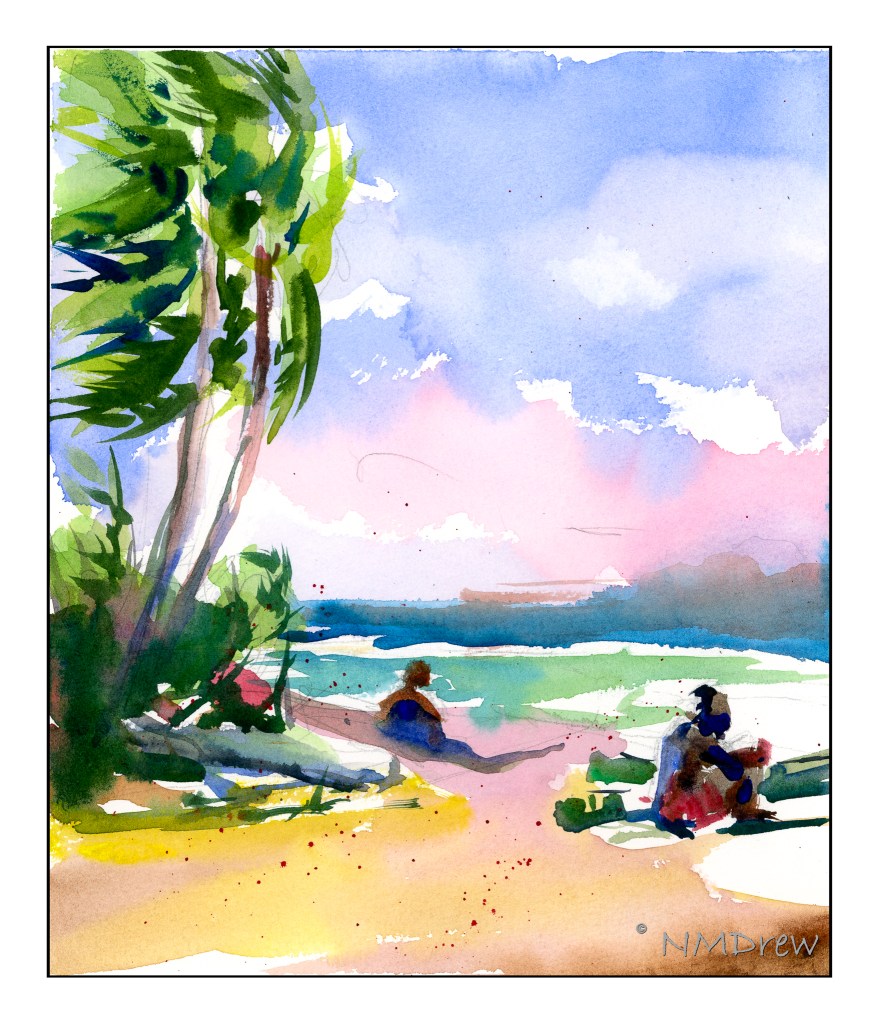
A study based on a watercolor by Charles Reid (see above).
Here, a quick study – about 15 minutes – of the watercolor above by Mr. Reid. It’s rough. The goal was to capture a purity of color and gesture to express movement, the shape of people on the beach, the colors of the sky.
Island, Island View
Sky, beach, water, clouds – the Caribbean has it all. The British Virgin Islands are just a few of the many islands in the area, many of which have tourist-driven economies. Despite this, the islands have their flavors, based on who originally colonized them – English, French, Dutch and American.
I don’t know if I could live on a small island because I am so spoiled by the ease with which I can buy a book (hard to do on an island, especially before e-books!) and a wide variety of food. What you cannot buy, though, is the atmosphere and the beauty. That you take home with photographs, paintings, and memories.
I have been so busy these past few weeks with cleaning and rearranging my house, discarding this, donating that, setting up a sewing cabinet, having personal documents shredded, etc., etc., etc., that the idea of sitting down to paint is like craving that first cup of coffee in the morning – I need it!
Whew. When I opened my gouache box, the smell of mold was there. Gouache needs to be kept damp, and if not opened up and used on a regular (i.e. daily) basis, moldy it can become. It’s not my idea of a good time.
I just decided to paint, not caring what it smelled like – and an open window and a good breeze helps! I mixed up colors, mashed up this and that, and when I was done, took everything to the sink and ran the water as hot as I could. Now, all is soaking, and here is a painting based upon a photo I took awhile ago.
Josh got home and helped me with a few things. First, we installed the pegs that allow the left hand tray / fabric support to rest securely on the left-hand doors. Next, we installed the longer footers on the foot rest.
This is how we plan to store the cabinet overnight. Will we be running into in the dark? I also have my drafting table chair pushed in because that is an important element. I need to measure how high it is, seat to ground, in case we decide (I decide!) if having to move a chair room to room is a major inconvenience. If so, I will need to know how far up or down a chair can go when and if I buy another one.
If you look into the foot space of the cabinet, you can see that my machine is lowered and the plug / machine cover is in place.
This is a view from the other side of the table which gives a better view of the plug on the top of the machine.
The Next Day . . .
Okay, overnight I stored it like this, both shelves on, folded in, and chair in place. No one got nailed in the middle of the night!
Now, in use . . .
I have set up the cabinet as I want to use it today. The extension table is out to support the rotary cutting mat. The left side has had its tray removed and stowed in a storage area in the footwell of the cabinet. The left side drawers are folded back so that the cabinet can be rolled in closer to the wall. My old typing table from the last century (I think even 1970s) is supporting a portable tabletop ironing board. The iron itself rests on a silicon mat so it won’t burn the ironing board cover. Time to iron and then sew another quilt square – and there are 4 in this pattern, so off I go!
Yep, the sewing cabinet arrived yesterday. No drums or Main Street parades, but locked up dogs and both front doors open. This is a floor model of a cabinet made by Koala Studios, and the quality is superb. Even better, it’s domestic, and that makes me quite happy.
Warning! Lots of external links to Flickr (where you can enlarge any image) and watch a video I made of the machine support going up and down.
Tim, from Kingdom Sewing, along with his kids and a friend, delivered it. The whole process went smoothly and quickly. Tim explained this and that, as well as showed how things work. Let us begin!
The cabinet against its blank wall. I have to fill up that space! It stands between the door to the hallway and the bathroom in the master bedroom. It matches the oak trim and base board (removed and not yet replaced, sigh), but doesn’t work with the floor. My opinion.
If you enlarge the photo above by going to Flickr (click on picture), you will see the plug that covers the machine lift that lowers and hides the machine into the cabinet. The cabinet itself measures 53-54 inches wide, 26 inches deep, 33 inches high. An extension table in the back doubles the depth of the table to 52 inches.
In the US, 29.5 inches is a pretty standard height for work surfaces, so I am actually a bit higher up than at the dining table, where I currently do all my sewing.
The cabinet rolls about extraordinarily easily and smoothly with very high quality casters that can be locked into place. It moves far more easily than my smaller white sewing cabinet. Wow! is all I can say to that.
Another image of the cabinet closed, with my floor lamp I use. It will be on the left side when I sew. If you click on this image (and any) you will go to my Flickr page. Admire the paint can we use as a door stop . . . and I need to get something on that wall above the cabinet. Ikea pegboards? A painting? Shelves? Walruses and peanut butter?
Here, the machine plug has been removed, a rubber cushioning mat (to cut down on vibration and to protect the surface from any ickiness under the machine), and a machine placed on top.
Here the cabinet is opened. My flashlight is on top. The doors are opened and folded to accommodate the shelves that can be mounted on top of them. Each shelf has pegs that you attach to the bottom of the shelf. These shelf pegs then can be inserted into holes on the tops of the folding doors and locked into place. The doors can be moved around or locked into place by locking the wheels.
This is the left side of the cabinet. The shelf is smooth. It can be used to support a serger, swung in to support fabric at the far left of the cabinet, or swung in closer to support long, as opposed to wide, bits of fabric, when the extension is fully to the left.
There are three drawers on the left of the machine, and because of the taller height of the cabinet, there is also a shelf cubby for a shallow storage container. To the right of the bottom drawer you can see a shelf. This is a foot rest. It comes with different footings so I can make it higher if I want – this is great for either tall people (shorter footings) or short people (taller footings). I haven’t figured out what I need yet – I have to see if I want to buy another chair or just use the one in the studio at the drafting table.
The right side of the sewing cabinet is wide open, with the doors swung as far back as they can go. The notion tray is on the top. In the back left, you will see some black – these are holes into which I can place scissors to hang down. The other indentations can hold things that might roll around, such as spools of thread or a bobbin.
Again, you can see the foot rest on the bottom part of the cabinet, and the cubby at the top of the drawers. On the left side of the open space (knee space) is the left side of the motorized machine lift, which is currently up. The indentation on the top of the cabinet shows you this.
This is the notion tray. The two black rings are for scissors. If you look closely at the lower left, you will see the power switch, “on” with the blue light apparent, that allows you to raise or lower the machine support as you desire.
Here is the power switch, turned on. As you can see, there is also a “remote control” for the machine lift! I can have it on or off.
Remote control! Notice the different shape of the up and down buttons? How clever is that? I did a phone video of the lift going up and down with a machine on it. I filmed it with my cell phone and triggered it with the remote control. When I try to put it into this post, there are weird gaps above and below it, so click on this link to see it if you want: https://flic.kr/p/2kNLDU8
The extension is supported by two flanges which roll out. The one on the left is snug against the undersurface of the extension, but the one on the right needs some help. It flops around a bit. That is a problem to be solved in the not too distant future . . . As you can see, there are also holes for electrical cords, one at the top for lamps, and one at the bottom for the machine lift on the motor. I am still working that out how I want to set it up.
Here you can see how smoothly the extension sits next to the table itself. This prevents snagging of fabric as you sew.
I’ve rolled the cabinet out and lifted up the extension, holding it in place with two supporting panels which swing out. The machine is totally raised up and resting on a rubber mat which will prevent damage to the surface of the machine support.
Smudge is here to supervise. She likes a photo op whenever possible. (Or is it a photo bomb?)
Sewing machine in place, notions tray in place.
Nice hardware, baby!
Ready to sew! Good light, adjustable chair, table extension, notions tray.
And there you have it! It will take a bit to work out how to do things and figure out what will work to my liking and my needs.
The extension table will be useful to support large items I am sewing. An issue with it is that one of the extensions appears to be a little short. Lopsided floor? I will have to move the cabinet around a bit to determine the situation, have Josh look at it, and / or call Tim.
I will want to put a mat under the chair to keep from wearing out the flooring when I roll around. The chair is adjustable in height, but may be a bit too wide and too deep for proper support when sewing for a long time. Lumbar support means a less deep chair if it is going to work. The foot rest inside the cabinet may need to be raised with the longer footings. I prefer to have my knees up and bent a bit, not dangling or having my toes lower than my heels. The chair itself is nice as it has a foot rest on it, but may not be the best when sewing. Again, that will need to be worked out.
The notion and side trays must be locked in on top of the folding doors. If not, they will topple off and break or otherwise get damaged. I managed to do it by myself, but that screwdriver needs to be close at hand!
Altogether, I think this is going to be a great bit of furniture to use while sewing. There is a lot it has to offer and adapts to situations and needs.