The Factory Dress

I thought I was going to hand sew a flapper-style drop-waist dress. The sewing gods are in disagreement, saying yes to the 1920s and no to the flappering.

Several years ago I bought a pattern called The Factory Dress by Merchant and Mills, a British enterprise with designs I really like. There is an elegance to them in their designs that is understated, yet practical, like good-sized pockets! The fabric I chose for this dress is a cotton weave from Japan in a darkish color with white woven rectangles. (I’ll photograph this later.) I cut the whole thing out this afternoon. The question is, should I hand sew it like I was planning, or should I sew it by machine? Something to brood about overnight, as well as whether I should line at least the skirt.

You can find this image on their website, along with some variations.  Google “the factory dress” and you will fine even more!

Vagaries in the Real World

In my perfect world, I would paint every day.  In my real world,  I have limited time just because I have so many interests.    Little things can become big things, not necessarily bad, but in the sense of taking more time than planned.  Also, life can produce some interesting lessons.

For example, I have recently found that 3M 101+ tape is the best tape for watercolor paper borders.  Lightweight, seemingly impervious to unsticking with a lot of  water from a wash, easily removable without tearing paper even when not using a blow dryer to warm it as you pull it off . . .

We bought a motion-activated infrared trail cam to determine what critter was destroying our plants in the side garden.  Mouses!  Traps caught one with cheese –   ours seem to dislike peanut butter.  I think they have learned their lesson.  The leaves are returning to the plants they ate.  They also figured out not to go into the traps otherwise chompy chompy.   Fortunately, I don’t deal with the traps or dead things.

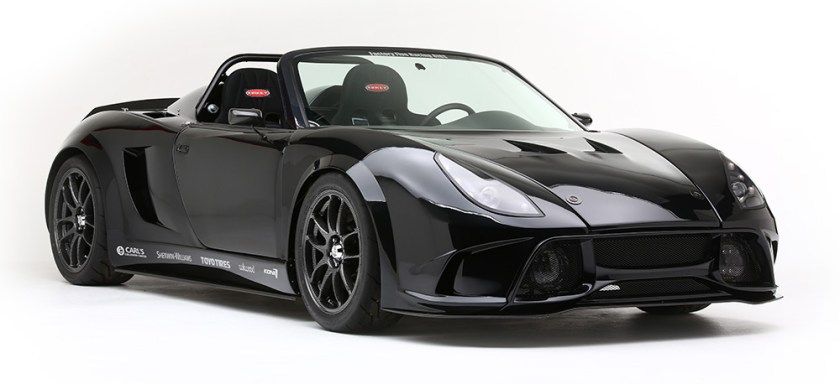
The 818S is going along nicely.  Brakes are the first big addition to it.  Josh has been riveting and blogging away at 805-818.com if you want to see.

I am sewing masks again, this time on my Singer 403A.   Threads need cutting, something that a computerized machine automates along with back stitching.  Technologies have changed since the 1950s for sure!

The ham will be used to iron out the masks I am currently sewing up.  Thanks to AVWalters for that suggestion!  I don’t tend to iron them, but why not as it is waiting to be used, looking very ham-like and hamsome.

I have also decided on the pattern to use and material for my 1920s dress.  Now, after the masks are done, I will dig out the pattern and determine if I have enough material in my stash for it.  If not, what?

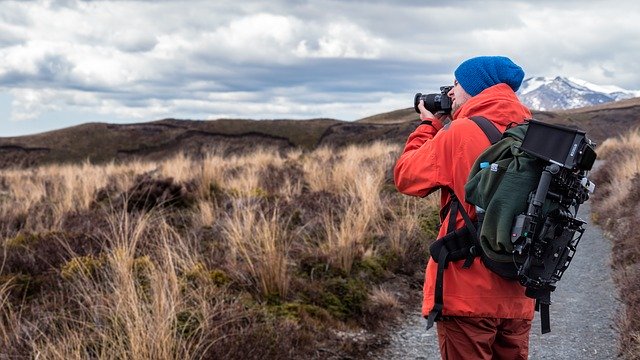
Also, decided to do more medium format photography with my Big Beast cameras – the ones that have modular parts or interchangeable lenses.  They weigh in at 500 lbs. easily, so a neck strap and a tripod or monopod make photography life easier.

With the sewing project and photography project, as well as oodles of appointments – 3 this week, 2 next – painting and drawing of course have gone to the wayside.  I don’t see this as a bad thing, but something to return to refreshed by not being there.  I see it as a vacation.  Go away.  Come back.  Refreshed by the differences.  Eager to begin again.

Oh, and I have a sweater to dye with indigo, another one to start work on, some spinning to do, and some shibori to plan when I do the indigo dye day.

And a bike to ride.

Ciao for niao!

Why a Ham?

Why not a ham?

This video shows you the reasons a tailor’s ham, aka a “pressing ham”, is a useful addition to your sewing (and ironing) wardrobe. I never used one until several years ago when I was on a super sewing binge. That’s when I really tried to improve my slap dash approach to something more sophisticated. While those attempts turned into annoyance, I have found my sewing and pressing aids really add to the pleasure of my sloppy sewing. Things are easier because of the shape of the ham.

And, I still sew, making shirts mostly, but now that I have more time than stress, I do want to make some more sophisticated clothes. Lately I have been wanting to sew a 1920s style dress, and am thinking of either hand stitching the whole thing. I think it would be perfect for summer. The ham will be perfect for anchoring my fabric so I can stitch on my project and put some tension on the fabric.    I may also find my ham useful if I decide to master handsewn buttonholes.

But that is for another time, like when I get started on it. And I really should get started on that dress, come to think of it. The solstice is less than 3 weeks away!

Homemade Ham

My life seems to becoming messier and messier since I retired. I have stuff all over the place or put away neatly and unfindable. Over the last three days, I have had appointments taking up the mornings, and then the afternoons have been filled with other things. When my routines are too unsettled, I get unsettled, and it seems like I just disappear. That introvert just evaporates with too many external activities and a sense of identity vanishes with it. Of course, this makes my chaotic retired life even messier. So, today I am determined to go through the house and put things away. Yesterday, though, I needed to make a ham.

Pork ham? Turkey ham?

Nope.

Tailor’s Ham.

Mine is missing, along with my clapper and sleeve roll. Neatly put away in a bag or a box, or out in the 5th dimension, or being hovered over with exquisite care by the Goddess Annoia.

I did a bit of research on patterns. There are actually a lot out there. YouTube has videos and google has oogles of them. Professor Pincushion on YouTube has a pretty good video, as well as a free pattern on their website that I used.

You can find the paper pattern here, but be warned, you do need to sign up for their free account. If you like their stuff, it’s worth it; I have found many useful tips and bits of information in their videos over the years.

Well, let’s begin. For the pattern, I used the one mentioned above. From my stash I found a piece of tightly woven muslin and a piece of tightly woven cotton flannel. Both are 100% cotton. Each piece was about 1/4 yard – just a scrap. Okay, a list:

    • 2 pieces of cotton material,  one muslin, one flannel, but use what you want – just make sure the fabric can handle high temperatures
    • sewing machine
    • thread
    • hand sewing needle and thread
    • filling material for the ham, also capable of high heat.  Some recommended fillings are old cotton rags, sand, sawdust, or hamster bedding.   (I used sawdust – called “Wood Flour” – which I bought from Amazon)

Easy steps to success!

    • Iron fabric.
    • Lay out pattern with 1/2 inch  margin around it.  I traced around the pattern pieces, marking the fabric with pencil.
    • Pin the pieces together, right sides together.  Sew around, leaving a section about 3-4 inches open for a hole for filling the ham with stuffing.  Back stitch by opening, and then run another bead of sewing around the  critter.   Trim and clip the curves.
    • Turn right side out.
    • Stuff.
      • I  propped the opening to the inside of the ham up with a toilet paper tube, and using a table spoon began shoveling the  sawdust into the  ham.  I felt like I was making goose liver fois gras, which did not feel especially good, but that is what went through my mind.  As I filled up the ham, I pounded and shifted the sawdust into place.  Toward the end, I used my fingers to push the sawdust in even more, changed to a smaller spoon, and continued.  I started at the dining room table, but soon moved outside, donning a medical mask as it was really dusty, and  continued the force feeding.  Finally, 15 minutes later, nearly all 5 quarts of the “wood flour” was gone, and my ham was fat, happy, and very solid.
    • Fold over the opening to the ham and hand stitch it closed.
    • Admire your ham.

This was a really simple project.  It took a couple of days to get my order in from Amazon, but that was okay.  I was too busy to worry about it and figured an afternoon would produce a most satisfying result, which it did.    If you look in the photo above, taken by me of course, you can admire my fine ham, toilet paper tube, and vintage Singer 403A sewing machine.