6 / 30

Day 6

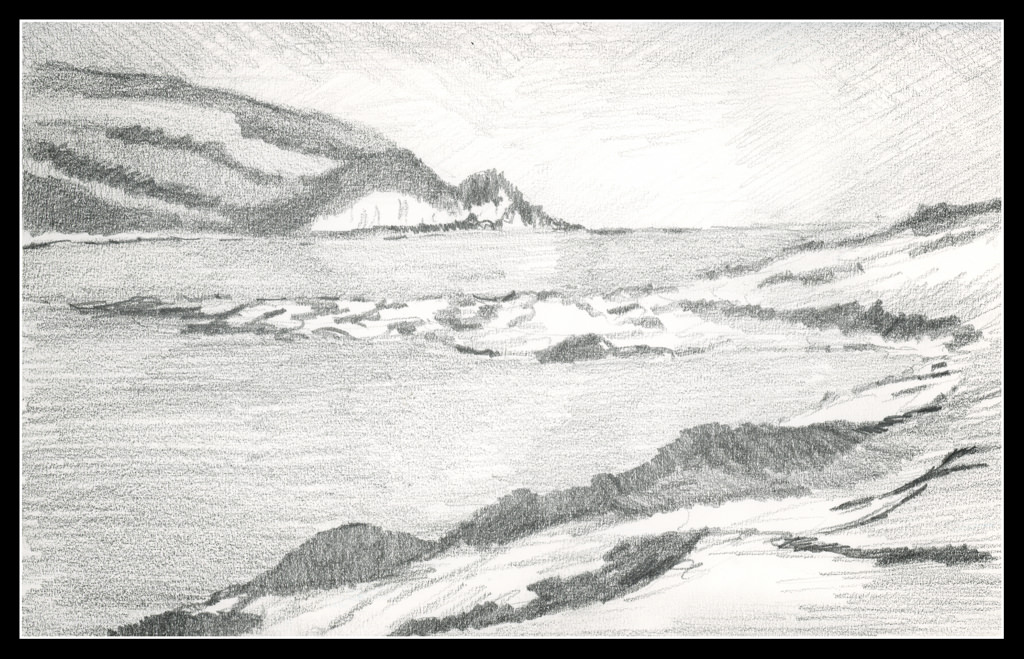
I think I am getting some of the points of this course and the usage of pencil to create value studies. First, I changed simply to an HB pencil and a smooth paper with a tiny bit of tooth. The bristol was too smooth a paper and the 2B and 4B pencils just smudged too easily despite my best efforts.

The teacher, Roberts, speaks of structure, rather than subject or detail, as the purpose of these drawings. This means masses of value, not picky details. The details can come in the painting, more so as it becomes larger. The value studies help sort out directing the eye to the point of interest.

The white cliff across the water is the focal point of the drawing, and, ostensibly, the painting. To lead the eye there I vignetted as one does in photography, but this time with graphite. The corners of the drawing are deliberately darker. A sort-of cloud or fog bank is light against the sky in the distance. I tried to use the pale reflection of the cliff in the water to draw the eye as well. Finally, I reworked the piles of sea weed and flotsam to aim the viewer toward the cliffs. The same can be said of the vegetation on the land above the cliffs.

I am beginning to get more comfortable with this approach to painting using a value study. 30 days of value studies is changing my eye and thought processes. Hopefully it will pay off in the future.

Watercolor Workshop, Day 3

Today was the last day of the workshop with Brenda Swenson.  She is a fabulous teacher who takes time with her students, with a personal quality that is positive and constructive.  I learned a lot from three days immersed in watercolor, and I think I turned a corner in how I handle color.  Besides being a good teacher – meaning her critiques and advice are sound – she also opened my eyes to a number of different things.

One lesson:  paint the same item 6 different ways.

Another lesson:  Use Canson pastel paper for painting!  The colors are good, the paper is 70% cottong, and those two things work well together.  Brenda brought in donuts for our first project.  Mine is below.

For the remainder of the day, we worked on vignettes.  I knew that vignettes were little images with white surrounding them.  So?  Well, it turns out that there is a real art to vignettes.  Making the image cruciform – in the shape of a cross – with portions of the painting touching the top, bottom, and sides (1 or all 4), but not flowing into the corners, makes for a vignette.  Key to an interesting picture is that each shape is in each corner is different than the others; additionally, work some of the white of the corners into the painting itself.  I was surprised to find myself rather calm today, rather than flighty and unfocused like yesterday.

Mine worked out fairly well.  A valid criticism was to make the lower windows somewhat greenish and warm, rather than a cold blue, to reflect the light of the unseen grass in the yard.  A glaze was suggested.

My second painting was supposed to be a vignette, but failed on the middle side portions.  I may go back in to fix it later.

Brenda provided all of us with incredible photos from her travels to use in the workshop, which in addition to unique items like plastic frogs and pecks of fake fruit, made for a really good experience.  My weekend was only too short!

White Space

In Western painting, white space is often something to fill up. The closest I can think of in Western painting where white space is used as a part of a picture is vignetting.

Vignetting occurs when a painting blurs towards its edges, creating a shape inside a border of white or another color. The white space encases the central object of the picture in an oval or round shape, acting as a frame to the picture itself. This is a conscious use of white space by the painter to frame a picture – it contains the picture, but does not interact with the painting itself.

When French painters of the 19th century became aware of the compositional elements in Japanese prints it was quite an eye-opener. Parts of a picture were suggested rather than seen – the imagination was used to fill in beyond the edges. Thus, in this same context, a piece of white paper has the potential for so much more than being filled in!

In her book Japanese Calligraphy: The Art of Line & Space, Christine Flint Sato writes “The calligrapher, facing the blank white page before beginning to write, does not ponder how to fill it, but how best to activate it” (p. 55). This suggests a dynamic relationship between artist or calligrapher with the white space – the white space is vital and alive, an element with its own life, its own potential, its own heartbeat and breath.

How then does the artist approach this white space? In ink painting, or in calligraphy, white can show through breaks in the ink as it is laid down – but the relationship with the remaining white continues. How the artist or calligrapher proceeds can energize the white, creating an exciting and active alliance between ink and blank paper – or kill it dead. Sato refers to this dead white as kukyo, meaning “emptiness” (p. 61). You can see Ms. Sato’s work, and some details of this book, at http://sumiwork.com/

Many books dedicated to the art of sumi-e write about its immediacy, but in practicing the art of sumi-e, I have found that I must practice to create that immediacy. This means knowing how wet my brush needs to be, how thick the ink, where I want to paint, where I do not want to paint. Japanese calligraphers, according to Sato, practice and repeat until they can produce a spontaneous – but a controlled spontaneity – calligraphic artwork.

Ink painting, as with all arts, requires practice and experience, and a willingness to “just do it”! In “doing it” skill is gained, and the mastery of the brush, the ink, the paper, the white space, give the artist a language of experience that allows, at last, that expression of self to flow so easily . . . practice those bamboo leaves every day!