Body Parts, I

These past few weeks have just flown by! I spent a number of days up in Monterey. I’ve been learning Mah Jongg (American style), playing cards, running around, taking my painting classes, and just enjoying life. I also ignore the news as much as possible.

I decided to get more serious about portraits, have done a few which I am still working on, as well as decided to go into the body parts business. It’s one thing to get all the bits and pieces to work together well in the face, but I have decided to do some studies of the eyes, nose, and mouths of different people – from photos – just to have a focus on the details of each body part.

Or, I guess, face part.

I also decided to use a new-to-me product, Arches “Huile” paper – 140# cotton rag paper treated to take direct painting of oil paints without the need to gesso its surface. The texture of the paper is not like canvas, but it is tactile in its own way, and I rather enjoyed it.

To begin . . . I decided to save the hardest part for last and begin with what I thought would be fairly straightforward. First, lips and a few teeth, then the nose, and finally the eyes.

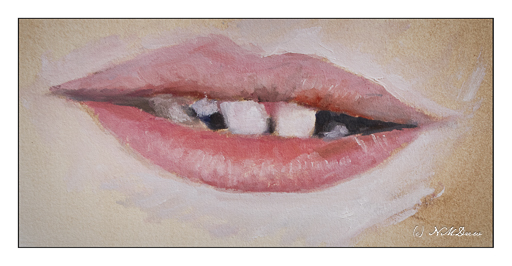
This study is from a photo of a kid just getting his adult teeth. Snaggle-toothed and chapped lips, so it was a pretty realistic photo. As this was my first painting on the Arches “Huile” I dipped my toe – well, my brush – in a bit gingerly, getting a sense of paint on paper. My brush was really small, a flat synthetic.

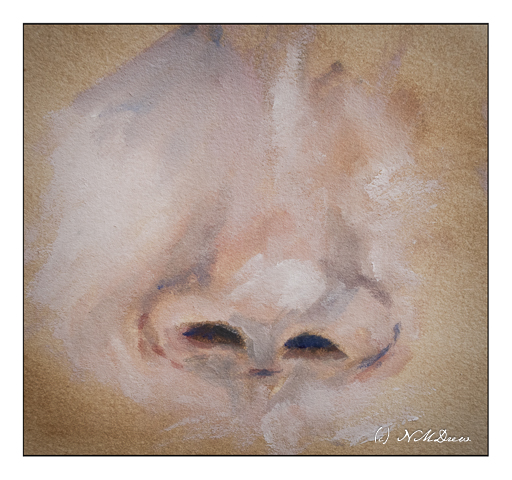
This is the nose of the same child, done separately on a different part of the paper. My brushwork became a bit more loose and I played a bit more with mixing colors not just on the palette, but on the paper as well for blending.

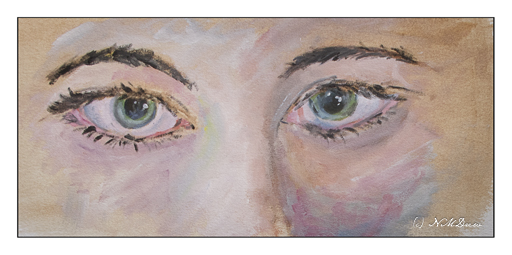
Finally, the eyes of an adult woman. I wanted something with a bit of drama, such as catch lights and strong eyebrows and lashes against a pale skin. Doing the eyes was a a bit of a slog, but in the end it seems to have worked out. Eyes have a lot of details whereas the lips and the nose had were more about color and shadow rather than itsy bitsy parts.

When I began the painting, I toned the paper for all studies with a thin layer of burnt umber, washed onto the paper with soy solvent. Once that was dried, I began each part separately by sketching it in with a small, flat brush and darker burnt umber. Once that was in place, I worked at pre-mixing the colors I anticipated I might use to match both value and color of the part I was painting. This is not my usual routine, so it was also a challenge.

After I did the mouth, I did the nose, followed by the eyes. Each time I used the same steps of outlining each part with the darker burnt umber. As many of my colors were already mixed on the palette, I added some new ones and modified the existing ones. This was rather fun and I did a bit of guessing about modifying colors, but it worked out pretty well.

My palette was restricted to titanium white, cadmium lemon, yellow ochre, cadmium red light, alizarin crimson, magenta, cerulean blue, ultramarine blue, burnt umber, and ivory black. The Arches “Huile” paper is rather nice, a bit pricey, but has a nice tooth. Other oil / acrylic papers I have used have smoother textures. Both are pleasant under the brush.

My goal is to learn to finally paint portraits with oils. It means practice and observation. I plan on continuing with this current palette and have set aside the above colors in a designated, dedicated “portrait baggy” to keep all the colors easily accessible.

Lopsovision No More

I had the second cataract surgery yesterday, on the left eye, and had the same lens implanted as I did in the right – closer focus vs. distance. The eye surgeon called me one evening to discuss choices, so I went with his recommendation.

Visual Pun?

Today, I had the 24-hour post-op check, and everything is doing very well! Eye pressure = 17 (normal is 12-25 per the optometrist) in both eyes, and I can see clearly between a distance of 8-24 inches. I used to only be able to see clearly if things were within an inch of the tip of my nose, if that gives you any idea of the change in vision.

The other rather shocking – but amazing! – thing is that I cannot wear ANY pair of my old glasses, and have to wear non-prescription sunglasses. My eyes are sensitive to the light, the left very much so, which is normal post-op. Currently I am using the wrap-around cataract sunglasses, and they really do help.

I have another post-op visit in a week, and then 2 weeks later an appointment for new glasses altogether!

I am honestly so pleased with the results so far. I have worn glasses nonstop since I was 8 or 9. Right now, none are on my face, and I can function well enough to probably drive without corrective lenses. In the mirror, I look very strange because there are no frames on my face. I will get them back soon enough – not as soon as I would like, but c’est la vie. Then the world will be even more perfect.

Eyes and Bottle

I took a few days off from painting and drawing because I needed to work on some sewing and knitting.  Made a couple of masks, and did a major step in a sweater, and those both took a lot more time than I expected.  But, breaking up patterns refreshes you – like a good vacation!

The next lesson in Keys to Drawing is to draw your own eyes!  I can’t see past my nose without my glasses, so it was a bit of a challenge.  Here I am, blindish and glasses-less.

I look pretty darned paranoid here!  My eyes are wide open and I am trying to see what I am looking at in the mirror.

The next one I did with my glasses on.

Hardly stylish, but at least I could see what I was doing!

Then, a tinted bottle.  As it is in the 90s, I have my water bottle everywhere I go.

Both assignments were to use a pencil, here an HB for both, and use lines.  The bottle neck is a bit small compared to the rest of the bottle – it’s really about 1/3 the bottle’s diameter – and a bit misshapen at the top.  I did have my glasses on when I did it.

As in painting, the idea is to go from the general (shape) to smaller details and to focus on line and shapes, not thinking, “I am drawing eyes” or “I am drawing a bottle.”  Overall, it worked.

Fish Hat: Dead or Alive (Revisited)

Years ago I made a fish hat for my husband.  It’s in the shape of a real fish, complete with eyes, fins, and a tail.  That was some 10 years ago, and over time, I have probably made another half dozen.  The fish hat is clever and a fun way to use up your stash of left over yarn.  The pattern was published in the online knitting magazine, Knitty, and you can find it here:  Fish Hat:  Dead or Alive? Because the dead fish hat was so popular, the designer even opened up a special website for more information about her ingenious pattern. The beauty of this last link is that you can find the fish hat in crochet, for charity, using a knitting machine, in different languages. If you don’t want to knit, find the crochet version at that site.

Fish Hats from the Knitty pattern site.

I even created knitted, rather than felt cloth, eyes for the dead fish.  The pattern is below:

Fish Hat [Dead or Alive?] Eyes

Cast on 4 stitches. Knit front and back of each stitch – 8 stitches. Transfer to double point needles, place marker at round beginning.

Rnd 1: Knit

Rnd 2: Knit front and back each stitch – 16 stitches.

Rnd 3: Knit

Rnd 4: *Knit front and back, knit 1,* repeat to end – 24 stitches

Rnd 5: Knit

Rnd 6: *Knit front and back, knit 2,* repeat to end – 32 stitches

Rnd 7: Knit

Rnd 8: *Knit front and back, knit 3,* repeat to end – 40 stitches

Rnd 9 and 10: Knit

Bind off.

Here is the first fish hat I made.  I made it around 2008 for my husband.  It has the knitted eyes, which look pretty good, I think.

The most recent fish hat is all stripes and has crocheted eyes.  The eyes were all done with single crochet.  For these eyes, follow the same ideas as the knitted eyes, but crochet.  It works.

I like the knitted eyes better.

With limited amounts of yarn for the most recent fish hat, I had to be pretty careful about what I used.  For instance, the tail is in two colors, not one.  The pectoral fins are smaller, too, because I was running out of black yarn.

I spent the last week knitting up this most recent fish hat – good way to listen to an audio book or watch some TV and do something productive and satisfying while riding out a head cold.

If you need something to do with your stash and have worsted-weight yarn, make a fish hat!  I’ve made a Nemo (clown fish) and others, and everyone has liked them.  The yarn is worsted weight, and my preferred yarn is acrylic, specifically Vanna’s Choice, which I find to be a very nice yarn altogether.  The original fish hat is about 10 years old, and has been washed multiple times.

This one is for my SIL who, at Christmas, said, “I’d like a fish hat, too!”  So, here it is, ready for her birthday next month.

Below, a rogue’s gallery of the fish hat in action!