Time to Learn, and a Tornado in Malibu!

Software updates and new versions come out on a regular basis. If you are diligent, you learn the newer versions and discard the old by uninstalling them. Sometimes the newer versions have features added and older ones removed for this reason or that. Usually I just install things and play. Today I decided it was time to really get my proverbial s*** together with regards to Lightroom Classic CC and On1 Photo Raw 2023.

In Lightroom up to the 2021 version of Photo Raw I could use the different modules of On1’s software individually. After that, no. I decided to get into the 2023 release of Photo Raw and figure it out. The first thing I did was to import a bazillion of presets into Photo Raw 2023. That took easily a few hours. Each preset group had to be imported individually. Argh! Why batch imports cannot be done, I have no idea – may be it can be, but I have no idea how!!

Anyway, done with preset importing, I started trying to figure out how I could get the best usage out of my LR and Photo Raw 2023 to edit by exporting an image from LR to Photo Raw. I found a great video, for Photo Raw 2022, not with the individual modules as before, but it works.

If you have struggled with LR and On1, this presents a viable option. It is not as good as the individual modules of the 2021 and earlier versions of Photo Raw, but it works. There are ways to batch edit in both LR and On1, and I do need to learn those as well.

While I was playing with On1 Photo Raw 2023, I started exploring the sky replacement element. It is really fun! Of course, you need to have some sense of matching the sky with the photo or it can look odd, but there are some adjustments it seems that you can make while importing a sky into a photo – ones that adjust the foreground for instance. If you have water, you can put in a reflection. You can also expand and shrink your new sky to a degree, as well as move the horizon and so on. Again, more study is needed.

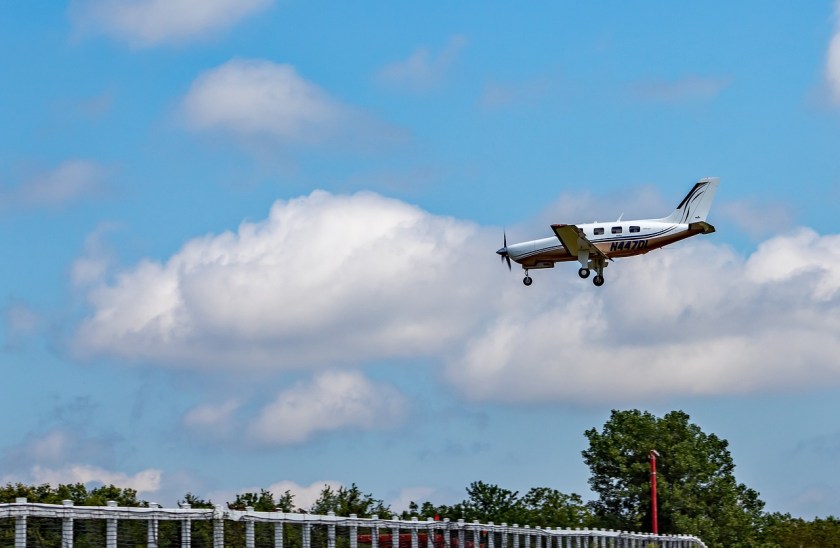
And here is just one of the pictures I played with. Below is one with an original sky – I downloaded it from Pixabay, a website with a lot of free photos for use. Per the description, this is taken in Malibu, CA. Those clouds are not common here – winter storms are usually when we see them.

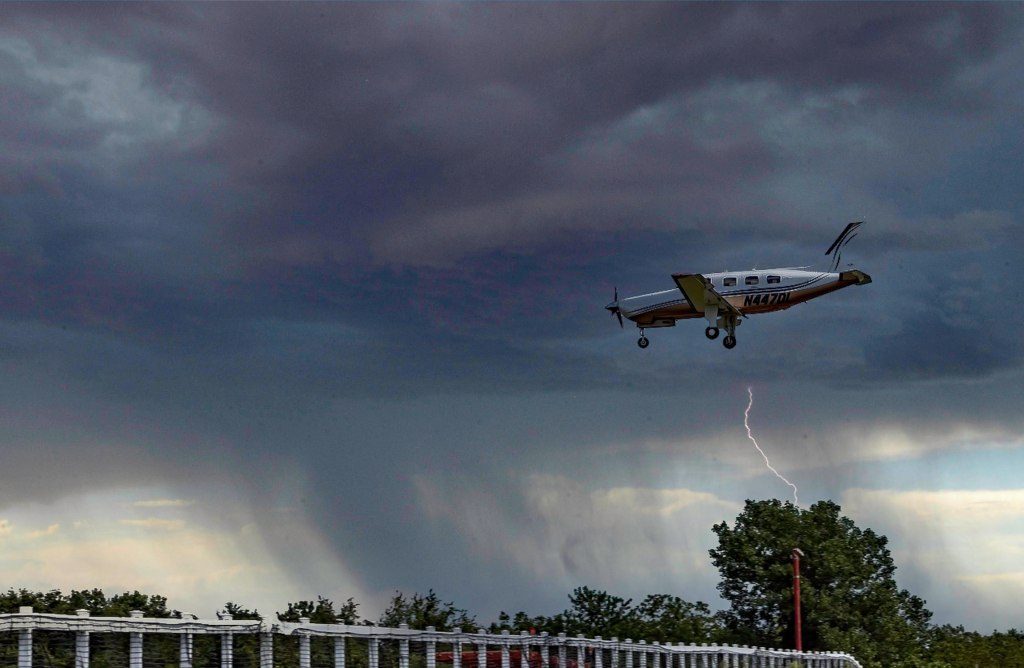
And here it is with a tornado and rain – not something you are likely to see here in California unless the world really changes!

And that is how I spent today – updating photo software, playing around, and trying to join the 21st century with AI and photography. I like the sky thingy – has potential.

And now – dinner and a walk and something other than computers . . .

Late Afternoon

Along the Chumash Trail

Yesterday afternoon I did a lot of sewing and running around to the point I so tired of the house and machines and tasks that the best thing to do was run away.

I do that a lot.

At about 5 p.m. I decided to snag the Canon G7X Mark II as all I wanted was a point and shoot and a brisk hike along a trail with trees and rocks and bugs and poison oak. It was perfect! The hills beyond the little canyon where the trail is were still covered with golds and lavender from this past winter’s rain, and alongside the trail was a profusion of mustard, monkey flower, salvia, penstemon, sunflowers and a number of flowers I don’t know. For two hours I ran around, ignoring my wifely duties of dinner (we had leftovers, so J. was fine!) and getting my mind elsewhere.

Too easy to forget about the natural world when the unnatural one demands so much time. The shade, light, sun, shadows, were not simple to get in a photo, and the colors just got burnt out in the glare or lost in the dark. In the end, a black and white with lots of subtlety seemed the best way to express the beauty of the hike.

A Cool Tool to Use When Replacing a Treadle Sewing Machine’s Leather Belt

Whew! That was a mouthful, but I wanted to get in as much info as possible as a headline.

Let me explain.

Putting on a new leather drive belt on my ca. 1911 The Free No. 5 treadle sewing machine has been like having a tooth pulled without anaesthesia – a painful, dreaded experience.

The Free No. 5 is a clone of the classic vibrating shuttle machine, the Singer 27 /28 and 127 /128 machines. On the right side of the machine is the leather drive band which is used to drive the machine with the help of your own two feet.

To begin with, a leather drive band must be purchased, and they can be found online – Amazon, Ebay, a great online shop called “Sewing Parts Online” (which also has a great YouTube presence, and which you can watch further down the line).

The drive band is usually 3/8″ in diameter, 6 feet long, cylindrical in shape, and comes with a metal C-shaped wire inserted into a hole at one end – you have to make your own hole at the other end. You can also get a stretchy band, as used on many spinning wheels, and that is also great – and a nuisance to install, too. It is melted together instead of spliced together using a bit of metal wire.

So, back to the leather band.

Before you can get the band to work on the machine, you have to remove the old band and then measure the new band. My machine’s drive band is about 5’5″ long, but to get the correct measurement, I have to insert the new band and track it around the pulley on the sewing machine, into the back opening of the table and into the wheel by the treadle and keep it in the groove that the drive band rests in, and then up out of the sewing cabinet to the front of the machine. This involves crawling around on the floor, poking here and there, and cussing from time to time.

From there, even up the ends of the drive band and then cut. And cut off less than may be needed because you can shorten the drive band, but not lengthen it. While the band is about $10, unless you have an extra band, you could just regret that first cut. As they say, measure twice, cut once. Very true!

So, once the drive band is the right length, you have to make a hole on the cut end of the band to take the end of the C-shaped wire. How to do that?

First, punching a hole in a round piece of leather evenly on both sides is a pain. Doing it without removing the threaded drive band is also a pain. If you don’t remove it, how do you hold the leather still when it wants to roll all over the place? Josh made me a jig which sort of worked – a v-shaped thingy to let the leather band rest in. I would lay the band in the jig and take a hammer and fine nail to the leather to make the hole for the wire. Taping the band in place was useful to keep things from rolling around, but if my nail wasn’t perpendicular to the band, disaster often awaited. Even an awl was no guarantee of a good hole.

And this is when the cool tool shows up and saves the day! It is like a pair of pliers in size and weight, but consists of 3 parts – a part to pierce the leather band, a part to cut the band, and a part to crimp the C-wire into place. Below is the tool closed, with safety lock on.

And below is the tool opened up.

Using this tool and the preceding steps, I installed my new drive band in under 5 minutes, and that included cutting the belt twice. Now everything is working like a champ! I can sew on my machine, wind my cylindrical long bobbins, and enjoy it all. Here is the machine, up and running!

I bought my cool tool off a seller on eBay – I ordered it, saw it was packed and ready to ship in a couple of hours, and received it 2 days later via priority mail. The company is “Lovebug Sew N Go” – 100% rating with thousand of sales. Very impressed!

The video below, from Sewing Parts Online, shows the tool in action, as well as installing a new belt. You can purchase pliers from Sewing Parts Online, and a belt as well. The YouTube video includes direct links for each.

I cannot recommend this leather drive band tool enough. It is a bit pricey, but the lack of stress and decrease in time involved to get the belt installed is more than worth it. If you have never replaced your leather drive band, of course you will find some great videos on YouTube.

My own experience, besides using this tool, is to stretch the new belt a bit, and then work the belt into the machine by inserting into the pulley, work it into the back hole of the table, into the groove of the wheel and around to the front. Pull it up onto the surface of the table and then measure, mark it with a pen. Cut the belt. If the belt wants to flop around a bit, use some tape to keep it under control The belt is then measured in length, and cut; you want a small gap between the ends of the belt – no overlapping. Insert the C-pin and then crimp it together. Test it out and adjust as necessary.

Every sewing machine and cabinet is different – some seem poorly designed and the belt may catch on the entrance and exit holes of the table. If your table and belt are at war with each other, wrap some tape over where the ends of the belt join to make for a smoother transition.

But – look at some videos first!

Potted Flowers without the Pots

I wasn’t interested in the flower pots these potted flowers are in, so I left them out. Now they are unpotted for your perusal.

Above are what are supposed to be little daisies and some lobelia. More negative painting practice, which didn’t really work out, but I did try it, both around the daisies and then painting green onto green in the greenery.

Venery in the greenery anyone?

I am much happier with this painting than the first one. Some negative painting, such as in the leaves and in the lavenders of the sea lavenders. With both, but particularly the sea lavender, I also tried to merge colors in the wet washes. There was a cauliflower which occurred in the far right sea lavender, but too much working on it made it a bit more messy. My mind was on painting colors, not really on patience of waiting for things to dry a bit – hence the cauliflower.

I worked on these this morning, painting on the patio in a bit of a gloomy day, but it was certainly pleasant enough. Being outdoors while painting certainly is beginning to have its appeal; now I think I might take a handcrank sewing machine outside to enjoy more of this summery now sunny weather whilst I sew!