Outside this time, sitting near our picnic table, looking at a pot of pinks on the patio and some backlit orange lilies. On the table, a sudden plop, and who is there but our athletic dog, Smudge. A few licks on the ear, a number of turns on her cushion, and she is sprawled out in her favorite spot. She loves to jump up onto the table, in part to get away from her sister, Inky, and because she likes to get up on stuff. She used to climb a tree in our backyard . . .
But, I digress. This time I decided to work from real life. It’s gloomy and overcast here in California, typical for this time of year along the coast. Even inland, we still enjoy (or not) the May Grey and June Gloom. Perfect for being outdoors – comfortable. And good for plein air.
First up, pinks or dianthus, members of the carnation family. I worked on these with two goals – large washes of color to become defined in shape by negative painting. I did the drawing with a Micron .oo5 pen, a waterproof pen with a delicate tip and good, dark ink.
While that dried, I started the next painting on the opposite page in the sketchbook. Here I used much the same approach – drawing in waterproof black ink (this time using one with a thicker point) and then working on colors and shapes, and giving more shape to leaves and flowers with negative painting.
Both of these are painted on 100% cotton paper and I am much happier with the results. The paintings are a bit fiddly, but it is also the result of trying to capture the flowers and leaves in light and shadow, painting from lighter masses to more detail, trying to indicate stems, leaves, and individual flowers to some degree which is identifiable but not like a photograph.
Today’s adventure was more to my liking than yesterday’s with the not very pretty pale waterproof ink. I feel a bit more successful about the end results. And I certainly am a lot happier with the paper.
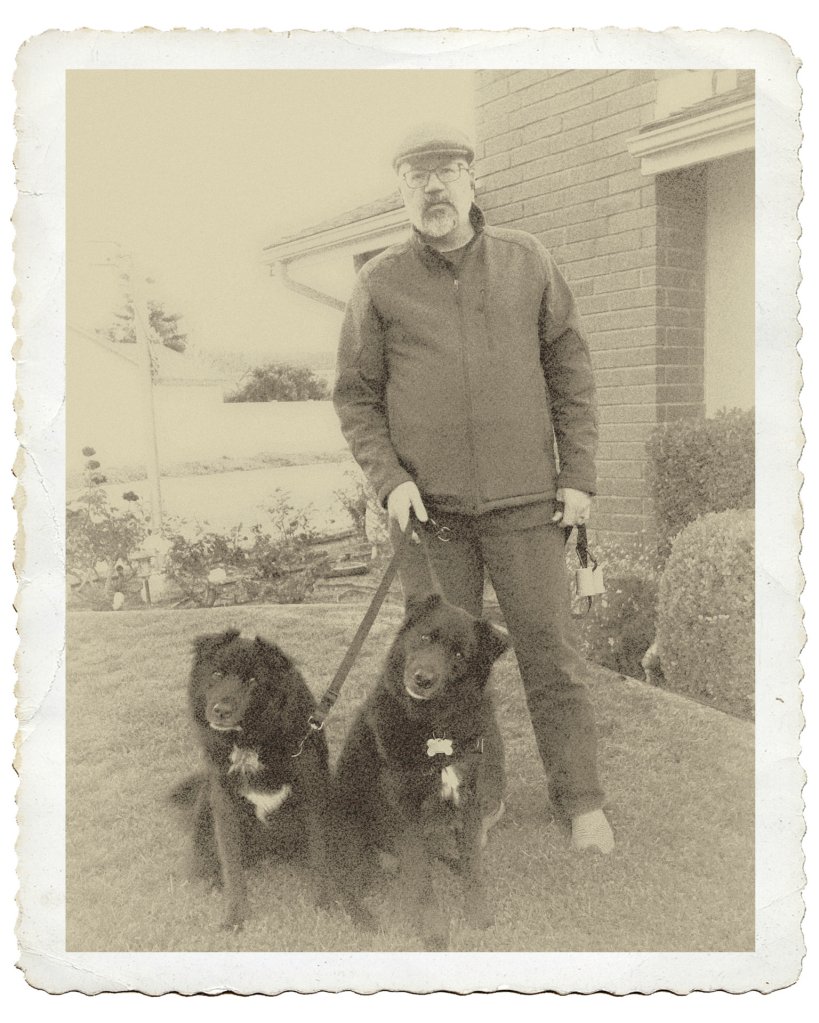
Coming from a family where family history is lost or suppressed or deliberately forgotten, I always have a bit of nostalgia for old things and memories and stories. Life in the future seems forbidding and apocalyptic, especially these days, so looking backward to areas of familiarity feels good and safe. Good because there are good memories, and safe because I know what was what (as best one ever can), and even though there were areas of ambiguity or fear or confusion, familiarity can help. Getting older has the same effect – familiarity. Falling in love as a teen is not the same as falling in love at 40!
Anyway, I put the black and white capabilities of a digital camera to work. The original photo was quite gritty and really not interesting as far as I was concerned, but then I putzed a bit and thought that a sepia print – faded black and white – and a deckled border could do the trick.
Artistic impulse satisfied!
Nostalgia satisfied!
Good memories of esposo and pooches add to the mix, and here you are.
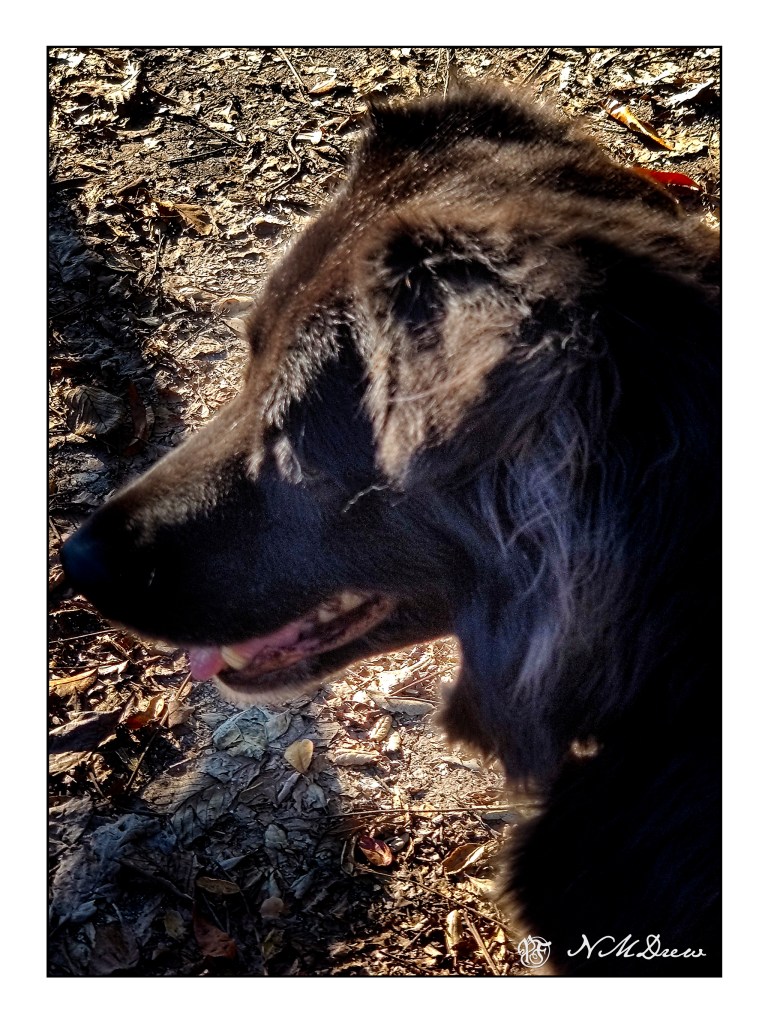
I always love a walk in the local botanical garden, but I haven’t been for awhile with one of our dogs. I fell down a hillside because one of them pulled me off balance – squirrel! – and am rather uneasy, but today I went. Luckily, nothing happened except beautiful weather, spring scents, new leaves, narcissus, and bulbs. I didn’t plan on taking pictures, but my trusty phone came in hand. Smudge brought her nose and one helluva good time.
The people who care for the garden do a wonderful job, and spring cleaning, or new year cleaning, came as the underbrush and detritus of last year has largely been cleared away. Only fallen leaves and new plantings – even my favorite old oak tree that usually has a pile of leaves in its center where branches grow was clean. Maybe the wind, maybe the fairies in the wood.
Tree Nymph Watching You . . . Beware!
Because of my fall down the hill with Smudge, I decided to take the easiest paths I could find in the climb to the top of the hill. Switchbacks with low degrees of ascent and descent worked, and we had a wonderful walk.
The Beautiful Smudge
We spent a few hours wandering around, sitting on benches, observing people and plants, listening to squirrels and crows, seeing lizards climb trees and play hide and seek in the ground cover. Smudge sniffed and climbed up on the benches to keep me company.
“Le Grand Pin” and New Bulbs
This is a beautiful pine, and though I have no idea what it is (and no label to be found), it is at a corner of the garden, like an old and dear friend welcoming you back.
Spring is Springing!
These bulbs are always so cheerful. They bloom for months and are a bright splash along the trail.
Last Year’s Leaves
These caught my eye – last year’s foliage, or this years tinged by frost? (We have had some below 32F nights!)
Old Oak
This is my beloved oak tree. It must be 500 or more years old – young when the Spanish first came to the area? Who knows . . . .
First Narcissus
I love looking for the narcissus planted throughout the gardens, and the daffodils, and the iris. They all bloom at different times.
“Le Grand Pin”
The pine tree from a distance. The rocks lining the pathway are new this year!
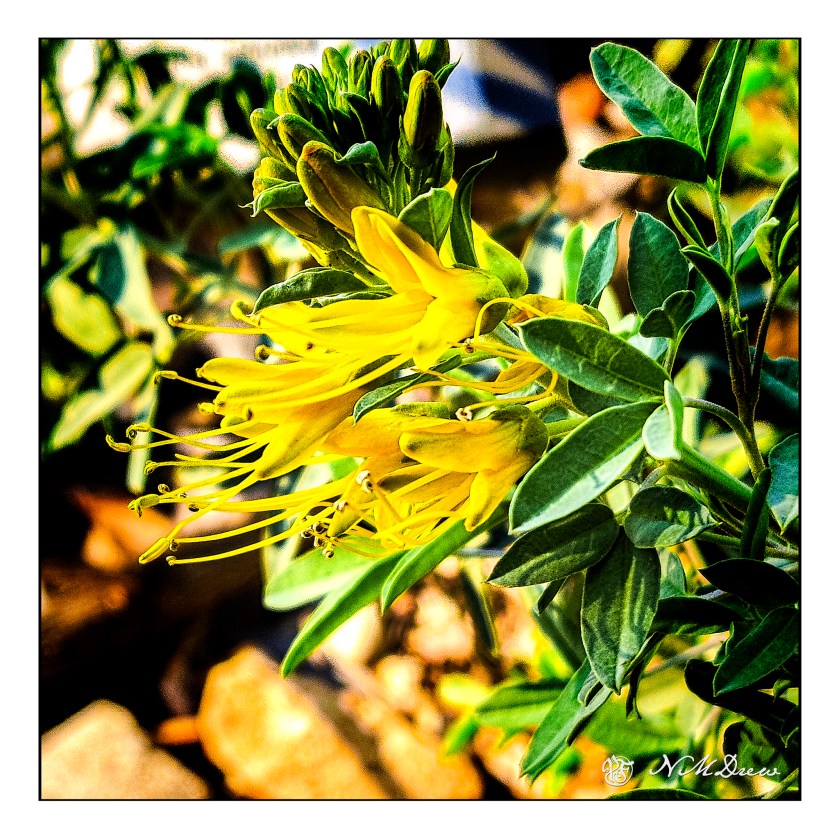
Bladder Pod in Bloom
This is a native plant, and it’s rather a fun one. When thebladder pod to spread its seeds, the bladders explode and send the seeds flying in all directions.
Initially, I didn’t plan on ending up at the botanical garden; rather, the goal was the dog park. However, it turns out that on the third Thursday of the month, the dog park is closed for cleaning and maintenance. So, how lucky were we to be able to enjoy this wonderful day?
Both Smudge and I have been hiding. Inky is not even letting me take a picture of her . . . hopefully, we will return sooner rather than later! It’s nuts, as always, with the holiday season!
Yep, the sewing cabinet arrived yesterday. No drums or Main Street parades, but locked up dogs and both front doors open. This is a floor model of a cabinet made by Koala Studios, and the quality is superb. Even better, it’s domestic, and that makes me quite happy.
Warning! Lots of external links to Flickr (where you can enlarge any image) and watch a video I made of the machine support going up and down.
Tim, from Kingdom Sewing, along with his kids and a friend, delivered it. The whole process went smoothly and quickly. Tim explained this and that, as well as showed how things work. Let us begin!
The cabinet against its blank wall. I have to fill up that space! It stands between the door to the hallway and the bathroom in the master bedroom. It matches the oak trim and base board (removed and not yet replaced, sigh), but doesn’t work with the floor. My opinion.
If you enlarge the photo above by going to Flickr (click on picture), you will see the plug that covers the machine lift that lowers and hides the machine into the cabinet. The cabinet itself measures 53-54 inches wide, 26 inches deep, 33 inches high. An extension table in the back doubles the depth of the table to 52 inches.
In the US, 29.5 inches is a pretty standard height for work surfaces, so I am actually a bit higher up than at the dining table, where I currently do all my sewing.
The cabinet rolls about extraordinarily easily and smoothly with very high quality casters that can be locked into place. It moves far more easily than my smaller white sewing cabinet. Wow! is all I can say to that.
Another image of the cabinet closed, with my floor lamp I use. It will be on the left side when I sew. If you click on this image (and any) you will go to my Flickr page. Admire the paint can we use as a door stop . . . and I need to get something on that wall above the cabinet. Ikea pegboards? A painting? Shelves? Walruses and peanut butter?
Here, the machine plug has been removed, a rubber cushioning mat (to cut down on vibration and to protect the surface from any ickiness under the machine), and a machine placed on top.
Here the cabinet is opened. My flashlight is on top. The doors are opened and folded to accommodate the shelves that can be mounted on top of them. Each shelf has pegs that you attach to the bottom of the shelf. These shelf pegs then can be inserted into holes on the tops of the folding doors and locked into place. The doors can be moved around or locked into place by locking the wheels.
This is the left side of the cabinet. The shelf is smooth. It can be used to support a serger, swung in to support fabric at the far left of the cabinet, or swung in closer to support long, as opposed to wide, bits of fabric, when the extension is fully to the left.
There are three drawers on the left of the machine, and because of the taller height of the cabinet, there is also a shelf cubby for a shallow storage container. To the right of the bottom drawer you can see a shelf. This is a foot rest. It comes with different footings so I can make it higher if I want – this is great for either tall people (shorter footings) or short people (taller footings). I haven’t figured out what I need yet – I have to see if I want to buy another chair or just use the one in the studio at the drafting table.
The right side of the sewing cabinet is wide open, with the doors swung as far back as they can go. The notion tray is on the top. In the back left, you will see some black – these are holes into which I can place scissors to hang down. The other indentations can hold things that might roll around, such as spools of thread or a bobbin.
Again, you can see the foot rest on the bottom part of the cabinet, and the cubby at the top of the drawers. On the left side of the open space (knee space) is the left side of the motorized machine lift, which is currently up. The indentation on the top of the cabinet shows you this.
This is the notion tray. The two black rings are for scissors. If you look closely at the lower left, you will see the power switch, “on” with the blue light apparent, that allows you to raise or lower the machine support as you desire.
Here is the power switch, turned on. As you can see, there is also a “remote control” for the machine lift! I can have it on or off.
Remote control! Notice the different shape of the up and down buttons? How clever is that? I did a phone video of the lift going up and down with a machine on it. I filmed it with my cell phone and triggered it with the remote control. When I try to put it into this post, there are weird gaps above and below it, so click on this link to see it if you want: https://flic.kr/p/2kNLDU8
The extension is supported by two flanges which roll out. The one on the left is snug against the undersurface of the extension, but the one on the right needs some help. It flops around a bit. That is a problem to be solved in the not too distant future . . . As you can see, there are also holes for electrical cords, one at the top for lamps, and one at the bottom for the machine lift on the motor. I am still working that out how I want to set it up.
Here you can see how smoothly the extension sits next to the table itself. This prevents snagging of fabric as you sew.
I’ve rolled the cabinet out and lifted up the extension, holding it in place with two supporting panels which swing out. The machine is totally raised up and resting on a rubber mat which will prevent damage to the surface of the machine support.
Smudge is here to supervise. She likes a photo op whenever possible. (Or is it a photo bomb?)
Sewing machine in place, notions tray in place.
Nice hardware, baby!
Ready to sew! Good light, adjustable chair, table extension, notions tray.
And there you have it! It will take a bit to work out how to do things and figure out what will work to my liking and my needs.
The extension table will be useful to support large items I am sewing. An issue with it is that one of the extensions appears to be a little short. Lopsided floor? I will have to move the cabinet around a bit to determine the situation, have Josh look at it, and / or call Tim.
I will want to put a mat under the chair to keep from wearing out the flooring when I roll around. The chair is adjustable in height, but may be a bit too wide and too deep for proper support when sewing for a long time. Lumbar support means a less deep chair if it is going to work. The foot rest inside the cabinet may need to be raised with the longer footings. I prefer to have my knees up and bent a bit, not dangling or having my toes lower than my heels. The chair itself is nice as it has a foot rest on it, but may not be the best when sewing. Again, that will need to be worked out.
The notion and side trays must be locked in on top of the folding doors. If not, they will topple off and break or otherwise get damaged. I managed to do it by myself, but that screwdriver needs to be close at hand!
Altogether, I think this is going to be a great bit of furniture to use while sewing. There is a lot it has to offer and adapts to situations and needs.