Indigo Batik & Miraculously Easy Wax Removal

Warning!    A very long and windy read.  Get your coffee or tea, put your feet up, and follow along . . .

I was going through my archives thinking I might have written something up about the last time I did indigo dyeing, but I  guess I didn’t.  So, we shall begin sort of at the beginning!

Indigo is a wonderful dye, and I have used a variety of methods to extract the blue color.  Over the 40-odd years I have been dyeing, I have used urine, sulfuric acid, and finally a kit.  The kit is the best and easiest and least time consuming or hazardous.

Indigo is a plant that is used to dye fabrics of all kinds – plant and animal fibers, cotton and silk – for centuries.  In the dye bath, it is a disgusting greenish yellow – not like spring’s new leaves, but a pukey army green.  It also doesn’t smell appetizing. To create a dye bath, you can use all sorts of chemicals, save your urine, or buy a simple kit.  I like the kit that is available from Jacquard – small, easy, convenient.  For the bulk dyer, this would not be a good buy, but for a small once-in-awhile dyer, it is great.  You can buy it from Dharma Trading, Amazon, or KnitPicks, to name a few places.

Indigo Tie Dye Kit

Last year, my MIL Judy came by and we did a bunch of indigo dyeing. We dyed yarn and fabric, doing flammegarn and batik as well.

Flammegarn dyeing involves taking a skein of white yarn and tying off areas of it. The binding material acts as a resist. The yarn is then submerged into the dye bath, and the color is taken up.  Multiple colors can be used, and multiple dippings.  The result is a randomly mottled yarn. I believe this is originally a Scandinavian technique – the name implies such – but I am sure other cultures have done it as well.

Batik is the use of a resist on fabric to prevent colors from dyeing the fabric. Wax is the traditional resist. Multiple layers and colors can be built up, and complex patterns can be created. You can apply the wax with a brush or a stamp, a stencil, or a djanting tool.

Removing the string resist in flammegarn is easy, but removing the wax resist in batik is problematic. Removing the wax from the fabric is a chore. Boiling or near-boiling water is needed to melt the wax. Once that is done, by dipping the cloth multiple times into boiling water, it is then further treated. It can be sent to the dry clearer and chemical solvents used (ick!), or you can iron it between layers of newsprint using a very hot iron to remove the last of the wax. I have always done this, but it never really did the trick. There was always a residual coating of wax that never seemed to leave the fabric, even after multiple washings in hot water, in the sink, in the washing machine, and ironing. However, I have now discovered how to remove wax quite easily!

First, though, let’s back track a bit. Judy took a brush and a lot of wax to her fabric (cotton or linen or a mix thereof we are not sure). Here is her material, dyed and waxed and now awaiting wax removal. This material is very stiff, and if you want to crumple it up in a ball, forget it. Instead, you really have to fold it! The wax then cracks and falls off if it is really thick. I don’t think you want to take it to your sewing machine in this condition! The fabric measures about 40″ wide and about 1.5 yards long.

Yesterday morning, Josh and I worked on getting the wax out. Below you can see what we did. Josh pulled out his brew rig, which runs on natural gas from our home, and set up my 4-gallon pot with water on the middle burner. Behind Josh is his 15 gallon hot liquor tank that he uses to boil water in beer making. It has a temperature gauge on it along with a spigot to which you can attach a hose. You don’t want to lift this boiling water, so he uses the spigot and hose to move hot water to his other kettles when brewing. This set up worked out really well for us as from the liquor tank we could easily and safely move the boiling water into the galvanized wash tub you see next to him. (All that red stuff behind the brew rig are car panels for the 818S!)

The 4-gallon kettle took minutes to bring to a boil, and so we moved it into the galvanized tub. The indigo-dyed cloth was submerged, and stirred. The wax began to melt out of the cloth, and some of the indigo dye bled out. I used wooden dowels and spoons to lift the material in and out of the water, stirring it and mushing it around.

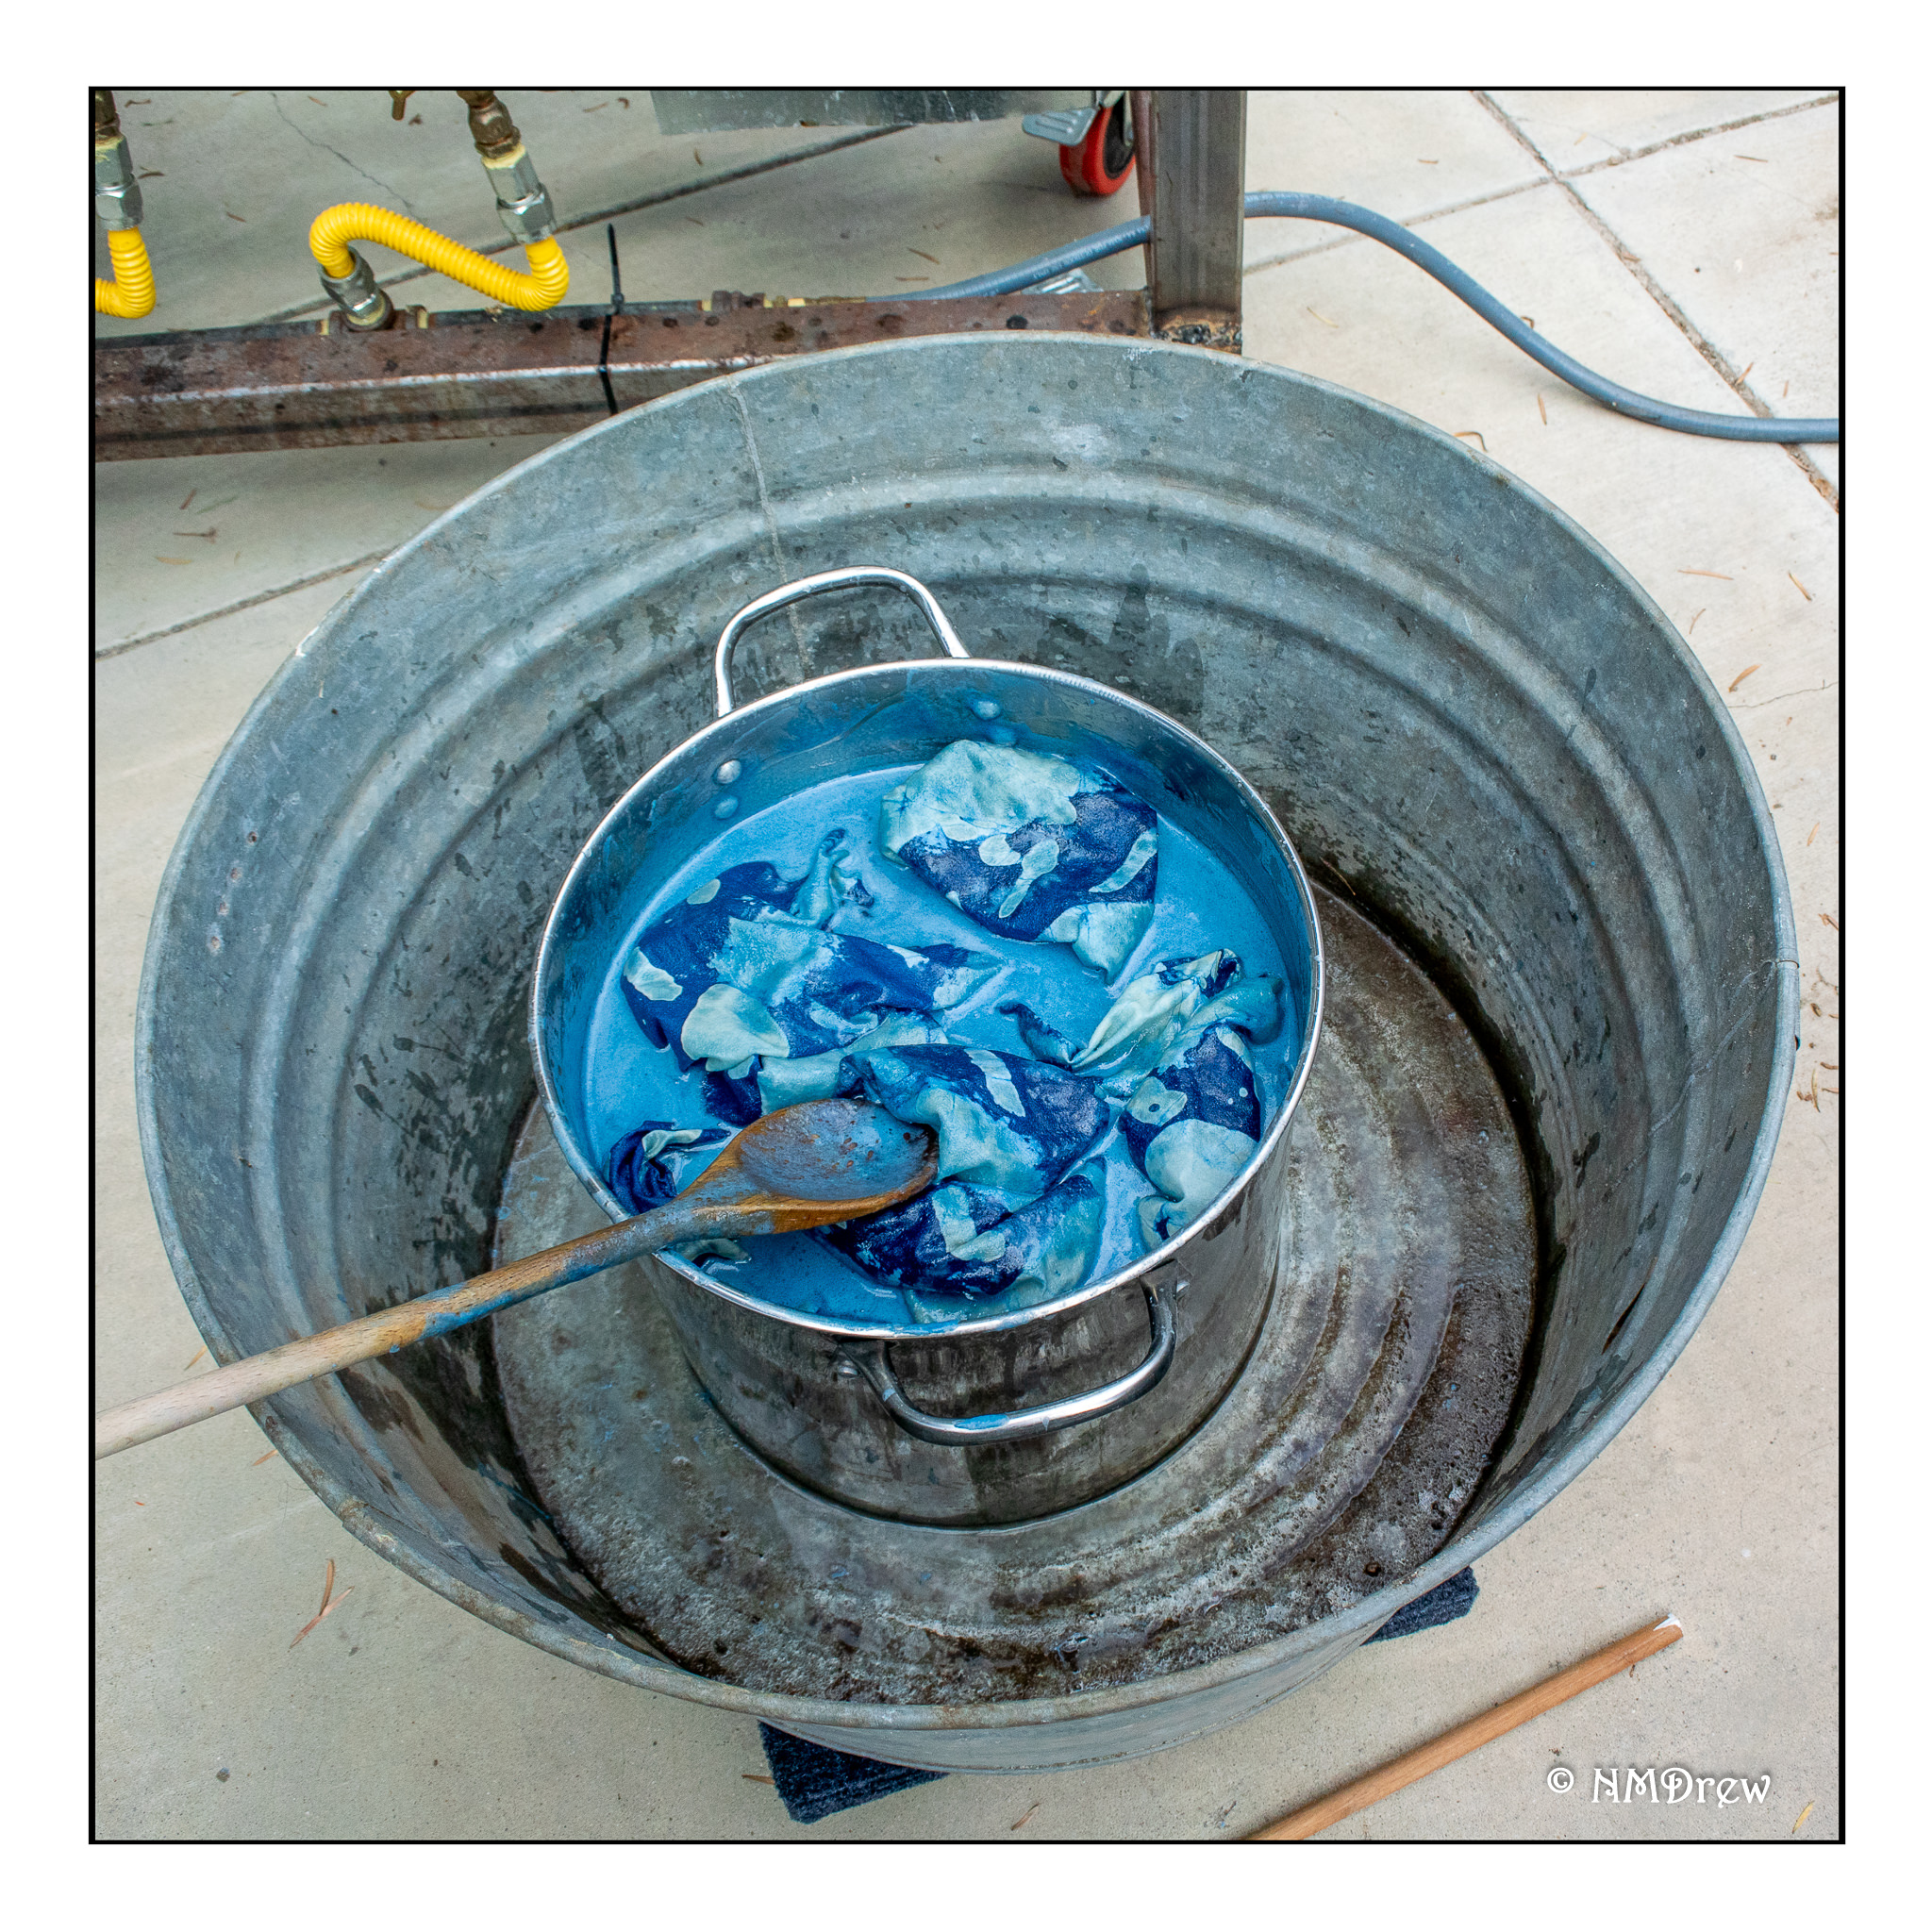
Here is a close-up of the spoon, fabric, melting wax and hot water. Water dripped and splashed into the galvanized tub – I used that to scrub out the dirt before we added the water from the liquor tank. Pretty efficient, eh?

After several dippings and stirrings, the fabric was removed from the 4-gallon kettle. Wax and murky water remained behind. You can see the liquid wax on the top of the water, and the hardened wax on the sides of the pot. It is interesting to note that the water has a greenish cast – water when you are dyeing indigo is also green. The blue color of indigo does not occur until the fabric or yarn is pulled out of the dye bath and exposed to oxygen.

Using the dowel and spoon, the fabric was lifted out of the pot and allowed to drip into the 4-gallon kettle. Here are the remains of the wax after the water was discarded. This was taken the next morning after the water had cooled and the wax had risen to the surface of the water. You don’t want to be pouring this stuff down your pipes!

The secret for easy wax removal is now revealed!  Read on, oh fans, read on!

The wash tub was then filled with hot water from the liquor tank – 15 gallons of boiling water. About 1/4 cup of dish soap (Dawn concentrate) was added to the water and stirred into the water. And that is the secret! The soap emulsifies the wax and allows it to be dispersed into the water or something.

The fabric wanted to float to the surface of the water, even after squishing out the air bubbles. I stirred and lifted the fabric again, making sure to mix it all up really well in the soapy water. Interestingly, no suds developed. Before sealing it to cool, I weighted the fabric down in the tub with some bricks to ensure it did not rise to the surface and collect any wax which had been removed. Then, we sealed if for the night! We used the wheels from the donor WRX. Our goofy dogs wanted to taste the soapy water, and I wasn’t inclined to let them indulge.

The wash tub and tires sat over night, to let the water to cool. The bricks would prevent the fabric from floating and getting re-waxed. The next morning, the tires were removed, and this is what we saw! No wax on the cold water’s surface!

I was really quite surprised. Never have I had such an easy time removing wax from fabric before. I pulled the material out of the tub, placing it into a bucket, and taking it to the kitchen sink. I wore some nitrile gloves (I didn’t want to turn blue) and rinsed and squeezed the fabric in the sink. From there, once the water was clear, the whole thing was carted to the washing machine, loaded in with hot water and laundry soap. When the cycle was done, into the dryer  for the final step of ridding the batik of wax.

And the washer and dryer are perfectly fine, thank you very much.

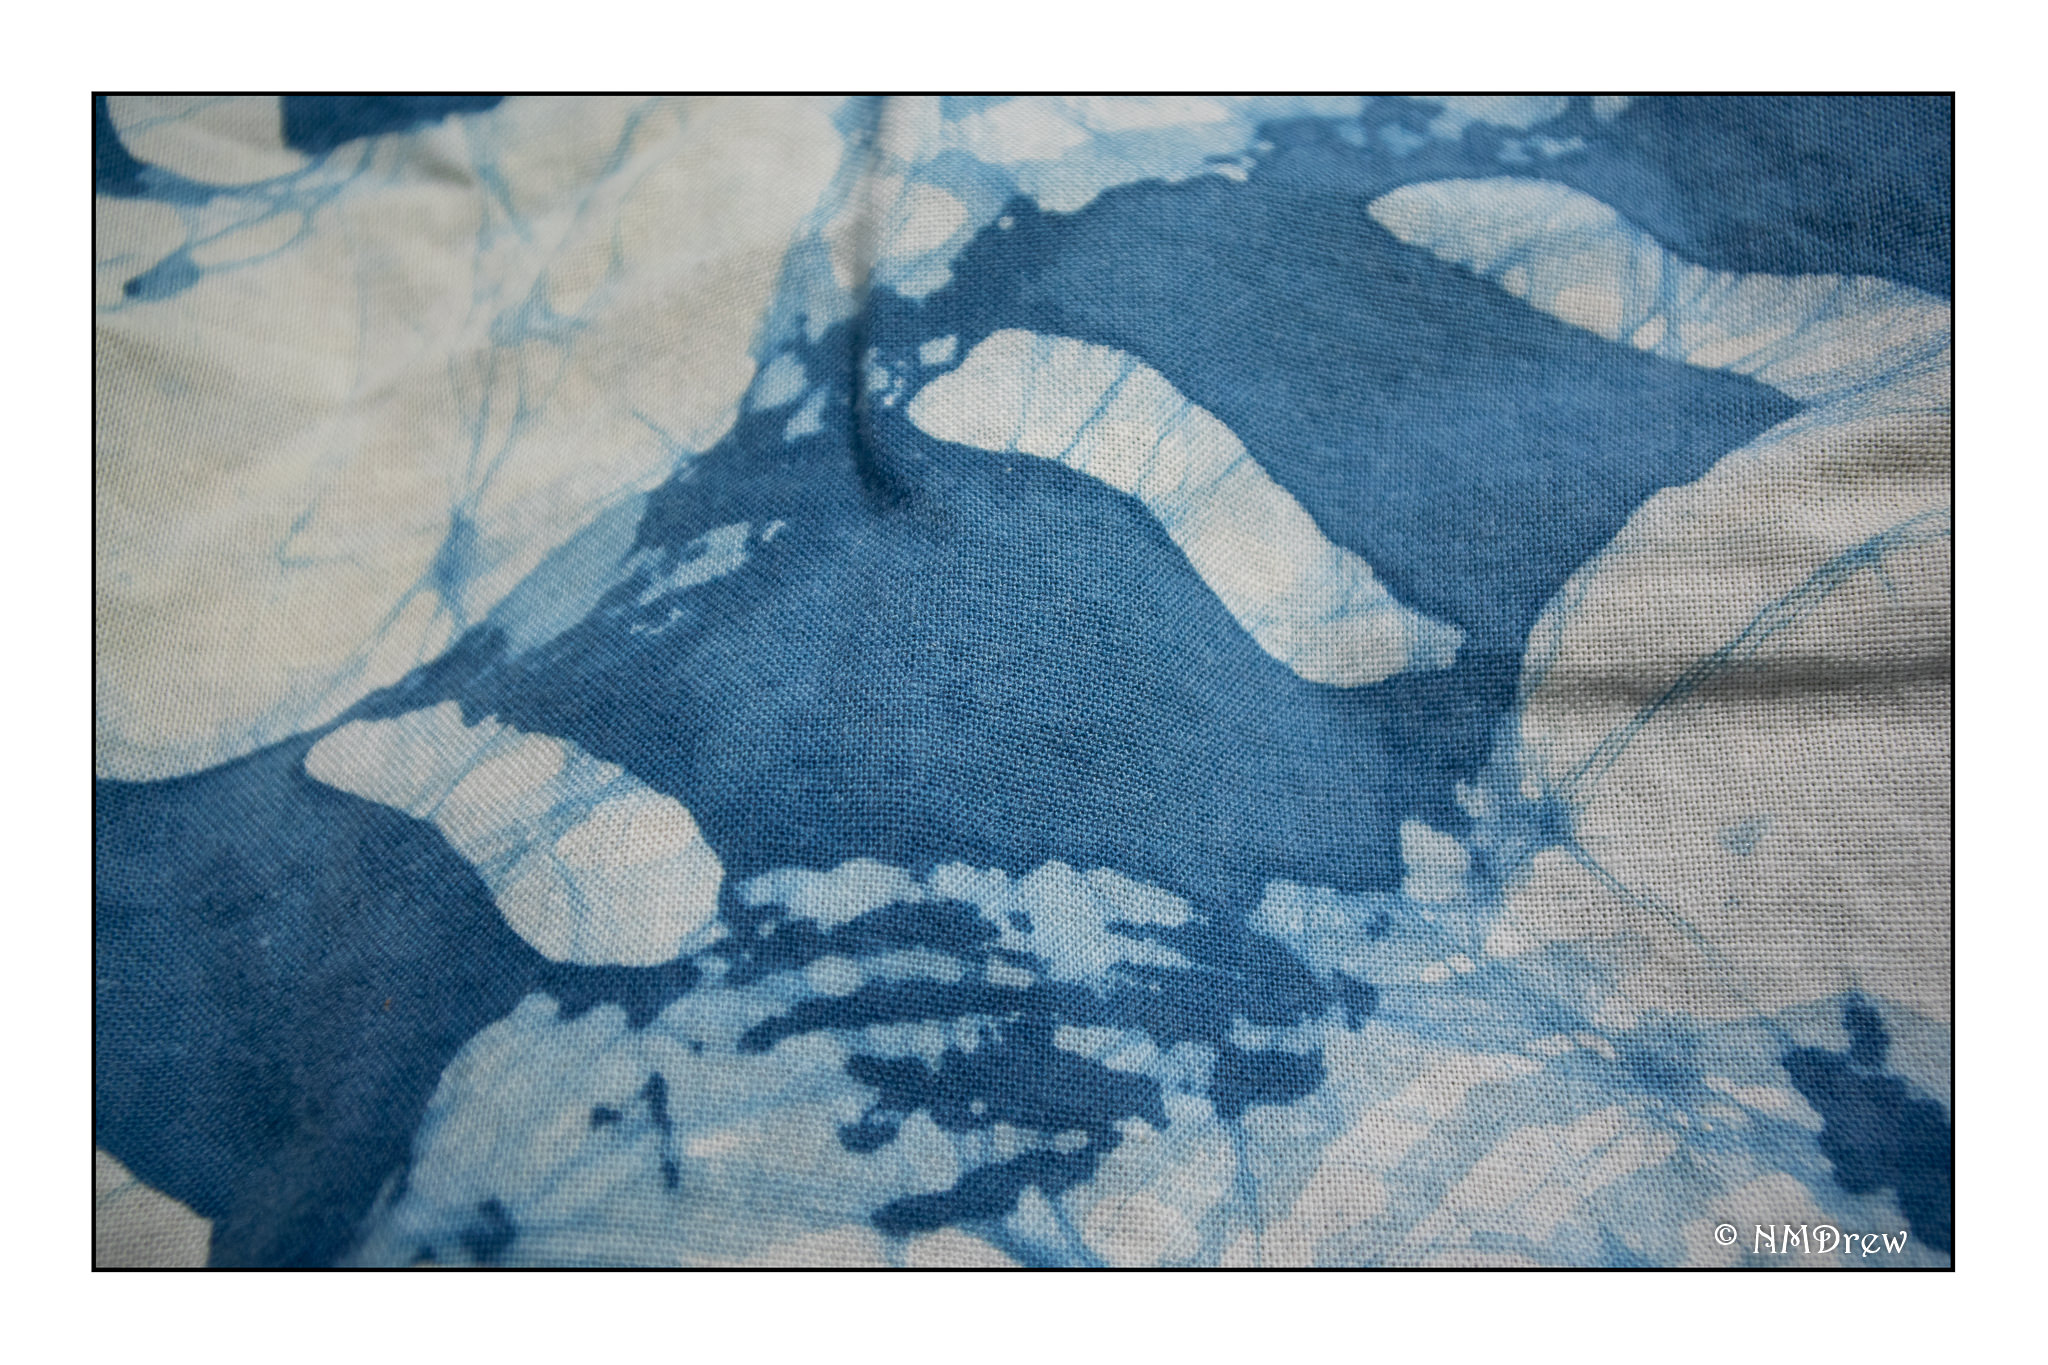
The fabric is now supple, easily crumpled into a ball, and ready to be sewn into a skirt of some sort. I think it would make a great sarong! Here are more pictures of the final cloth – all it is needs is a bit of ironing and styling.

A close up shows how the wax cracks and the dye seeps in, as well as how it colors areas with less wax. The thicker the wax, the less likely the indigo or dye is to seep in. Because the wax was thickly applied, cracks easily develop. Areas where thinner wax is applied and not worked into the fibers are more likely to take some dye, albeit less intensely.

Finally, a closer shot showing the weave of the fabric – and I think it is linen! The texture of the weave is more irregular that cotton, but the fine weave of the fabric made me wonder.

And, at last, this beautiful indigo-dyed linen fabric is crumpled up and ready for its next iteration!

Vagaries in the Real World

In my perfect world, I would paint every day.  In my real world,  I have limited time just because I have so many interests.    Little things can become big things, not necessarily bad, but in the sense of taking more time than planned.  Also, life can produce some interesting lessons.

For example, I have recently found that 3M 101+ tape is the best tape for watercolor paper borders.  Lightweight, seemingly impervious to unsticking with a lot of  water from a wash, easily removable without tearing paper even when not using a blow dryer to warm it as you pull it off . . .

We bought a motion-activated infrared trail cam to determine what critter was destroying our plants in the side garden.  Mouses!  Traps caught one with cheese –   ours seem to dislike peanut butter.  I think they have learned their lesson.  The leaves are returning to the plants they ate.  They also figured out not to go into the traps otherwise chompy chompy.   Fortunately, I don’t deal with the traps or dead things.

The 818S is going along nicely.  Brakes are the first big addition to it.  Josh has been riveting and blogging away at 805-818.com if you want to see.

I am sewing masks again, this time on my Singer 403A.   Threads need cutting, something that a computerized machine automates along with back stitching.  Technologies have changed since the 1950s for sure!

The ham will be used to iron out the masks I am currently sewing up.  Thanks to AVWalters for that suggestion!  I don’t tend to iron them, but why not as it is waiting to be used, looking very ham-like and hamsome.

I have also decided on the pattern to use and material for my 1920s dress.  Now, after the masks are done, I will dig out the pattern and determine if I have enough material in my stash for it.  If not, what?

Also, decided to do more medium format photography with my Big Beast cameras – the ones that have modular parts or interchangeable lenses.  They weigh in at 500 lbs. easily, so a neck strap and a tripod or monopod make photography life easier.

With the sewing project and photography project, as well as oodles of appointments – 3 this week, 2 next – painting and drawing of course have gone to the wayside.  I don’t see this as a bad thing, but something to return to refreshed by not being there.  I see it as a vacation.  Go away.  Come back.  Refreshed by the differences.  Eager to begin again.

Oh, and I have a sweater to dye with indigo, another one to start work on, some spinning to do, and some shibori to plan when I do the indigo dye day.

And a bike to ride.

Ciao for niao!

Iron Gall Ink – A Quick Update

I spent most of the day dyeing with indigo on yarn . . . and some silk. A long day! But, on the list of things to do was to decant the iron gall ink I have been making over the past week.

Success! It is a really beautiful ink! It flows well off the flex dip pen nib as well as the quill I cut a few days ago. I’ll blog a bit more about it later, as at the end of a long day, I’m really tired, but really content with both the dyeing and the ink.

Saturday Dyeing

Jacquard Indigo Kit

I spent all day Saturday dyeing yarn with indigo, cochineal, and quercitron (yellow oak bark).  Judy came out from Ventura with three skeins of white yarn, one of which was 100% washable merino, another was merino and nylon, and another of merino and silk.  Mine were all 100% wool, specifically the Crazy Eight yarn from Wool2Dye4. I gave Judy a skein of the Crazy Eight, so all told, we had 8 skeins of pure white wool for our projects.  I also had two skeins of Sea Wool I had dyed using cochineal, one lighter than  the other, and a skein of moorit Shetland which I had earlier dyed with quercitron.

Indigo Vat

Friday evening, I set out 15 g. of quercitron bark to soak overnight, as well as 10 g. of cochineal mixed 10 g. of tartaric acid. Saturday morning, once we got the first dye bath heating, we set up the indigo. After my earlier disaster with indigo, I decided to order a dye kit from Dharma Trading Company, in Berkeley, California. This is a very tidy little kit, well worth the small price – kind of like frozen vegetables in midwinter – a definitely good thing to have!  The only thing I needed to buy was a container with a lid – this little kit produces 4 gallons of intensely blue dye, and we certainly did not make a dent in it.  Putting the container – a commercial food storage unit – on a furniture dolly was a good thing to do, too, as that is a lot of weight to carry around.

Cochineal Skeins with Overdyed Skeins on Outside

We found out, very early, that the indigo in this vat is very strong. I dipped my two cochineal Sea Wool skeins in the vat once it was ready – and they turned deep blue violet after only a minute in the vat. Oops! I was aiming for lavender! You can see how dark the two cochineal skeins became, as well as the original shades of pink. We used this knowledge to good advantage later on, and diluted the strength of the indigo by taking a couple of cups and pouring it into water in another container. Much nicer! The lavender and greens Judy got were all done with a diluted indigo bath.

Judy's Lavender (Indigo Over Cochineal) and Green (Indigo Over Quercitron)

To get her lavenders and greens, Judy did two dye baths. The first was a purely yellow skein in the quercitron, and a purely pink skein in the cochineal. As her skeins had different fiber content in them, as well as had been treated to be washable, her colors were not as intense as the Crazy Eight yarn, which is a washable merino, but is made up of 4 2-ply strands plied together. Because of the silk in her yarn, all temperatures were carefully controlled not to exceed 180 F. – important to keep the luster of the silk, as well as to keep the yellow from drifting into drabber shades.

Indigo-Dyed Moorit Shetland

If you are unfamiliar with indigo dyeing, you might like to know that before you get the blue, it is green in the dye vat; the oxygen in the air creates the blue color. You can see that the large vat is green in color, with a bluish rim at the top. As a result, it is difficult to gauge how dark your indigo will become once exposed to the air. So, as I said, we diluted the indigo with more water. Then, to get the gradated yellow-into-green, and pink-into-lavender, Judy dipped only a part of her skein into the indigo, and slowly squeezed the dye into other areas of the skein once it was removed from the weaker solution. Doing this three or four times, she made some very nice space-dyed yarn.

For myself, I wanted to preserve most of my skeins as solid colors, and so chose to do one skein in pure quercitron, one in pure cochineal, and one in a medium indigo. My last white skein was tied off in the traditional flammegarn method. and dipped first in the cochineal, tied up some more, and then dipped in the indigo. The results were quite pleasing altogether. I was also quite pleased with the indigo-dyed moorit yarn – it took on a pleasantly greenish cast.

Left to Right: Tie-Dyed, Quercitron, Cochineal, Diluted Indigo
Judy's Indigo Overdyed Flammegarn

Saturday flew by! By and large, Judy and I were happy with our results. Judy had done a flammegarn in quercitron, cochineal, and indigo, but it was too pastel for her tastes. Rather frustrated, she dumped it into the undiluted indigo – and lost all here cochineal. However, the yarn came out really nice, despite that. In place of the yarn she didn’t like, she got one which is mulberry and teal, two of her favorite colors. The picture here is a bit too intense – the graduation between the purple and teal was far more subtle, with the teal being darker.

Our working concept was to use the lightest colors first, and then move to the darker ones. This meant yellow, then pink, then blue. I was not really pleased with the green we got using this method. Looking around, I see some people dye with indigo first, and then with a yellow overdye. I expect that the initial indigo has to be relatively pale to achieve middle greens. This is something I plan to do at a later date, and while greens are often readily available in other dye plants, the ones done with a combination of blue and yellow seem to be more vibrant. Color mixing is an art, and not knowing how something works best is frustrating, but at the same time so much fun. Since I am not a professional dyer, I am not too concerned about creating repeatable products, but I do like having control over my results a bit more. This is where a sense of adventure is important, as well as a willingness to try something. Theories often do not work with realities!

That said, here are the skeins, all hung up to dry a bit before getting dinner ready for the men.

Thockies, ii

Having another week off before returning to school is soooooo nice! I’ve been able to sort out yarn, focus on designing a few things, and soon enough, get some sumi-e done as well.

I was pretty sure I would make socks out of the Riihivilla yarn – and decided that is exactly what I would do. My final choice of contrasting yarn was a warm, naturally creamy white. The warmth of this white is far nicer with the colors than the stark, wintery white I first considered, and does a lot to bring out the warm reds of the cochineal and purple of the variegated yarn.

You can see from the pictures that the color differences, while subtle, are readily apparent. The hand of the wool is very pleasant and has a nice bounce to it.  I’m looking forward to wearing these socks!

When you dye with natural dyes, it is very easy to make a yarn become harsh and unpleasant, partly from the handling of the wool – such as extreme temperatures – or the chemicals involved. These yarns are mordanted with alum, and obviously handled properly. Having dyed with plants myself, I know only how easy it is to mess up and ruin an otherwise nice yarn. Leena Riihelä, the owner of Riihivilla in Finland, has done a great job!