Flammegarn

Early this morning, I got up to meet a cool, breezy morning with a clear sky and the promise of perfect weather. What more could be asked for on a day when the morning is to be spent outdoors dyeing yarn? Everything from the last pre-dyeing days was gathered together – the pans, the spoons, scales, and so on, including the skeins of pre-mordanted yarn. Today, a number of things were planned, and happened: dyeing both commercial and handspun yarn with cochineal and black oak bark, also known as quercitron.

What is flammegarn?

Today’s entry is about flammegarn, which is an old Scandinavian method of making yarn with variegated colors. A skein (or two, or three) is tied off with cord, immersed into a dyepot, and colored. The result is a “flame yarn” – so named because this was traditionally done in red over white yarn – with splotches of red and white coloring which knit up into a space-dyed yarn. Modern dyers do this – just google “flammegarn” and you will find a number of examples. Earlier this year I wrote about making flammegarn with commercial dyes, which you can read about here. Judy’s knitted up some socks out of her flammegarn – I need to get a picture of them to post.

Set up the dye materials the night before.

Last night I prepared the dye materials. Specifically, I ground up 5 g of cochineal bugs, and mixed them with an equal part of tartaric acid. Then I added hot tap water, stirred them together, and let them sit overnight. I weighed out 10 g of black oak bark, and did the same, but without the tartaric acid. I did about five dye baths this morning; out of these, two were used for the flammegarn, which is fingering weight, commercially spun blue-faced leicester in two 200-yard hanks.

Filter out the particulate matter.

The dye pot was set up by filtering out the particulate matter from the water into which I put it last night. I used an old coffee filter and a paper filter; the filter was set aside and the clear liquid placed into a large dye kettle.

Cooler dye bath temperatures are better for yellows.

Even though I was using only about 135 g. of wool (100 BFL, 35 moorit shetland), I wanted a large kettle. A larger kettle is easier to control as far as not allowing the temperature to rise very high. This is especially important with yellow as the hotter the temperature, the more the yellow can drift toward brown or greenish hues. I kept my pot around 140-150 F. The weight of dye matter to fiber (the BFL specifically) was 1:10 – 10 g. oak bark to 100 g. of BFL, which had been premordanted with alum and tartaric acid.

According to J.N. Liles, most of the black oak bark color will be taken up in the first 20 minutes of immersion. This proved to be the case. I pulled both the BFL and moorit out periodically to check the color, and once I liked it, I put in a piece of copper pipe – about a thumb’s length – and a pinch of gypsum (the chalk my husband used in beer making to change the pH of his brew, as well as increase the availability of calcium and sulfur ions). Liles recommends adding “1/2 tsp. of chalk” but doesn’t state whether it is calcium carbonate or sulfate, so I used the gypsum. The color in the pot became a tad bit brighter – a rather mellow, pale gold.

Prepare the flammegarn by tying off sections of the skeins.

While the dye bath was heating up, I took my two BFL skeins and tied string around them. The string acts as a resist, keeping the white (or lighter colored yarn) from getting dyed. After this, they were set into hot water prior to immersion into the dye bath.

This yarn was removed from the pot and set in a basin to cool enough so it could be handled for untying and re-tying to create the flammegarn yarn. While the fibers cooled, I took the remaining particulate matter of both the quercitron and the cochineal and remixed them with water, and then filtered them again. The result was a orangish coral color. This was added to the remaining dye in the pot that had been only the black oak bark. This was slowly heated while the flammegarn was prepared with more ties. This new dye bath now contained the exhaust of the cochineal and quercitron, the tin added in the last five minutes of the original cochineal dye bath, and the gypsum and piece of copper pipe. Once this bath reached about 180 F, the flammegarn was immersed into the bath. Here it remained about 10 minutes, was removed, and then dipped into ammoniated water (about 1 part ammonia to 24 parts water – 1/2 c. to 3 qts. of water). After the dip, I rinsed the yarn in clear water and spun it out in the washer before hanging the hanks up to air dry outdoors.

It’s in the water.

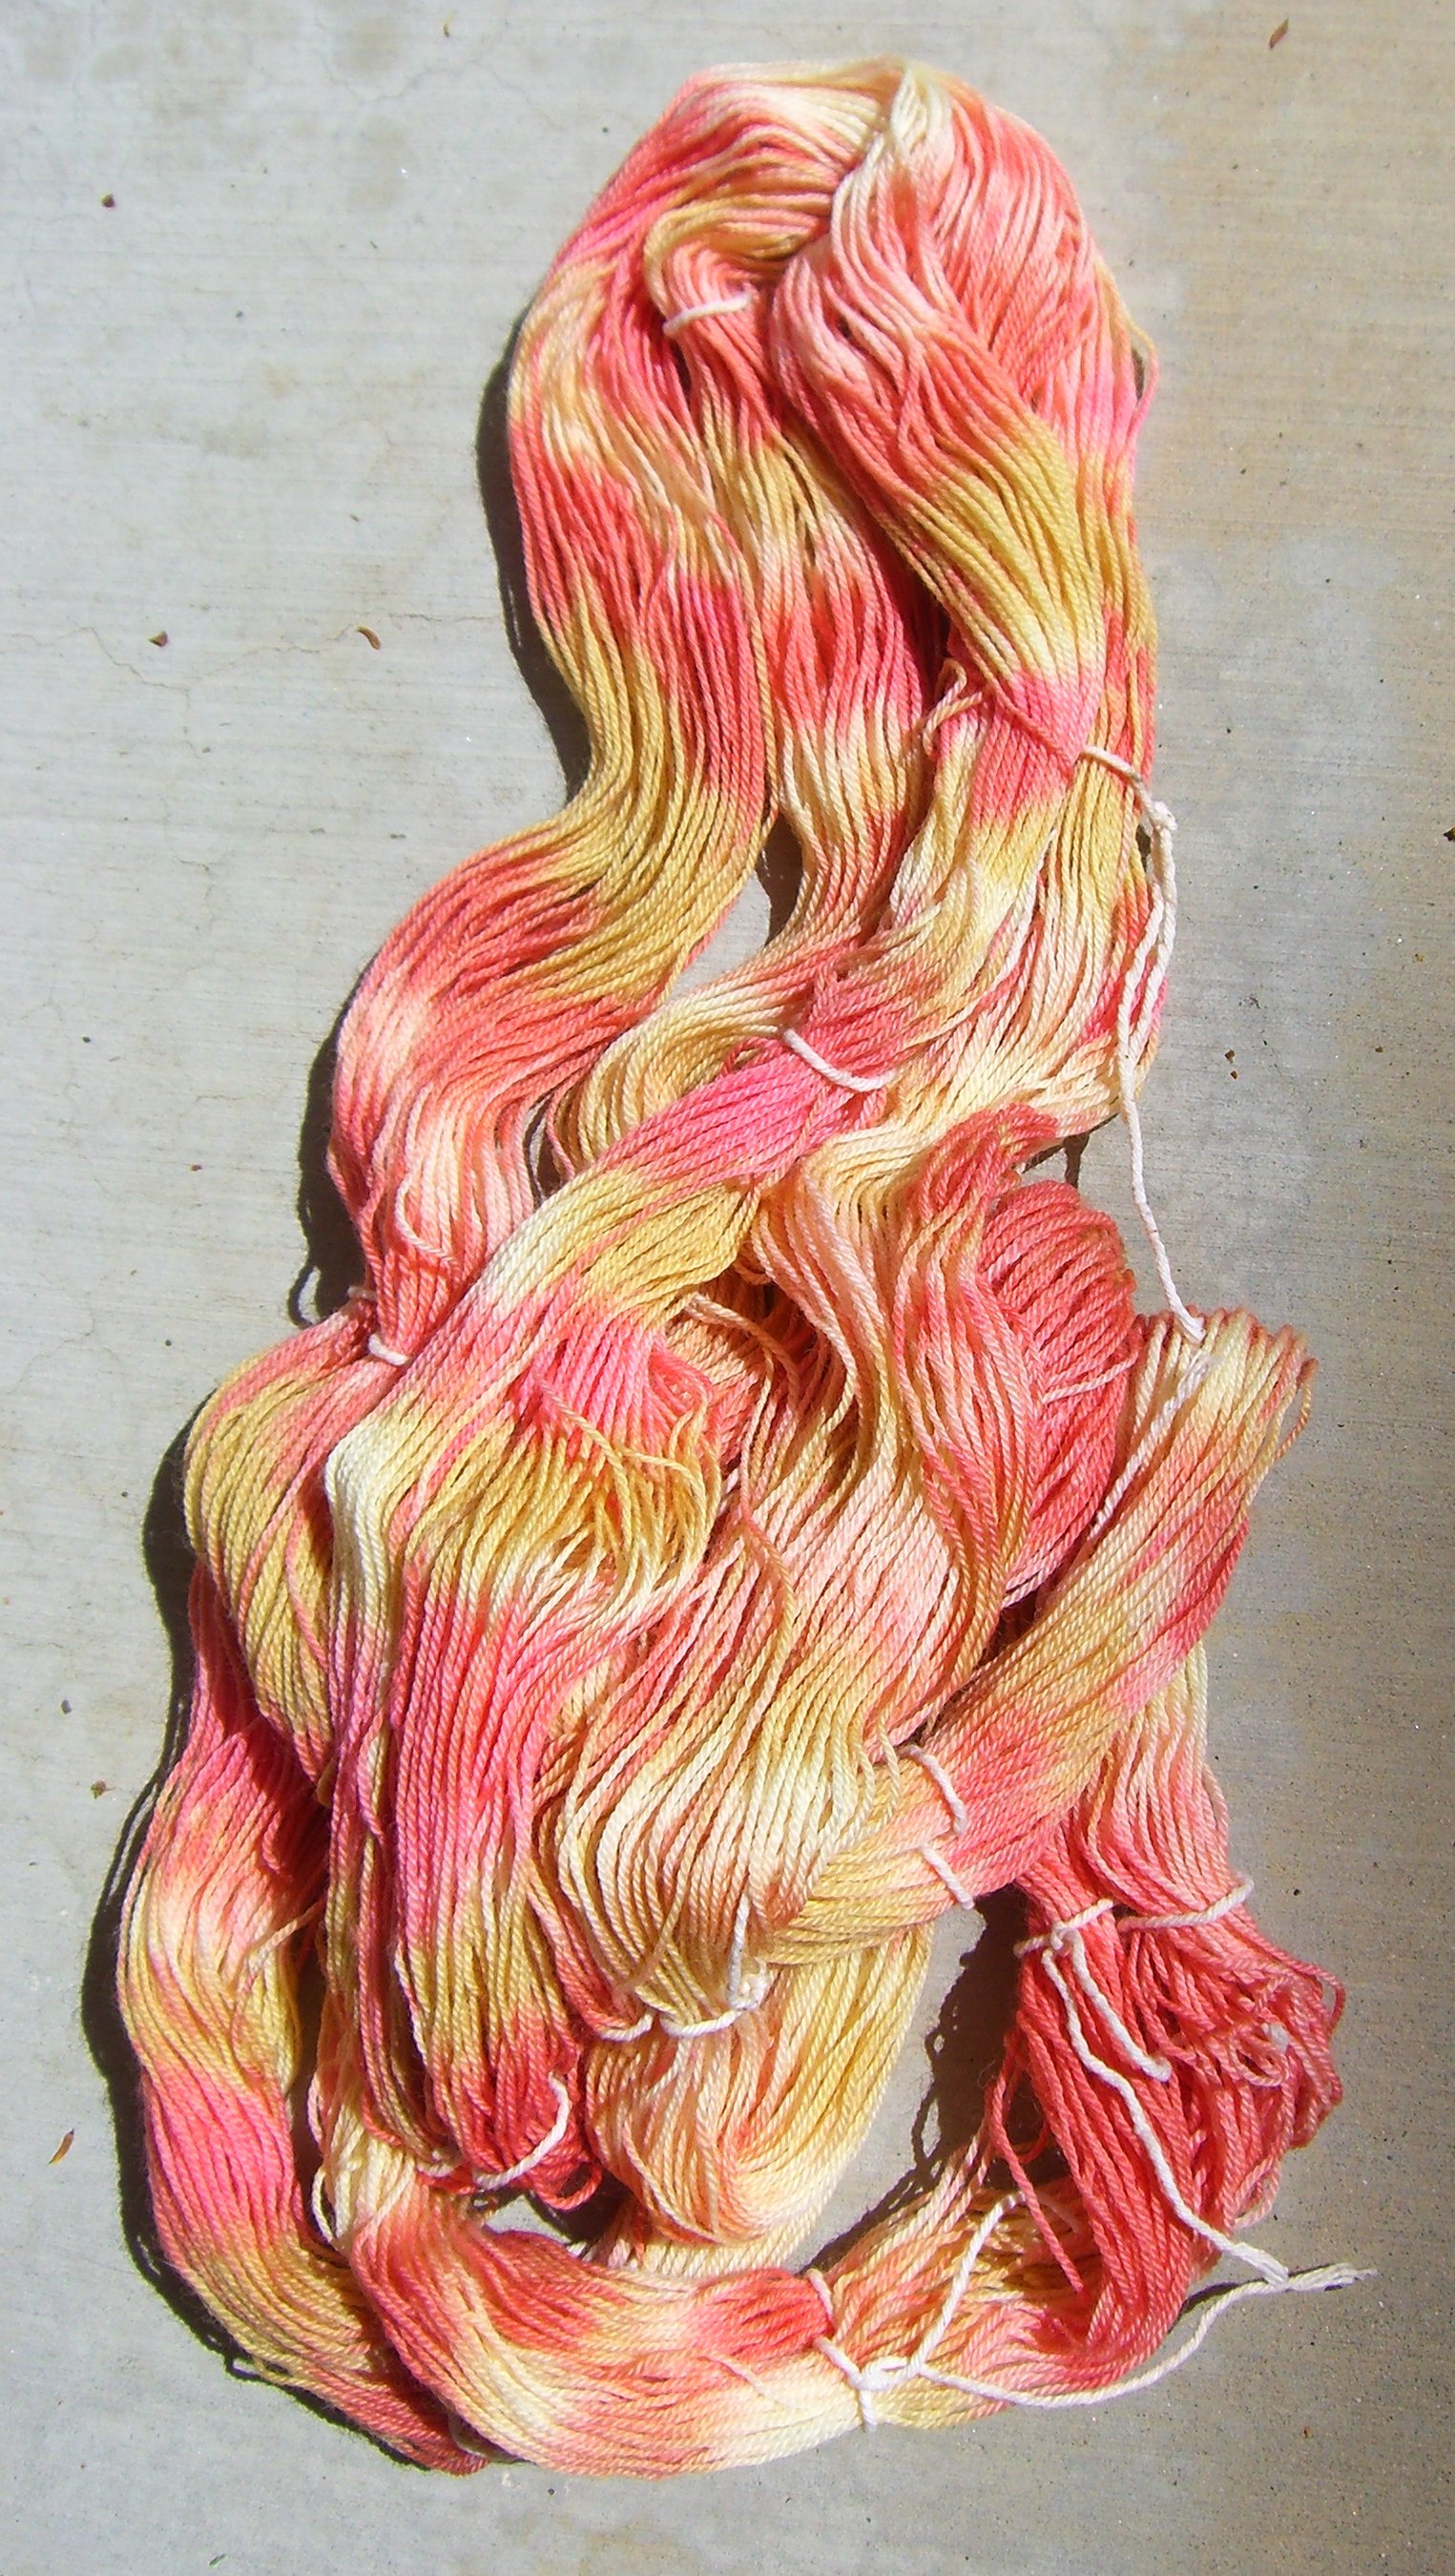
The water here in Thousand Oaks has a pH of 8. This means it has a slightly alkaline quality. The use of gypsum is to move the water closer toward pH 7, which is neutral. Ammonia is alkaline, and pushes cochineal toward the purples, and the tin in the dye bath helps to promote the red qualities of the cochineal. With the golden underdye of the quercitron, the overdye of the two exhaust baths created a color similar in tone to the gold. The result is a color variation in the yarn ranging from pale gold, to darker gold, corals and pinks.

Voila!

The final results are below. The colors are a bit lighter, but the photograph does a good job of showing the true colors. My camera pushes yellows and oranges toward the reds, and makes them far too intense at times. If you click on the photo, you should be able to see the skeins in a larger photograph, which will help you get an idea about how they look in real life. Bigger is better, here! These skeins most likely will become my own pair of flammegarn socks, either with a 2×2 rib for the ankle, or plain knitting, unless I create a little scarf with some plain knitting combined with lace.

Natural Dyeing: Mordanting

Setting Up

It is a bright, crisp spring morning, perfect weather for mordanting outdoors.  The stainless steel dyeing pots have been pulled out, scales, yarn, alum and tartaric acid, buckets, goggles, gloves, basins, buckets, towels, thermometer, mixing bowls and spoons. First to be set up was a kettle of water to heat on the burner.  Next, 100 g. of wool weighed out, and set to soak in hot water.  On the smaller scale, a plastic bowl was set down, and then turned on to set the tare weight to zero.  5 g. tartaric acid weighed and emptied into a stainless steel bowl.  10 g. alum weighed out, and added to the bowl with the tartaric acid.  Hot water added to this to dissolve the crystals.  Meanwhile, I continued to organize a few things as the water heated.

Weighing

Having two different scales, one for large items and one for small, is great. These are the scales Josh uses in brewing, to weigh grain and hops. The large one does both pounds and kg and g, while the other one does tenths of a gram, along with other weighting systems.

Traditional natural dyes have an alum-to-wool weight ratio of 1:4.  This means for every pound of wool, 1/4 lb. alum is to be used, or for every 100 g. of wool, 25 g. of alum is to be used.  Most books warn you not to use too much alum as it makes the wool sticky.  It does, and it is a really disgusting feeling.  Nor can you fix the problem.

Trudy van Stralen, author of Indigo, Madder, and Marigold recommends using a 1:10 ratio of alum to wool, and a 1:20 ratio of tartaric acid to wool.  Now, trying to figure this out in pounds is absurd, and this is where the beauty of the metric system really shines.  It means for 100 g. of wool, the alum proportion is 10 g, and the tartaric acid is 5 g.  If this is confusing, just think of it in terms of U.S. money – $1.00 = 100 g, a dime is 10 g., and of course a nickel is 5 g.

Van Stralen also recommends using the same water and the same solution for subsequent batches of wool, saving time in heating up water, and saving money by only adding 5% more alum and 2.5% tartaric acid back to the mordant bath.  Appeals to me!


Mordants-to-Wool Ratio

My first batch of mordanting wool had plenty of room in the kettle, so for the second batch, I weighed out more wool.  This time it was 260 g.  Using the 10% rule would give me 26 g. of alum; the 5% rule of tartaric acid would be 13 g.  Given the idea that there is essentially 5% and 2.5% of alum and tartaric acid respectively remaining in the mordanting kettle, I went with an approximation of 7.5% for the alum, which was 20 g, and 3.75% for the tartaric acid, which is 10 g.  I added these to the mordant water to accommodate the larger amount of fiber.  I still won’t have 25% alum to wool in weight, so there should be no stickiness problem.  The rest of the wool will be weighed out in 260 g batches, so it should go more quickly.  If I didn’t do this, I think I could easily spend the whole day mordanting; I’d rather do it in half the time!

For all of these, the water is not boiling, but holding steady at about 200 F.  The wool skeins did not get agitated by roiling water.  The commercial skeins have held their crisp twist, and the handspun ones did not exit the mordant bath any more felted than they were prior to entering it.

Premordanting for Indigo?

I don’t have any idea if indigo will be affected by an alum-tartaric acid premordant, but as I figure I will be overdyeing some of my future indigo wool with quercitron, for green, and cochineal for purples, premordanting the wool could only help.  That is something to be seen in the future.

Comment

The last time I used natural dyes and mordants was ages ago.  I used pounds and ounces, cups and teaspoons.  The metric system is far easier than the English system!  I am looking forward to the results as van Stralen uses a higher concentration of dyestuff to goods; this is my plan for this adventure.

I really like van Stralen’s book because of the clear and colorful illustrations.  My own small dyeing library has old and new books in it.  The different approaches to mordanting and to dyeing are interesting to read, as are the approaches to dyeing.

I’ve done the one-pot-dye-and-mordant approach, which is really time efficient, but perhaps not efficient in the use of chemicals and dye materials.  There is also the added nuisance of having to pull twigs and flowers out of the wool.  I am hoping to avoid this, and am trying to decide if I should get some mesh bags to contain the dye materials if I cannot grind them up finely enough.

A lot of the books from the 70s use the all-in-one method.  Liles book is very specific.  Others are vague.  For Californians, Ida Grae’s Nature’s Colors is a must-have – too many books seem to think that the entire U.S. lives on the east coast!

This round of natural dyeing is a bit more systematic compared to my usual approach to dyeing.  I’m interested in seeing the results of this.  Because there is time involved here, it makes sense to heed what I am doing.  And, as it is also an artistic experience, I find myself contemplating what I might do with this batch of yarn or that.  For instance, the Shetland is being considered for – what else? – a Shetland sweater vest.  This means I can use colors and more colors, but there will be (in theory) an underlying harmony from both the moorit fleece, and the natural dyes themselves.

Final Notes

Before you begin any dyeing – natural, unnatural – I cannot emphasize enough the importance of skeining your yarn properly.  Even if it comes in a commercial skein with a few ties, it most likely will not be enough.  I tied off a few extra figure-eight ties on the Sea Wool, but that was not sufficient.  Some tangling resulted.  For my handspun, I did my usual, and placed eight ties throughout the skein.  My skeiner creates skeins which are 1 yard long, so I have six feet to play with.  I find that I can have very minimal tangling if I adhere to eight ties, and 3 figure-eights per tie.  A lot of work, but it is more work to untangle a skein.  The alpaca and Blue Faced Leicester, being very fine yarns, probably should have had even more ties.

Below is a table of my weights of fiber and mordants.  This could be a handy thing for me to refer to later on!

Batch Wool Weight (g) Alum Weight (g) Tartaric Acid (g) Comments
1 105 Sea Wool 10 5 10% / 5% for initial pot.
2 260 Sea Wool 20 10 Did 7.5% / 3.75% as this was a larger amount than put in pot.  200oF.
3 215 handspun, alpaca, Blue Face Leicester 11 5.5 Pot boiled.  Skeins got tangled.  5% / 2.5%.  200oF.
4 220 handspun moorit Shetland 11 5.5 Came out nice.  5% / 2.5%.  200oF.
5 280 handspun moorit Shetland 14 7 Water color rather lightly olive colored.  5% / 2.5%.  200oF.

Natural Dyeing: Preparations

Several years ago I did a lot of dyeing of handspun yarn using natural dyes.  I picked plants along the trails when I went hiking and bought others mail order.  I grew coreopsis, and experimented with different ones from my flower and vegetable beds.  I mordanted with alum, chrome, and saddened in an old cast iron kettle.  Lately, my interest in natural dyeing has been reawakened, and so I have started the process.  This time, though, I am premordanting all my yarn, instead of doing a one-pot mordant-and-dye extravaganza.

I have pulled out a lot of odd bits of yarn, some colored, some not, some handspun, some commercially spun.  I spent the morning skeining them up and washing them twice in very hot, soapy water (how I love Dawn for grease removal!), rinsed them, and now have them hanging up to dry.  The house is filled with the sweet smell of clean, fresh wool.

Starting from the left I have handspun Finn-Lincoln, then handspun moorit Shetland, commercially spun lace-weight alpaca, commercially spun 2-ply Blue Faced Leicester, a couple of small skeins of handspun, and then seven skeins of Sea Wool in natural or cream.  These will all be premordanted in a 10% alum, 5% tartaric acid solution per dry (or nearly dry) weight of yarn.

I plan to use mostly cochineal, black oak bark (quercitron), indigo, and brazilwood.  Some will be overdyed, others will be dipped in ammonia or vinegar after baths, some will have a tin post-mordant.  Not quite sure yet of all the details.  I also plan on a copper penny blue vat, most likely for the alpaca.  I have some tubing Josh has used for his wort cooler.  The color focus will be on blue and violet colors, though others are not out of the question.

Close-up of Sea Wool
Moorit Shetland
Finn-Lincoln and Moorit Shetland
From Left to Right: Alpaca, Blue Faced Leicester, Handspun

In the links area I’ve added a number of natural dyeing sites I found interesting, as well as a list of books in PDF format from Spin-Off Magazine.

A Good Day to Dye

The weather turned this weekend from cold and windy to warm and sunny, with all the elements of spring making themselves known:  the mockingbirds in the trees, the frisky squirrels, daffodils and freesias blooming.  Thus, for a few days, the cabled beret was tossed out the window (figuratively, not literally), while the dye pots and colors and yarn came out to play.

A couple of weeks ago I sent away to Wool2Dye4, and ordered two skeins of their 100% washable merino sock yarn, their 80/20 merino bamboo combo sock yarn, and a one-pound cone of their Blue-Faced Leicester.  I also had some sock blanks from KnitPicks that have been waiting many months to turn into butterflies.  My MIL’s birthday is on the Ides of March, so this yarn and dyeing is something we do occasionally as a birthdye present for her (and for me, though I’m 7 months from now . . .).

Anyway, it was a blast!  First thing we did was to paint up our sock blanks.  We used powdered dye mixed with water – I’ll detail that in another post – and plastic syringes to place the colors.  Judy’s sock blank is below.

Judy's Sock Blank - Before Steaming

This is my sock blank.

My Sock Blank - Before Steaming

We did this out on the picnic table, on top of a plastic tarp.  Before dyeing the blanks, two long sheets of plastic wrap were stretched out beneath where each blank would go, and pressed down to make a seal.  The blanks were soaked in warm water with a tablespoon of dish soap (Dawn) for about 30 minutes.  We set up the dyeing table and colors while the blanks soaked.

Once we had our blanks painted, into the kettle they went!  We rolled the blanks up in the plastic wrap, folding over the edges and such to seal in the colors, with a final sheet of plastic wrap, like a burrito.  The kettle was set up with a vegetable steamer and plastic tray, and the blanks steamed for about an hour.  Once they were done, we pulled them out and, as quickly as possible, freed them from their coverings and set them in a basin of warm water mixed with about 4 oz. of white vinegar.  There they cooled, and while they were cooling, we got on to more dyeing!

Our “cooked” sock blanks now looked like this:

Judy's Sock Blank - After Steaming
My Sock Blank - After Steaming

One would hope that the abstract patterns would come out like the blank, but already I know they won’t.  I’ve started knitting up my socks, or gloves, or whatever they are going to be.  The colors are intensely rich, and the photos really do not show what they look like.  Judy’s will more likely show its pattern – the blanks are always described as “make your own striped socks” – so it makes sense.  Still, it is fun to knit them up to see!

The next dyeing adventure was to spread out a skein of yarn each, already soaked, and pour colors onto the skein.  We’ve done this before, and often the patterns of the colors are really enjoyable.  Judy made used multiple colors in hers, and I decided to go for a more monochrome pattern.  You can see the results to the side – the turquoise skein is mine, and the multicolored one is hers.

The results of this are really satisfying as you can create strips or areas of color and work the color into the yarn. Judy’s painted skein is very obvious in its sections of color, but where the colors overlap can become very exciting. Mine is more subtle, which is odd for me, and for once the magpie did not overtake the entire project. I really like the turquoises and blues which were the result of mushing together a few shades of blue and turquoise.  Wrapping the skeins in plastic wrap and steaming them allows for the different projects to go into the same pot without polluting each other.

The final project was to create flammegarn. This is a resist method used in Scandinavia to create randomly bicolored yarn.  White or colored wool is tied off with yarn, in sections, and the yarn is immersed into color.  The result is randomly colored and white yarn, much like our multi-colored yarns of today, but with fewer colors and shorter areas of color.  The results are always fascinating.

Judy Holding the Tied Flammegarn Skeins

We decided to use the same colors, and to utilize our knowledge of color mixing to get some results.  We dyed our entire skeins a rather lime yellow greenish color.  Once we could handle the yarn out of the dye pot, we tied ours off.  Judy is holding up the dyed, still tied, skeins.

And then you can see her holding up the now untied skeins.  Hers is on the left, and mine is on the right.

She liked her colors, but for me, the colors did absolutely nothing.  Yucko!  Just not for me.  So, I decided to overdye my flammegarn skein, and I am so glad I did.

Judy with Untied Flammegarn Skeins

I decided to continue to apply color theory to the flammegarn. The yarn was a rather yellow-green and blue-green. I could overdye the yarn with a turquoise, but then I would have two similarly colored skeins. I decided to use violet. The yellow would turn to a grey color (yellow and violet being complementary colors), and the blue would turn to a blue violet. Into an intensely purple dye pot it went!

You can see from the results, the overdye was perfect. No more putrid yellow and blue green. The overall effect of the skein is a rather purplish blueberry color – more violet than blue – and really nicely mottled. Up close, with some photoshop lightening of the picture, you can see the colors a bit more distinctly.

The long, thin picture of the skein is close to the real color, and in daylight it has that deep purply blue color.  The larger picture on the left shows you the detail of the color, which, when knitted up, should add a bit of interest to the yarn itself.

Altogether, this was an incredibly satisfying day! The random effects of dyeing are half the fun – just experimenting and playing. You can see that Judy has an eye for detail and construction. Her colors are more orderly than mine, and I tell you, I really admire that in people. She is, for example, and incredibly talented beader and needlepointer, with the patience of a saint. Her work is impeccable. Me, I am far more crazy and like the process of making a mess. Too often, a mess is just the result. However, I was really pleased with the way everything turned out, for both of us, and I know we had a lot of fun together. With spring approaching (here in California), the plants are beginning to grow, and we plan on a natural dyeing adventure pretty soon, with native plants, as well as materials from other parts of the world. Stay tuned!