Thingiverse Flash Cover for the Instax Wide 300

If you use the Instax Wide 300 by Fuji, you know that it has a flash that won’t be turned off.  As a result, flash goes off when you don’t want it and can over expose your picture and waste film.  Instax film doesn’t cost an arm and a leg like the Polaroid film does, but it still is annoying to not have control over that darned flash.

Enter Thingiverse, the world of free patterns for 3D printers.  My husband has one and makes some really cool things.  I looked, sought, and found a cover for the 300 Wide’s flash.  You can find it here:  https://www.thingiverse.com/thing:2788611 – and it works really well!  From the site, this is what things look like – screen dump of the cover.  Notice it has sticky foam tape or something to help keep it on the camera itself.  It helps to keep the cover from sliding away from the flash as you move the camera.  I don’t have any foam tape, but made sure the flash was covered, and it worked out nicely, as you will see below.

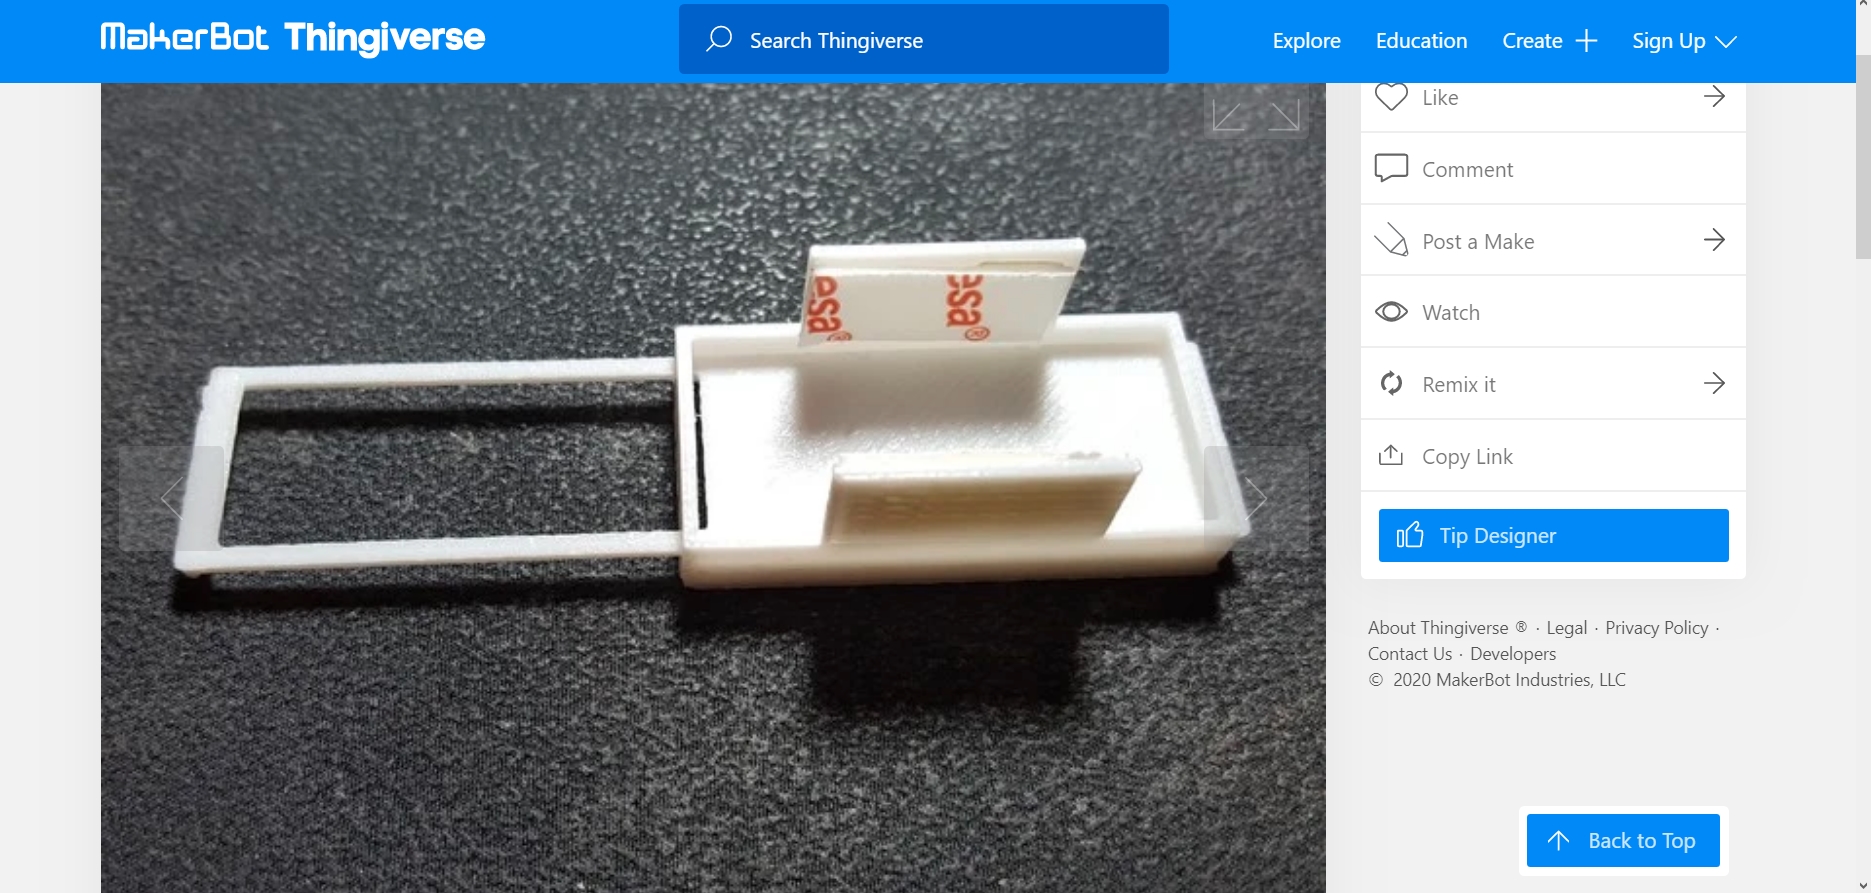
This is how it looks on the camera itself – again, pictures are from the Thingiverse site – click on the picture to enlarge it.

Notes from the Thingiverse site for the flash cover mention that if you make one in black, it shuts out a lot of light; a white one works more as a diffuser. My husband had hot pink set up on his printer, I had black and white film in the Instax, and I think the pink could have acted as a sort of red filter. Dunno. As we have a lot of different colors for the 3D printer, guess who is going to try them all out once they are printed?

Here are the two pictures taken a couple of minutes apart to check out the flash cover. The first one is without the flash cover. I shot this out the studio window around 8:30 this morning, facing east, where the sun comes up. (I always have to say to myself, “And the sun sank slowly in the west” to remember which direction it rises – oh, well!) Pow! The flash went off.

And now, with my hot pink, newly printed flash cover, here is approximately the same image with the diffuser on.

Once more, the flash flashed, but was not flashing all over things. And it produced a rather pleasantly darker picture. Because the film is black and white, I expect the picture is not picking up the finer gradations of color it could. The window is blown out. But does it matter? I don’t think so. I am curious to see what will happen with color film, which I will load up when I finish this black and white.

I cannot say enough good things about Thingiverse. If you have a 3D printer or know someone who will print for you, not only can you find this flash cover, but also other cool photography stuff, like film uptake spools, pinhole cameras for 35mm and 120 (I have one yet to be tested out), 35-to-120 adapters, and who knows what else. Totally cool stuff if you like to play around, which I do, and certainly does Mr. D.

Toys! Toys! Toys!

Pattern for DIY Diffuser & Reflector

These were very easy to make.  The biggest decision was to glue or not glue parts together.  On the first one, I did, gluing one of the frames to one of the 90 degree elbows, and on the other I did not.  The feet, I glued parts, just because it made sense to have them as stable as possible.

Supplies

  • Ratcheting PVC pipe cutter
  • PVC primer
  • PVC glue
  • Nitrile gloves

For each reflector / diffuser frame you will need:

  • 2 10-foot lengths of PVC pipe, 1/2 inch. Note: if you want heavy-duty feet, use 3/4″ or larger, and adapt the parts accordingly.
  • 4 90-degree elbows, 1/2″ slip
  • 4 T-joints, 1/2″ slip
  • 4 caps, 1/2″ slip

Cut

  • 2 lengths 36″ long (frame)
  • 1 length 24″ long (upper frame)
  • 2 lengths 11.5″ long (lower frame)
  • 2 lengths 3″ long (footing)
  • 4 lengths 6″ long (footing)
Fabric

Choose your fabric to meet your needs.  If you are not familiar with sewing, a few things to note:
  • Be sure how wide your fabric is on the bolt.  It is doubled over, so it will be twice the width as on the bolt.
  • Remember that seams need to be considered in the purchase of your material.  This affects amount of material purchased.
  • Check the fabric.  Does it ravel?  Does it stretch?

Frame will tilt if the lower portion with the T-joint is not glued.

For my frames, I chose a transparent white nylon material, a gold stretchy lame, and a woven silver lame.  This material came in 54″ widths.  Thus, I bought 1 2/3 yards of the transparent white nylon, and 3/4 yard each of the gold and silver fabric, as I backed them against each other.

Frame Assembly

Create a rectangle using the 90-degree elbow joints. Assemble the 36″ lengths for the sides, the 24″ length for the upper portion. For the lower portion, join the two 11.5″ lengths with a T-joint.  Glue the pieces together if you want them to remain rigid in the frame, or do not glue these pieces to the T-joint if you want to be able to tilt your frame. Measure this lower portion against the upper 24″ frame with the elbow joints attached – you may need to adjust the lengths of the pipe to create a good rectangle by trimming the ends of the pipes. Before you glue your pieces together, remember to use the primer first. Then, glue the pieces altogether, or not. If you want to be able to take the frames apart, be judicious in what you decide to glue. Also, glue in a well-ventilated area, and wear your nitrile gloves!

Footing Assembly

Glue the 3″ pieces to either side of a T-joint. Before gluing, attach a T-joint to either side of this piece. Make sure that you place the center joint so it is 90 degrees to the ground – this is the part which goes upward to support the frame – and the side T-joints are flat to the ground. Use a flat surface to place this upon, such as a concrete patio or garage floor. When you are happy with the placements, glue them in place. I did these one at a time, and for the second one, quickly stood on both ends to make sure they were in the same place. Place caps on one end of the four 6″ pieces, and glue in place. These 4 pieces are placed in the T-joints for stability of the footing. You may glue them in place, or not.

Upright Between Footing and Frame

This can be any length.  The shorter ones are more stable, but the longer ones add needed height.  In a windy situation, these are too lightweight to be of much use, but an assistant can hold them if necessary!

Reflector / Diffuser Material

I made pillow slips for the frames.  This allows the covering to be pulled over the frame once it is assembled.  The lower end is open, which allows the frame to be tilted.  It also helps stabilize the frames if you do not glue all the pieces together. Assemble the frame without the footing, and use it to figure out exactly how to cut your fabric.  Allow 1/2″ for each seam.  Cut the fabric as necessary.  If you are a novice to sewing, give yourself room for mistakes – you can always sew more of a seam, but it is not easy to add more material once you have cut off too much! When you sew your slip covers, consider your material.  The white nylon for the diffuser ravelled where it had been cut.  These ends continue to fall out even after sewing, so it is a good idea to finish these edges with zigzag stitching.  This limits the ravelling.  You can do the finishing before or after you have assembled your slips.  I like to do it before I begin sewing, as ravelling threads can get worse as you manipulate the material.  I finished the edges on the silver lame as well, but did not need to do it on the gold lame knit because the structure of the material prevents ravelling from occurring.

For the diffuser, I folded the material over itself, measured it against the frame, pinned it, and sewed it together. When sewn, I turned it so the seams were on the inside.  I also finished the lower edge to prevent ravelling. For the gold and silver reflectors, I placed the front surfaces (the parts I wanted facing outward) toward each other, pinned, and then did the seams.  This way you turn the pieces right side out when done, and the seams are on the inside.  Be sure to make a hem at the bottom of this slip cover as well. Total cost for these two frames was probably less than $30.00.  Total time to assemble was about four hours.  The PVC cutter was the most expensive tool!  Get a good one, not a cheapo for $3.00 like I did.  The blade got worn out, and finally, I had to spend a wopping $13.00 for a new one.

DIY Studio Reflector & Diffuser

Like many people venturing into photography at a more than amateur level, there is a lot of equipment to consider.  Lights, diffusers, soft boxes, strobes, stands, backgrounds for studio work.  Lenses and cameras to make pictures.  Software for post-processing.  The list is endless, and the choices are many.  Because I am not interested per se in studio work, but rather intrigued by it, I don’t want to spend a lot of money investing in items I may not use more than a few times.  I like making things, so I began looking at do-it-yourself projects.  Amazing what is out there!

I came across plans for photographic studio equipment called “Tinker Tubes” by Dean Collins at software-cinema.com.  These are really cleverly designed, easy to make, and incredibly inexpensive.  I decided to make small frames to use as reflectors and diffusers, and put together frames measuring 2 x 3 feet.  Being a novice to PVC pipe, primer, and glue, a small project made sense.  Then, I followed Collins’ footing plans to support the frames.

The coverings were easy enough, as I’ve done a lot of sewing.  I basically made pillow cases to cover the frames, using inexpensive or on-sale material from the local fabric store.  I used white nylon tulle for the white diffuser, and for the reflectors a stretchy, shiny gold lame, and a woven metallic silver material.  I double stitched all the seams, as well as overcast the edges to keep raveling to a minimum.

The first frame I glued at every corner with an elbow. Then I decided that, rather than just propping them up here and there, it would be a good idea to put them on a stand. I glued the feet, being careful to align the upright T-tube perpendicular to the footing. I didn’t glue the T-tube in the lower portion of the frames because I decided to use them and decide what should be glued, and what should not. Because the entire second frame is not glued at all, it can be angled, as shown above. And, both frames can be easily torn down, and different lengths attached to the footing to allow it to be set up at different angles.

Each frame is lightweight, highly portable, likely to fly away in a wind unless weighted, and dirt cheap. For both frames, including glue, primer, material, and PVC, I probably spent a total of 3-4 hours and about $25.00.

And I have leftovers!