My favorite potholders are finally getting just too beat up to do much good. They are simple cotton pads, about 8 inches square, filled with some kind of batting, and quilted. I have silicon ones, mitts, and so on, and when my cotton potholders are in the wash, I prefer my Ove Gloves. This morning is dedicated to sewing some new, padded, old-time potholders.
It’s is time to see if I can make something to replace my dying heroes . . . .
As always, YouTube provided some good videos, and this was my favorite. I made the first two. Hers look great, mine look pretty sad, but if they do their job – to protect my hands – then my sad potholders are a success.
My machine is my old workhorse, my mid-1950s Singer 15-91. Straight stitch, forward and back. It’s a great machine, but not as up-to-date as some of my other machines. No walking foot. No automatically adjusting pressure as the material goes from two layers of fabric to two layers of fabric, cotton batting, and “Insul-Bright” batting for heat reduction on the hands. I had to watch what I was doing because I have never sewn a potholder in my life.
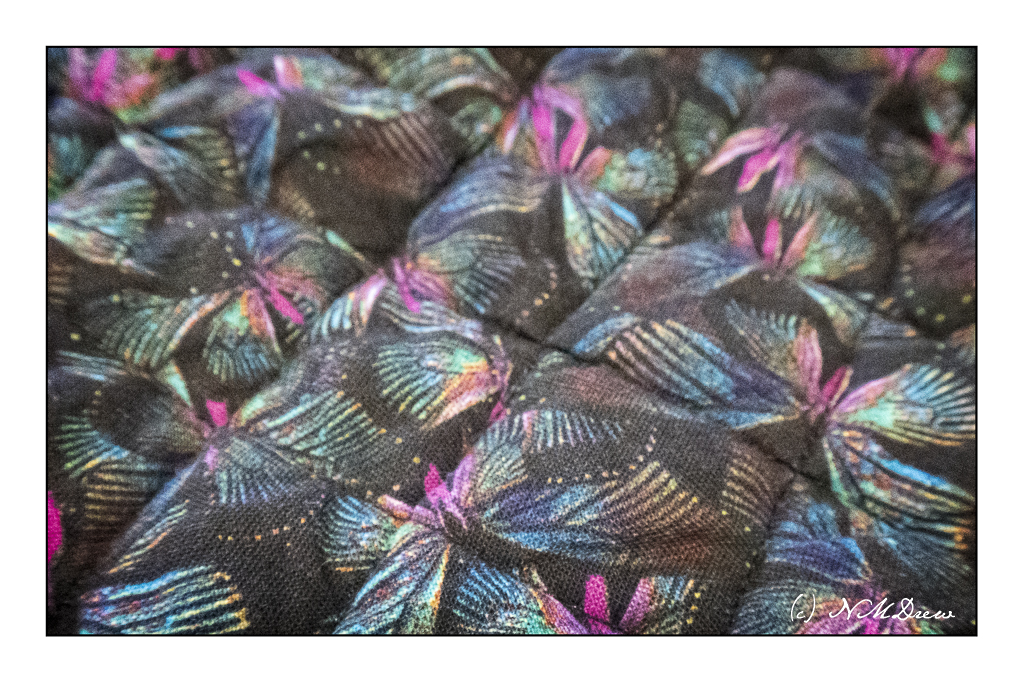
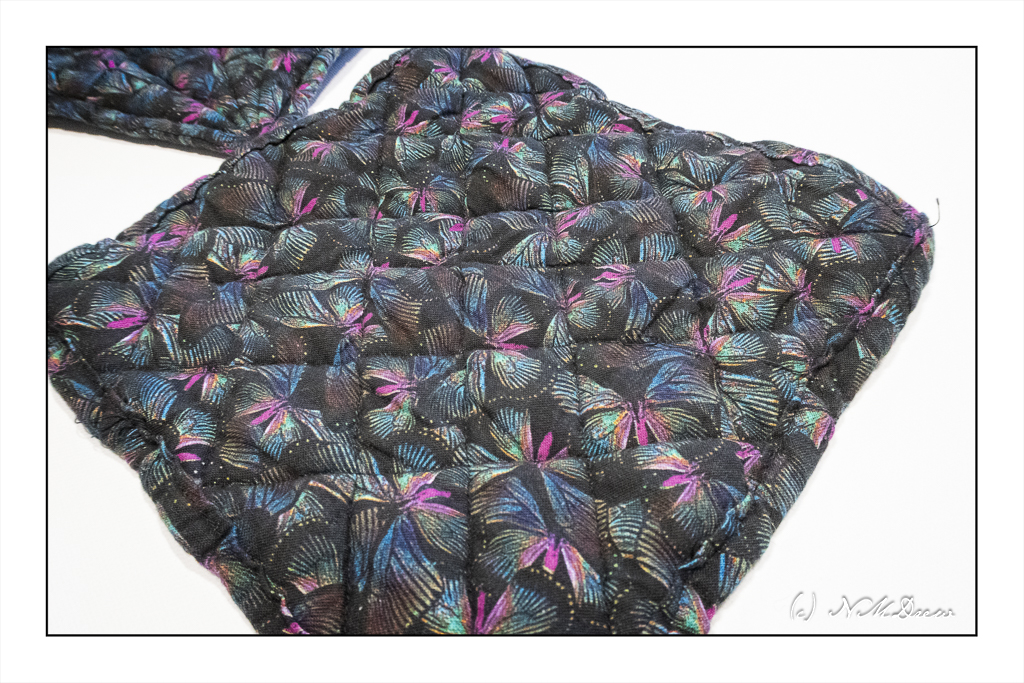
Here is a close-up of the fabric. I didn’t pre-wash the material, which is a quilting cotton. I put each potholder together, batting, fabric, and quilted it before throwing them into the washing machine. I like to do this whenever I have made anything quilted because the cotton shrinks and the quilting becomes more prominent.
A few things about the potholders. I used 100% cotton fabric and thread, one layer of 100% cotton batting, and one layer of the “Insul-Bright”. I avoided polyester in any form as it is plastic and melts – no polyester thread, no polyester in the fabric. Interestingly, the “Insul-Bright” is polyester with something embedded within it, so we shall se there – but these are not going into the microwave!
When I quilted, I worked diagonally across the fabric. I think this made the fabric stretch and pull out. It got rather annoying. Next set of potholders – yes, there will be more – will be quilted along the warp and weft as much as possible.
These were not particularly difficult to make – a bit of a challenge as they are a new project. I have some ideas about how to do things differently. Let’s see how it goes.
A “hussy” is a rather slutty woman in today’s parlance, but a few centuries back, a “hussy” was a shortened term for a “housewife” or “hussif” – in today’s terms, a sewing kit containing needles, thread, pins, spare buttons, scissors, whatever. They could be practical or fancy, depending on class and income, but the fact is, a sewing kit is a handy thing to have. I admit, I have fixed hems with scotch tape or a stapler, but good sewing helps many a problem! In fact, according to one source, the English troops were routinely issued sewing kits after returning from battle in rags, whereas their Russian counterparts were all supplied with a sewing kit, and could fix their uniforms on the march, or at least around the campfire!
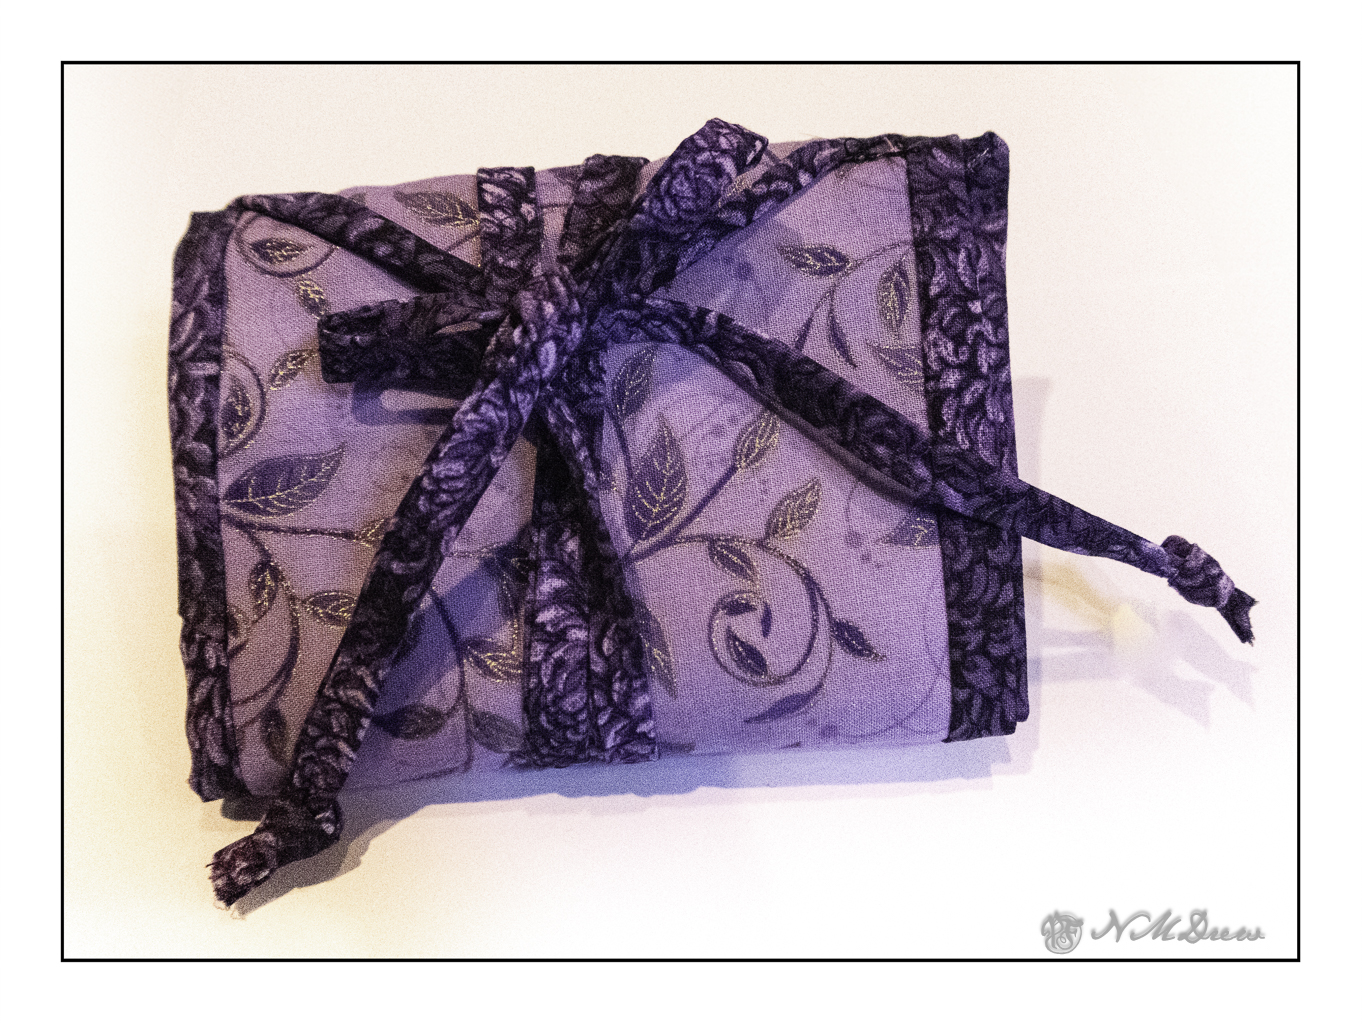
As we make preparations to take a trip, I know I need something to keep me out of trouble – in other words, to keep from being bored. I like to work with my hands, but knitting can be cumbersome (i.e. a sweater), and truthfully, I am tired of socks. I make hats for presents off and on, but those are dull, too, after a while. I am thinking I may try to hand sew a blouse on our trip as we will be on a boat for a couple of weeks – and hand work with a good audio book is not a bad thing to have in quiet moments.
So, with the hopes my scissors and needles will not be confiscated at the airline, I will adhere to the TSA parameters for carry on luggage. If I lose my scissors, I will be surprised as per TSA the blades can be 4″ from the hinge. I am getting some little folding scissors – will that work? Anyway, to bring all this stuff in one convenient spot, I made myself a hussif . . . .
Click on the photos to see them in more detail if you want!
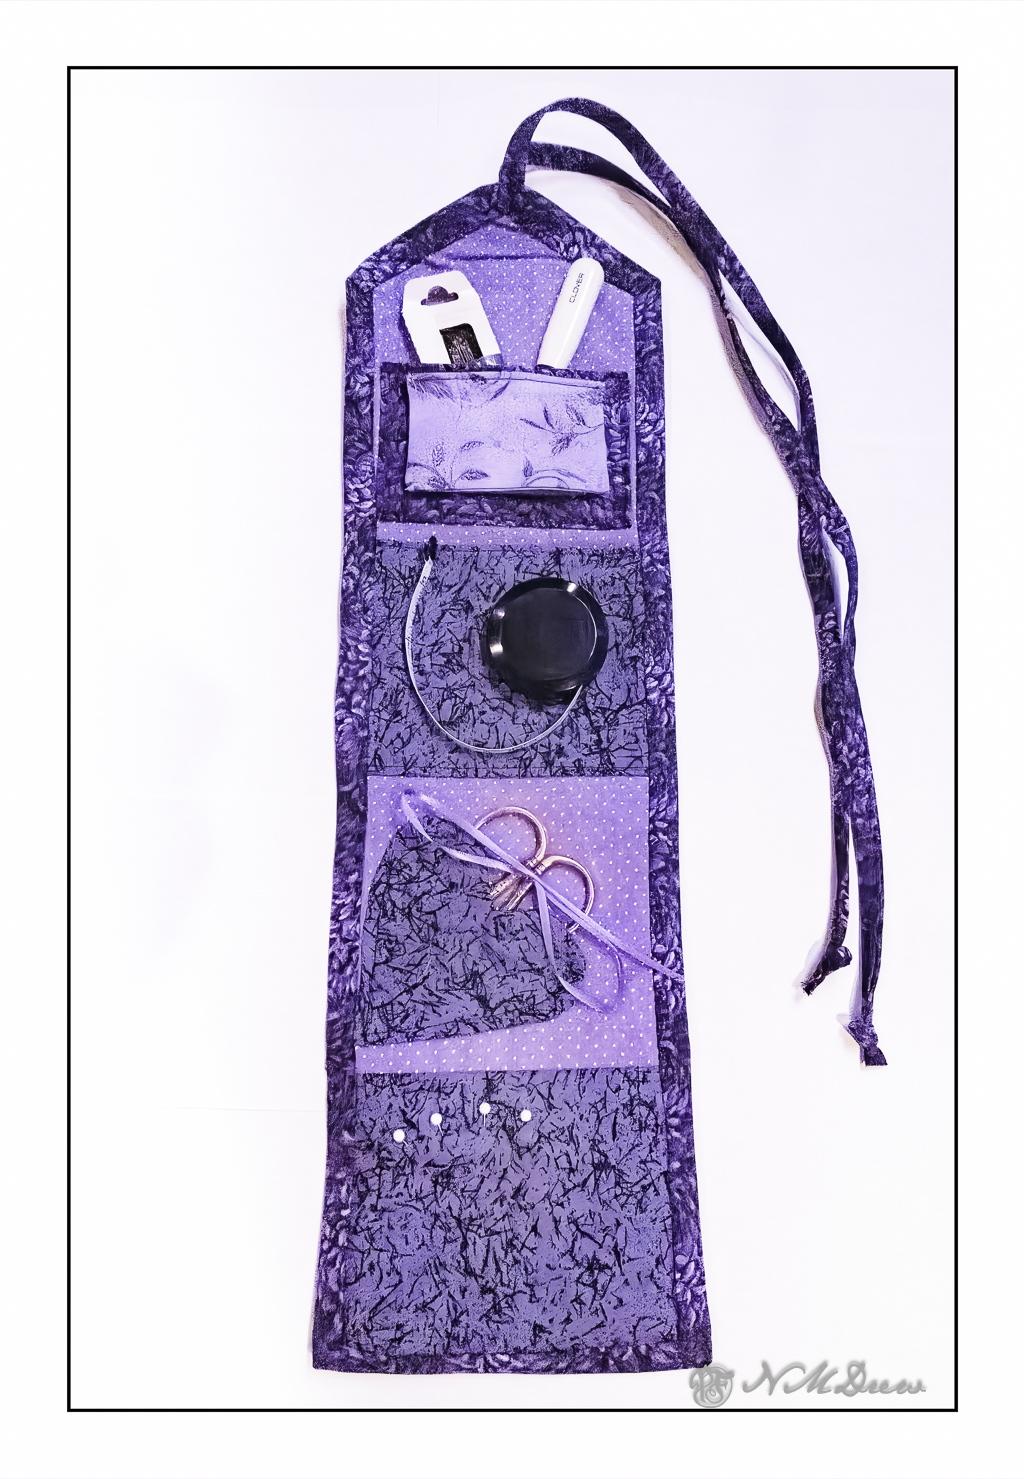
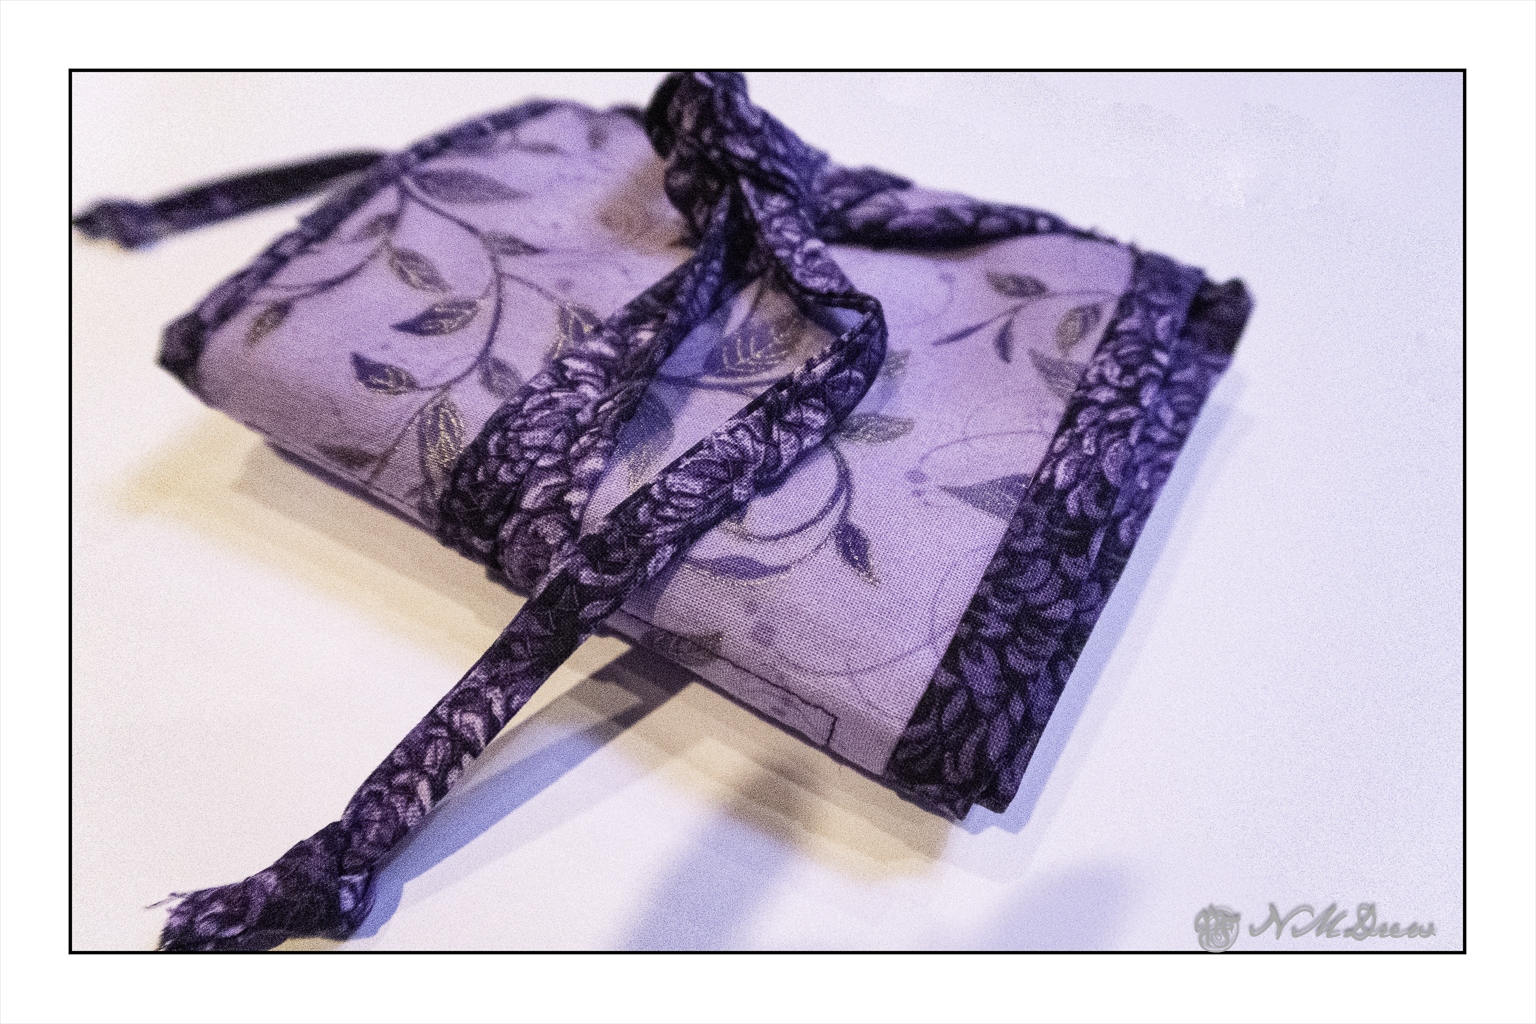
The nice thing about these hussies is that I can customize them! It took a bit of time to come up with a design – and fabric – and so on. To begin with, I had to decide on width and length – in the end, from top to bottom, it is about 16″ long and about 5″ wide. From top to bottom of the above picture you will see the ties to keep the hussif rolled up. Then, a pocket to hold needles and other thingies, but on top of that pocket is a needle book with felt to stick needles into (picture below). The second section, with the tape measure upon it, is simply a pocket to hold supplies. Below that is a pocket for my embroidery scissors with a ribbon to help keep them in place. Finally, the fourth section is a pin cushion of sorts, made with 4 layers of quilting batting to give it some loft.
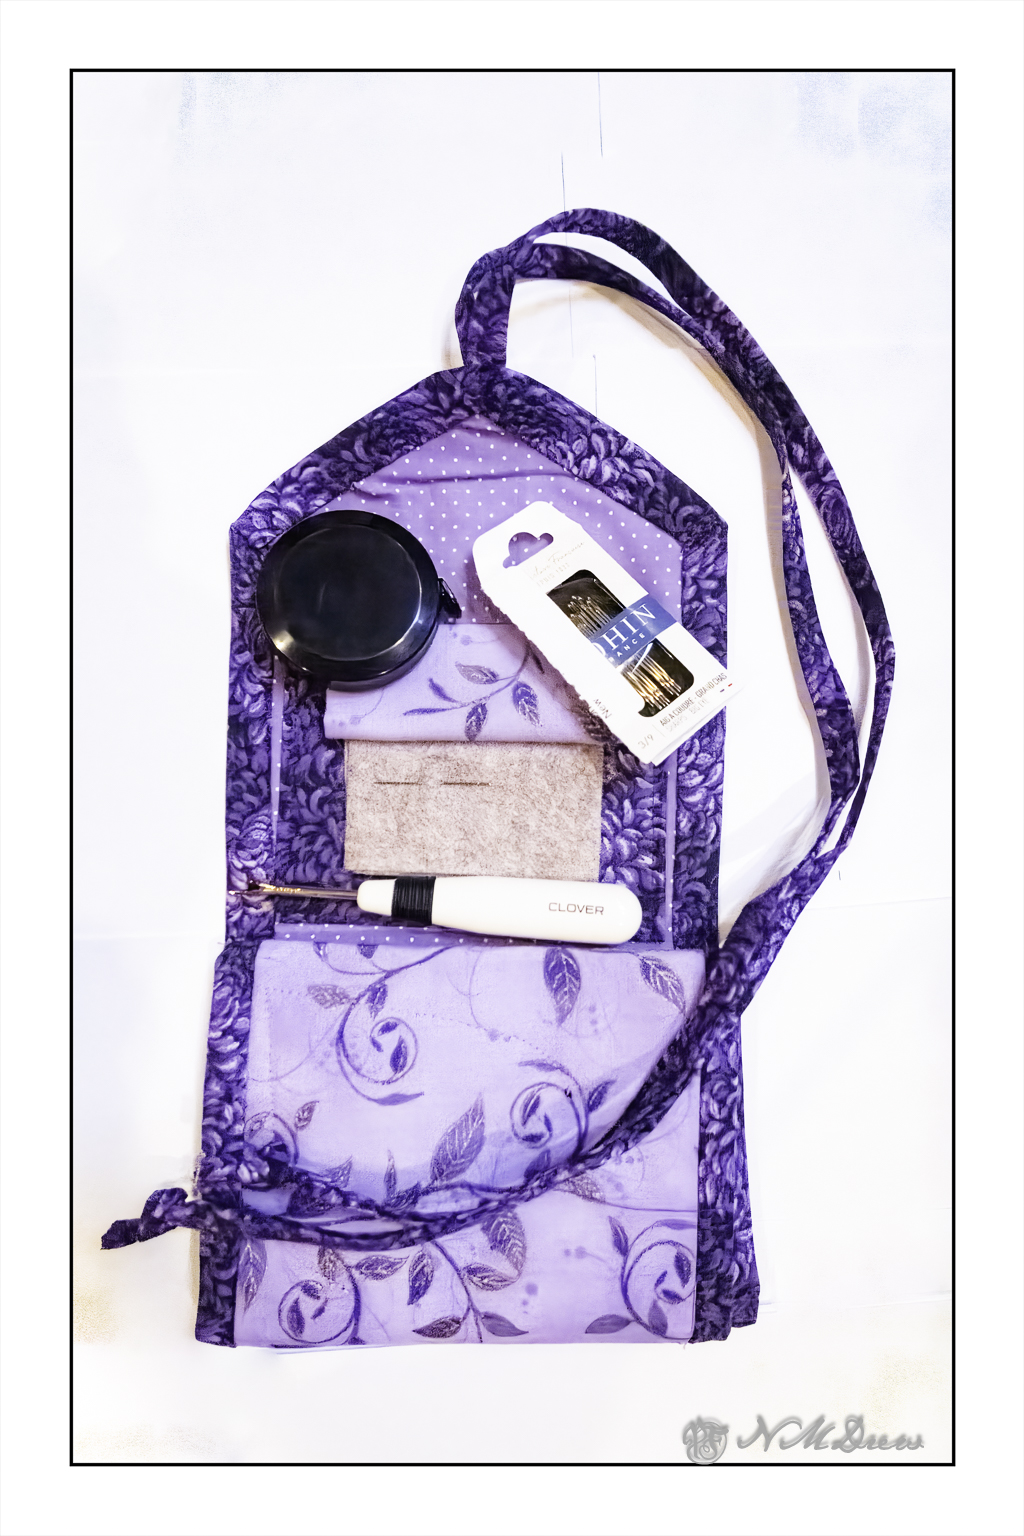
Above is the hussif with the lower to sections folded up, hiding the pin cushion and scissors pocket, and general pocket. The needle book is opened to show a needle in place. I have 3 pieces of felt here so different needles can be placed in them. I use needles with large eyes or the Clover self-threading ones – I can actually thread them quite easily! I recommend Bohin large eyes if you don’t want the Clover ones – other brands, too, are good. For hand sewing needles, get reputable ones. You will pay more, but trust me, 100 cheap bits of crap metal are not worth it!
And here is the hussif rolled up on itself. It ties quite nicely to keep itself from falling apart. Below is another view of it tied up.
Making the hussif took some doing, and I played around with it for a few days, experimenting and sewing at the same time. I watched a number of YouTube videos on both hussifs and needle books. In the end, to put it simply, I did the following:
Chose 4 colors of cotton quilting calico
Used fusible interfacing
Used cotton quilt batting for the pin cushion
Cut 2 major pieces of fabric for front and back, about 6″ wide and roughly 18″ long. I fused the interfacing to the outer layer of hussif.
I cut out the pocket – about 4×6″ – and doubled it up so that the fabric was 2 layers. I sewed a top and bottom seam, right sides together, and then placed the pocket on the unfinished body of the hussif – the binding would cover the raw edges.
I cut out a heart-shaped pocket for my scissors, using 2 layers of fabric and, as with the pocket, sewed right sides together leaving a hole to reverse it. This was a bit of a challenge, but it came out okay in the end. I sewed it directly to the inner layer of fabric – I should have moved it over a bit, but that is for next time!
The pin cushion is one layer of fabric laid over 4 layers of cotton quilt batting. I sewed the seam at the top and then folded it over the layers of batting, leaving all the raw edges to be covered with binding.
The needle book and pocket at the very top were done after I did the binding. More in a bit here!
I used non-bias binding on the hussif. I cut a very long length of 2″ wide fabric, sewing the pieces together to have plenty of material to go around. I created a double-folded strip from this – first folding the binding in half, ironing the hell out of it, and then opening it up and folding each edge to the midline. Essentially, this is quilt binding.
The binding was sewn from the outside in, meaning I sewed the binding onto the back of the hussif. I used the first fold – at 1/2 inch – as the seam line. I pinned it to the edge of the hussif, and used mitred corners along the way. I then finished it by hand by folding it inward, pressing it again, and steaming it, and using whip stitches to keep the binding in place.
Now, the top pocket and needle book! It drove me crazy. In retrospect, I would make the pocket as I did the one in the second section, beneath the tape measure in the first image. However, before doing that, I had to cut the felt and then place a bit of calico as a cover – this is to keep me from stabbing myself with needles.
First step here – sew the needle book together. Then attach it to pocket. Then sew it onto the hussif. I will make the pocket first, attach the needle book to it, and then make sure the pocket stretches side to side before using the binding to cover the raw edges.
Yeah, this is wordy – but it is what I worked out while doing it. I watched videos on doing quilt binding – perhaps bias would be better next time – and made things up as I went. I spent about 3 days and 7-8 hours designing and sewing it. All told, the fabric and supplies ran about 18.00 USD. Scraps would have worked, too, or stuff from my stash, or even fat quarters, but I was in the mood for purple and lavender, and that is not in my stash!
I am pleased with this – frustrated as I was at times – but the creative experience and learning experience make it even more valuable to me. I have been wanting to make one for some time, and this may keep me from too much trouble in the not too distant future . . .
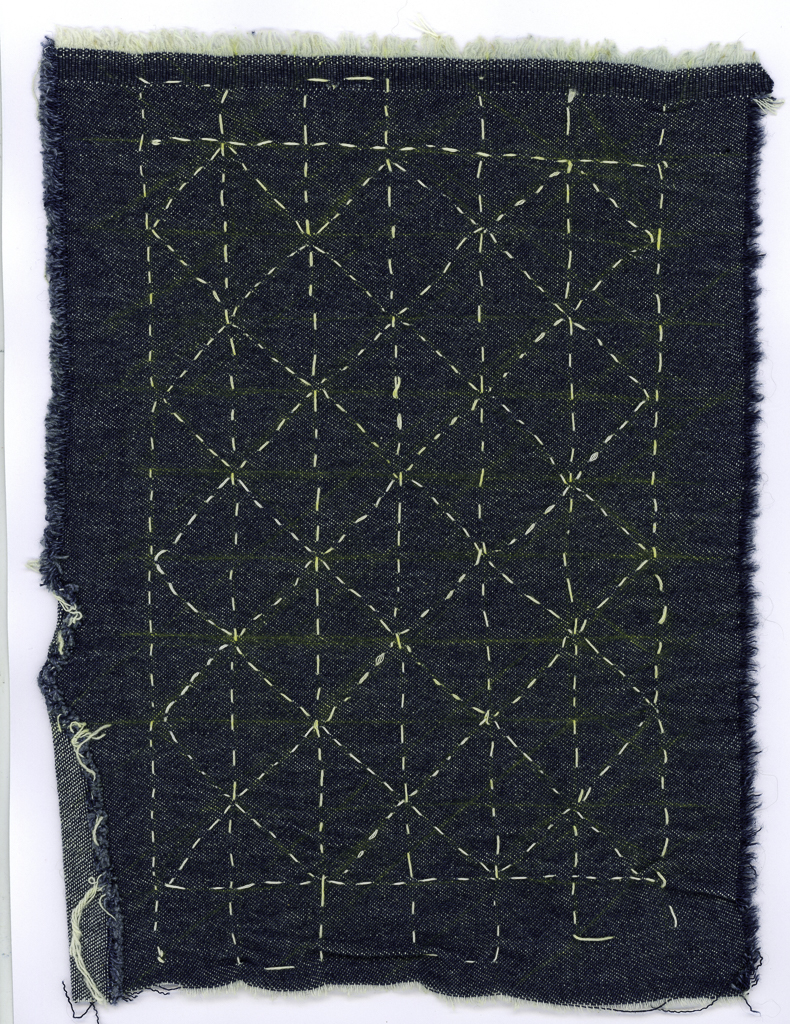
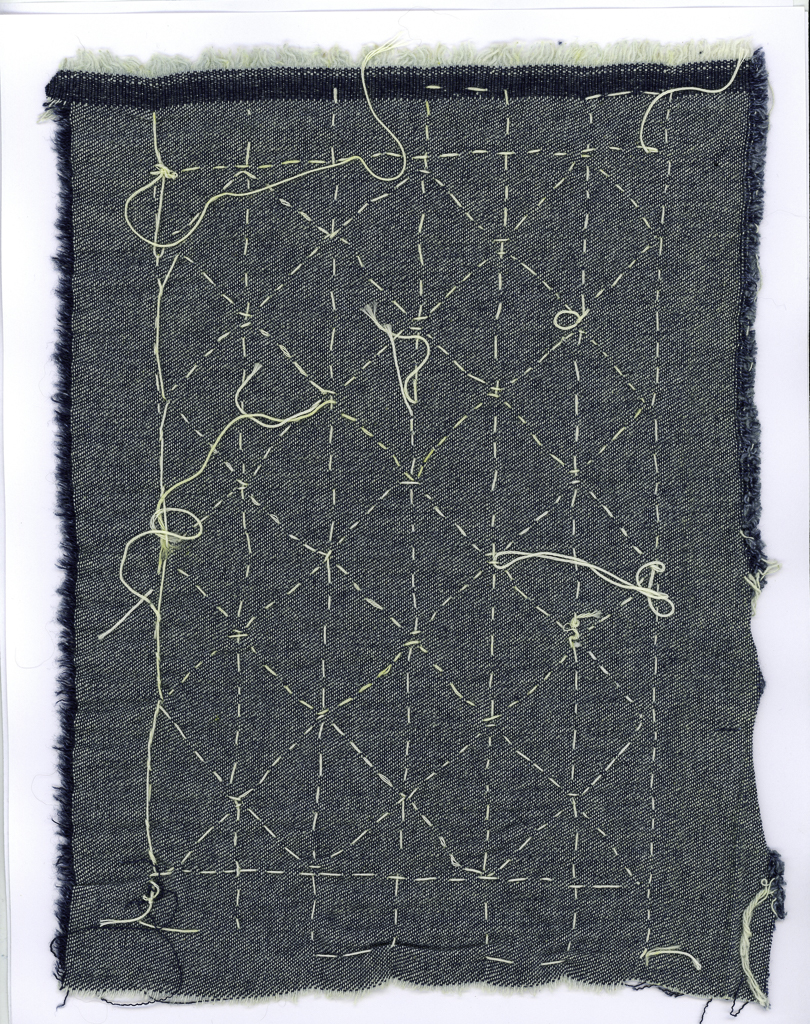
Awhile ago I decided to try my hand at sashiko, a traditional Japanese embroidery used for both practical and artistic reasons. Originally it was used to quilt layers of cloth together, old clothes to make new ones. Patches were pieced onto already patched clothing. Today it is hard to imagine that clothing had to last generations, but this art form was for practical reasons. The artistry of it – the creation of patterns – shows the fact that, despite hardship and poverty, the need to express and create, to add beauty to the world, exists at many levels.
Today, we don’t patch clothes like that, to make them last for ages. We don’t need to for the most part. Instead, we call it “visible mending” and use it to enhance our clothes or show off our skills. It is a tradition that is now becoming a fabric art, much as quilting. However, these stitches are made by hand (although Babylock does have a machine which mimics hand sewn sashiko) and add character to jeans or old denim, or are used as a way to enhance something, such a purse or towel or whatever.
I bought sashiko thread, needles, a palm thimble specific for sashiko, and from there watched a few videos. I have some denim that I am cutting up to practice on. My stitches are uneven and I am trying to find a rhythm first in creating a running stitch. It is far harder than you think. So, first, the rhythm and comfort with the stitches.
Above is my first attempt. I just drew straight lines by hand, but later got out my pica stick and used it. Loops are left so that the fabric does not pucker as the rows are stitched, and as each row is done, I attempted to straighten and flatten out the fabric – a running stitch is great for gathering!
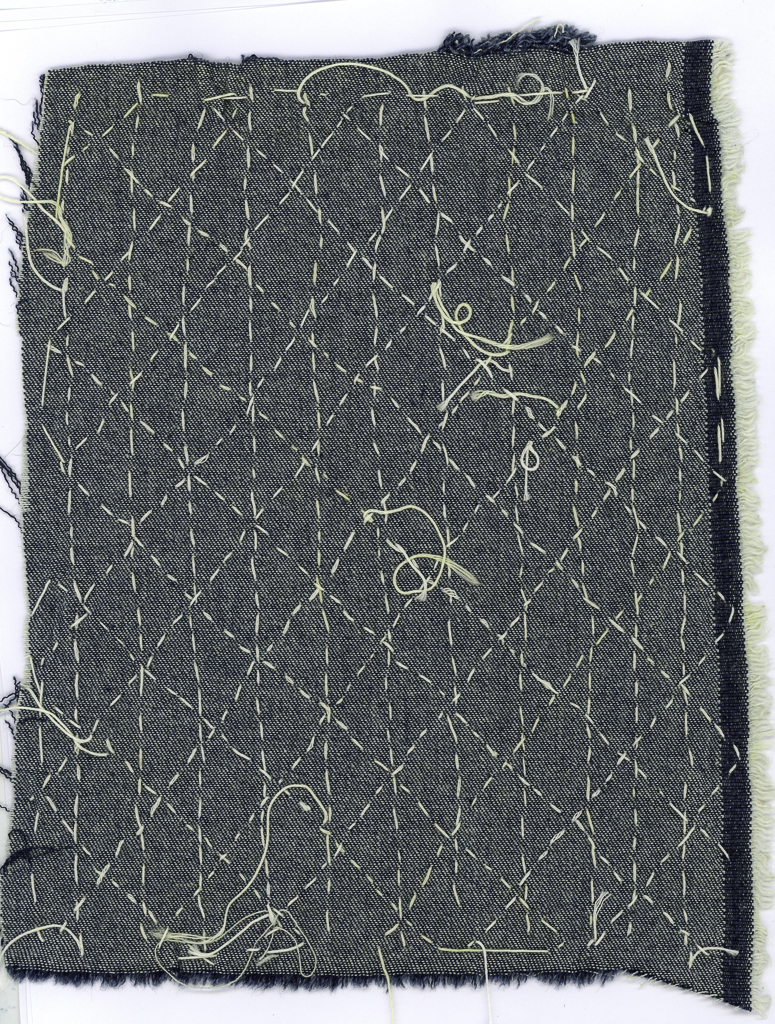
Above is my second attempt. More running stitches, but I tried different ways to begin and end rows. The loops prove to be important is not getting puckers – I got rid of a few with a hot iron, but you can see at the bottom a pucker across the left side.
Securing stitches is important. I tried different ways – many involve stitching over other stitches. I am still exploring that element – I want to figure things out on my own!
Above is the reverse of each of these samplers. The one on the left is the first; the one on the right is the second. The second one is neater as i carefully used a Chaco chalk pen to mark lines as I moved along.
Currently I intend to stick to straight lines and figure out how to connect them in different ways to make patterns. Tradition holds many patterns to be explored – many straight, geometric, circular, a combination of both, and many can become pictorial if you desire. Not all are done in a running stitch is my guess as I have seen some designs with completely solid lines of thread – backstitch or a running stitch then redone in between and in the reverse direction with another running stitch?
Whew! That was a mouthful, but I wanted to get in as much info as possible as a headline.
Let me explain.
Putting on a new leather drive belt on my ca. 1911 The Free No. 5 treadle sewing machine has been like having a tooth pulled without anaesthesia – a painful, dreaded experience.
The Free No. 5 is a clone of the classic vibrating shuttle machine, the Singer 27 /28 and 127 /128 machines. On the right side of the machine is the leather drive band which is used to drive the machine with the help of your own two feet.
To begin with, a leather drive band must be purchased, and they can be found online – Amazon, Ebay, a great online shop called “Sewing Parts Online” (which also has a great YouTube presence, and which you can watch further down the line).
The drive band is usually 3/8″ in diameter, 6 feet long, cylindrical in shape, and comes with a metal C-shaped wire inserted into a hole at one end – you have to make your own hole at the other end. You can also get a stretchy band, as used on many spinning wheels, and that is also great – and a nuisance to install, too. It is melted together instead of spliced together using a bit of metal wire.
So, back to the leather band.
Before you can get the band to work on the machine, you have to remove the old band and then measure the new band. My machine’s drive band is about 5’5″ long, but to get the correct measurement, I have to insert the new band and track it around the pulley on the sewing machine, into the back opening of the table and into the wheel by the treadle and keep it in the groove that the drive band rests in, and then up out of the sewing cabinet to the front of the machine. This involves crawling around on the floor, poking here and there, and cussing from time to time.
From there, even up the ends of the drive band and then cut. And cut off less than may be needed because you can shorten the drive band, but not lengthen it. While the band is about $10, unless you have an extra band, you could just regret that first cut. As they say, measure twice, cut once. Very true!
So, once the drive band is the right length, you have to make a hole on the cut end of the band to take the end of the C-shaped wire. How to do that?
First, punching a hole in a round piece of leather evenly on both sides is a pain. Doing it without removing the threaded drive band is also a pain. If you don’t remove it, how do you hold the leather still when it wants to roll all over the place? Josh made me a jig which sort of worked – a v-shaped thingy to let the leather band rest in. I would lay the band in the jig and take a hammer and fine nail to the leather to make the hole for the wire. Taping the band in place was useful to keep things from rolling around, but if my nail wasn’t perpendicular to the band, disaster often awaited. Even an awl was no guarantee of a good hole.
And this is when the cool tool shows up and saves the day! It is like a pair of pliers in size and weight, but consists of 3 parts – a part to pierce the leather band, a part to cut the band, and a part to crimp the C-wire into place. Below is the tool closed, with safety lock on.
And below is the tool opened up.
Using this tool and the preceding steps, I installed my new drive band in under 5 minutes, and that included cutting the belt twice. Now everything is working like a champ! I can sew on my machine, wind my cylindrical long bobbins, and enjoy it all. Here is the machine, up and running!
I bought my cool tool off a seller on eBay – I ordered it, saw it was packed and ready to ship in a couple of hours, and received it 2 days later via priority mail. The company is“Lovebug Sew N Go” – 100% rating with thousand of sales. Very impressed!
The video below, from Sewing Parts Online, shows the tool in action, as well as installing a new belt. You can purchase pliers from Sewing Parts Online, and a belt as well. The YouTube video includes direct links for each.
I cannot recommend this leather drive band tool enough. It is a bit pricey, but the lack of stress and decrease in time involved to get the belt installed is more than worth it. If you have never replaced your leather drive band, of course you will find some great videos on YouTube.
My own experience, besides using this tool, is to stretch the new belt a bit, and then work the belt into the machine by inserting into the pulley, work it into the back hole of the table, into the groove of the wheel and around to the front. Pull it up onto the surface of the table and then measure, mark it with a pen. Cut the belt. If the belt wants to flop around a bit, use some tape to keep it under control The belt is then measured in length, and cut; you want a small gap between the ends of the belt – no overlapping. Insert the C-pin and then crimp it together. Test it out and adjust as necessary.
Every sewing machine and cabinet is different – some seem poorly designed and the belt may catch on the entrance and exit holes of the table. If your table and belt are at war with each other, wrap some tape over where the ends of the belt join to make for a smoother transition.
When I made the knot bag the other day, I had gone out to buy fabric. I bought enough material for two bags – one blue, one purple. The latter was chosen knowing full well someone I know named Judy might like one for her sock knitting. Well, Judy, here you are, as promised in my reply to your comment . . . see you soon!